Results
Configuring the URL and proxy
Precondition
The use of SINUMERIK Integrate has been activated.
Check whether the Internet connection is available and activated:
-
TCU:
Press "Online Services". The "Login" window is opened.
If this is not the case, check the connected Internet connection. -
PCU:
Start the control in service mode, and call up an Internet page using the Web browser, for example, "www.siemens.com".
Procedure
The "Settings" window is open.
-
Press the "URLs >".
-
Press "Edit" and select the following settings:
-
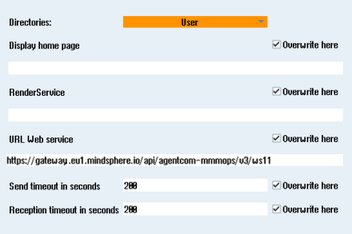
Directory: Select the "User" entry in the "Directory" drop-down list.
-
Display home page: Select the "Overwrite here" check box.
-
RenderService: Select the "Overwrite here" check box.
-
Web service URL: Select the "Overwrite here" check box.
-
Enter the following web service URL depending on which Insights Hub system you are connected to:
Insights Hub V3 Livesystem
Insights Hub Alibaba -
Enter the required value in the "Transmit timeout in seconds" input field. The default value is 200. Then select the "Overwrite here" check box.
-
Enter the required value in the "Receive timeout in seconds" input field (default value is 200), and select the "Overwrite here" check box.
-
-
Press "OK".
A syntax check is performed and the access data is saved.Usually, the settings are now complete. If further adaptations need be made within your company network, read the following paragraph:
Proxy adaptations (optional)
-
Clarify with your network administrator whether the Proxy settings have to be adjusted for the connection to Cloud mode.
If this is necessary, proceed as follows: -
Press "Proxys >".
The stored settings are displayed. -
Press "Edit" and then select the following settings:
-
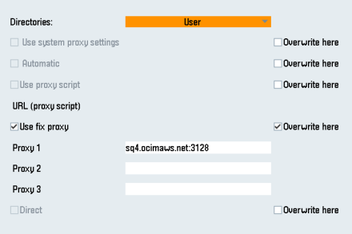
Select the "Use fix proxy" check box.
-
Enter your proxies in the "Proxy 1" to "Proxy 3" input fields.
-
Select the "Overwrite here" check box even if you only enter one proxy in order to accept the new entry.
-
-
Press "OK" to save the settings.
-
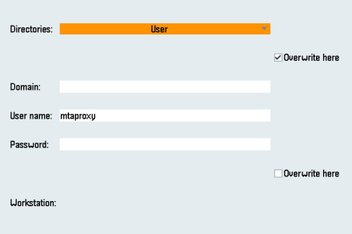
If authentication is required for the proxy, press "Authorization".
-
Select the "Overwrite here" check box to accept the new entry.
-
Enter the user data in the "Domain", "User name" and "Password" input fields.
-
-
Press "OK" to save the settings.
-
Restart the control so that the access data can take effect.
Additional ports
Activate the port for HTTPS communication to ensure secure data transfer between the user server and the control.
-
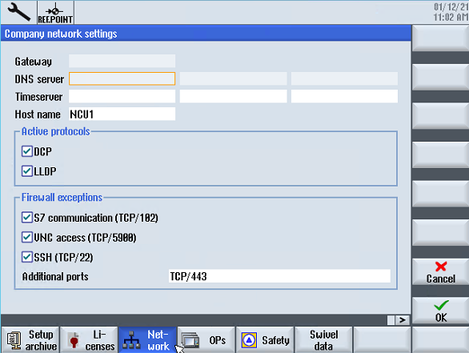
Press softkey "Commissioning" >" Network" > "Company network".
The "Company network settings" window opens. -
Press "Change" to edit the settings.
-
In the "Firewall exceptions" area, add port "TCP/443" in the "Additional ports" input box.
-
Press "OK".
NOTE
The following steps allow you to transfer SINUMERIK data to the Insights Hub platform.
By performing the steps described below, in particular through input and confirmation of the Web service URL, processes are performed automatically in which software scripts are loaded to the SINUMERIK control.