Results
Transferring files
It is possible to transfer single or multiple files or directories between the service engineer's PC and the operating PC of the machine operator - and vice versa. This allows, for example, patches to be imported for error correction.
Precondition
-
The connection between the service engineer and the machine operator has been established.
-
The "File Transfer" function is current.
Important icons
|
Icon |
Description |
|---|---|
 |
Opens the higher level in the directory tree. |
 |
Updates the view of the directory tree. The directory list is only updated automatically when other actions, such as navigation, copying, renaming or deleting, have been performed. If the machine operator makes changes to the directory tree outside of the remote session, the owner of the conference must update the view. |
 |
Creates a new subdirectory in the selected directory level. |
Displaying file properties
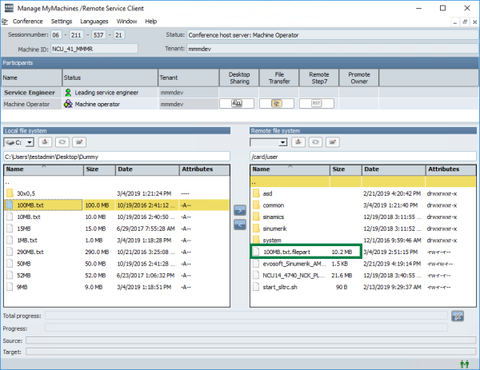
In the "Filetransfer" window, the following file properties are displayed in the file system in the column view:
-
File name
-
File size
-
Date of the last change
-
Attributes
When you close the window, the window size and position are saved. When the function is opened again, the window is restored with the same dimensions.
You can set the column width and position. However, the settings are not saved.
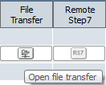
Start transmission
-
Click the "Open file transfer" icon to start the file transfer.
-
The "Filetransfer" window is displayed once the function has been established.
You can now transfer files between your PC (local file system) and another PC (remote file system). -
Use the cursor to navigate to the required files.
-
Some directories and files are protected. If you do not have sufficient access rights, the message "Access denied" is displayed.
-
Select the files or directories that you want to transfer, either at the PC (local file system) and/or at the remote file system.

-
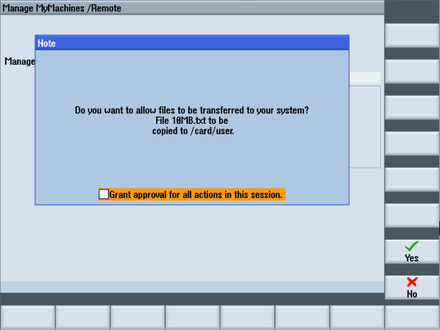
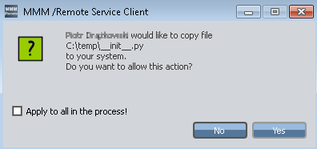
The machine operator must grant permission for the file transfer.
If the machine operator uses the SINUMERIK control:
-
Transfer is started if the machine operator presses the "Yes" softkey.
-
Transfer is denied if the machine operator presses the "No" softkey.
If the machine operator uses the application MMM /Remote PCU/IPC:
-
Transfer is started if the machine operator clicks on "Yes".
-
Transfer is rejected if the machine operator clicks on "No".
-
-
Copy the selection into the appropriate directory using symbols ">" / "<".
No other actions can be performed during the copying procedure.
NOTE
The file transfer can be canceled by the machine operator. In this case, the message "Filetransfer canceled!" appears
NOTE
If a directory or a file already exists in the target system, the following prompt is displayed: "Path already exists on the remote file system. Overwrite?" The source and target directories are also displayed.
Confirm this message with "OK".
If you no longer want to receive such messages, activate the "Apply to all in the process!" checkbox before confirming.
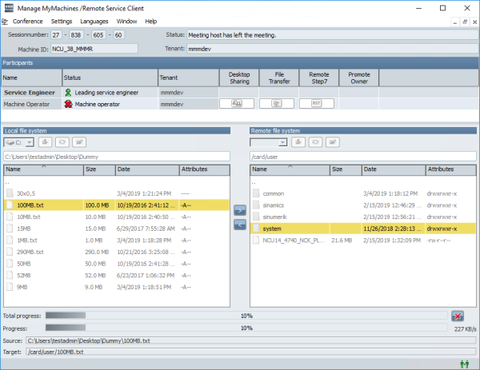
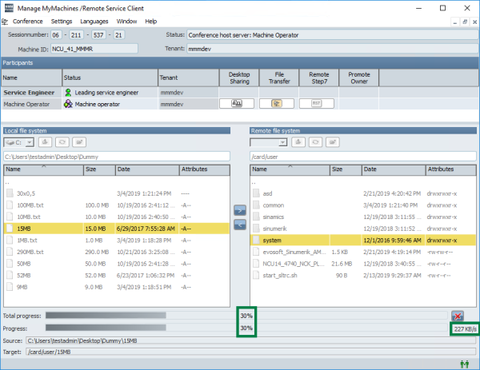
The operation is displayed on a progress indicator.

-
You see the result at the end of the data transfer.
Resuming the file transfer
If a file transfer is interrupted by a temporary network fault, the copy procedure is resumed automatically when the connection is established again. During network failure, the corresponding window is deactivated. As soon as the network fault has been corrected, file transfer is automatically resumed starting from the last byte transferred successfully.
If the connection cannot be re-established during the current session, then the transfer can be continued manually in a later, separate session.
The service engineer must start the copying procedure to the same target directory again. If the system finds the incomplete file from the previous unsuccessful transfer in this directory, then the operation is continued from precisely this position.
NOTE
To ensure that the source and target files are identical, the checksums are compared first. This calculation can take several minutes for large files (above approx. 100 MB). During this interval, the message "Waiting for confirmation!" is displayed in the status bar.
Creating a new directory
You can create new directories on your operator PC or on the SINUMERIK control in the same way.
-
Navigate to the required directory level.
-
Click the icon
to create a new directory.
-
Assign a name to the new directory.
-
The machine operator must authorize creation of the directory.
Performance optimization of the file transfer
The "speed" of file transfer depends on the specific network configuration and the network load. The file transfer rate can also fluctuate substantially during transfer.
In addition to the progress bar, the current percentage and transfer rate (KB/s) can be observed.
Display of the file transfer in the protocol
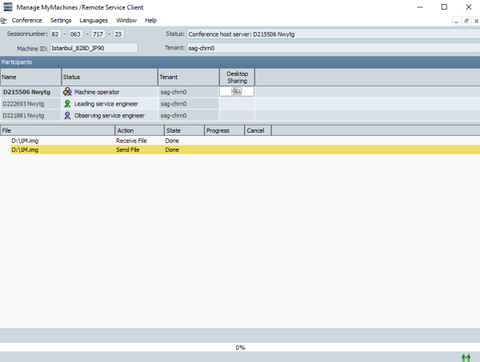
The actions performed by the service engineer are shown in the dialog below the list of participants in the protocol. The protocol is only available for the machine operator.
|
Protocol window of the file transfer |
|
|
File |
The protocol window of the file transfer opens automatically when the service engineer performs an action. The window can also be shown or hidden via the "Conference" > "File transfer protocol" window. The directory and the file name to which the actions performed by the service engineer refer, are displayed in the window. The protocol settings can be made using window "Settings" > "File transfer". |
|
Action |
Shows the type of action. |
|
Status |
Shows the current status of the action. |
|
Sequence |
Shows the progress as a percentage and as a progress bar. A progress bar and percentage is also shown in the lower part of the window. |
|
|
The machine operator can cancel the action via the icon. |
The machine operator automatically sees the protocol when the service engineer starts the file transfer. Irrespective of this, the machine operator can open and close the protocol window manually:
-
Call the "Conference" > "File transfer protocol" menu.
You will see the log in the lower window with the current status. -
During the file transfer, in addition to the name of the current file, you will see the action performed, the status, a progress bar and an icon to cancel the file transfer in the protocol window.
NOTE
In the "Settings" menu, you specify whether the file functions performed during a session are to be written to a protocol file.
Canceling file transfer
-
Click on icon
 to cancel an ongoing file transfer.
-
A confirmation prompt is displayed.
Click on "Yes" to irrevocably cancel the file transfer.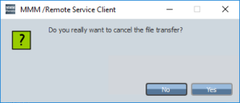
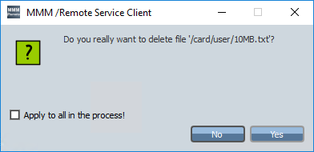
Deleting files
-
Select the directories or files to be deleted.
-
Right-click to call the "Delete file" menu command.
NOTE
If you delete a directory or a file with write protection, the following prompt is displayed: "File is write-protected, do you still want to delete it?"
-
Click "OK" to delete the message.
-
If you no longer want to receive such messages, select the "Apply to all in the process!" check box before confirming.
-
-
The machine operator must authorize the deletion of the files.
NOTE
You cannot perform any other actions during deletion.
Renaming a file
As a remote user, you can change the name of transferred files or directories:
-
Select the appropriate file or directory.
-
Right-click to call the "Rename" menu command.
-
Enter the required name.
-
Click "OK".
-
The machine operator must authorize the name change.
Assigning attributes
As a remote user, you can change the attributes of transferred files or directories:
-
Select the appropriate file or directory.
-
Right-click to call the "Attributes" menu command.
The setting dialog opens for the attributes of the selected element (file or directory).
-
Set the required attributes via the check boxes.
-
Click "OK" to confirm the settings.
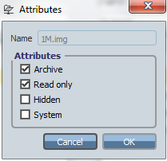
-
The machine operator must authorize the attribute change.
Ending file transfer
You end file transfer in the same way:
-
Owner of the conference: You close file transfer using icon "X" in the upper right-hand section of the window.
-
Owner of the conference: You close file transfer and end the conference.
File transfer and any operations still in progress are terminated. -
Machine operator: You leave the conference.
The message "File transfer canceled!" is displayed for the service engineer.
NOTE
If the machine operator activates option checkbox "Grant approval for all actions in this session" then approval is also issued for the following functions of the session:
Desktop sharing
File transfer
STEP 7 via Internet
Automatic session recording