Results
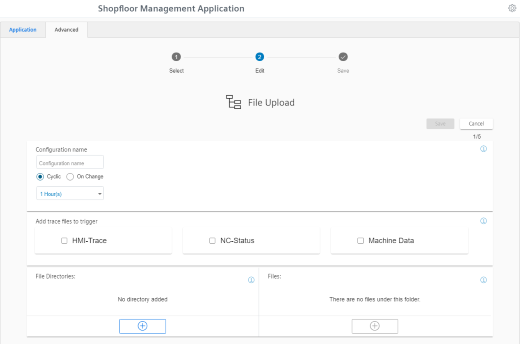
File Upload
Function "File Upload" allows files to be sent from the SINUMERIK control to MindSphere.
You can send multiple files from various directories in the same trigger. In a cyclical trigger, you can upload trace files
along with the customer-specific files.
There are two variants of the "File upload" function:
-
Change-dependent file upload
The upload is carried out after a file is changed on the SINUMERIK control. The change date of the files is checked cyclically, i.e. hourly, on the SINUMERIK control. -
Cyclic file upload
The upload is carried out in a defined time cycle. The cycle duration is specified in the user interface.
The cyclic file upload does not check files for changes.
Parameters
|
Parameter |
Description |
|---|---|
|
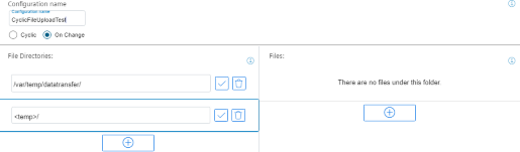
Configuration name |
Enter a name for the configuration. The name must be unique and not exceed 30 characters.
|
|
Cyclic |
The files are sent to MindSphere at defined intervals. Select the time interval from the drop-down list:
|
|
When modified |
The control checks the files at 1-hour intervals. If the file or directory changes, the relevant files are uploaded to MindSphere. |
|
Adding trace files to the trigger |
Recorded traces are sent as files to MindSphere.
Activate the action log setting on the machine. |
|
File path |
Enter the correct file path. |
|
File |
Enter the file name. |
Icons
|
Icon |
Description |
|---|---|
 |
Create a new entry for the file or directory path. |
 |
Change the entry for the file or directory path. |
 |
Save the entry for the file or directory path. |
 |
Delete the entry for the file or directory path. |
 |
You will receive more information. |
NOTICE
There is a risk that an attacker, within the network between SINUMERIK Integrate and MindSphere, gains access to the file system of the server or service clients. The attacker can then read or manipulate various system components (e.g. database content). As a consequence, the attacker can manipulate tool data, NC programs, machine archives or the system structure itself, for example. This type of attack cannot be prevented by MindSphere.
-
It is therefore imperative that the person responsible for the machine network takes the appropriate industrial security measures for the production/machine network.
Siemens AG does not accept any liability in this regard.
Files
The maximum file size is 100 MB.
Use the following file extensions for the "File Upload" function:
-
.xml
-
.txt
-
.log
-
.png
-
.jpg
-
.ohs
-
.pms
-
.ems
-
.mds
-
.pdf
-
.ini
-
.csv
-
.json
-
.sav
-
.mst
-
.bst
-
.stt
Directory paths
The following directories are available for the file upload:
-
/card/user/sinumerik/hmi/appl/
-
/card/oem/sinumerik/hmi/appl/
-
/card/oem/sinumerik/hmi/OMATIVE_ACM/data/
-
C:\ProgramData\Siemens\MotionControl\oem\sinumerik\hmi\appl\
-
C:\ProgramData\Siemens\MotionControl\user\sinumerik\hmi\appl\
-
/card/user/sinumerik/hmi/cfg/
-
/card/oem/sinumerik/hmi/cfg/
-
/card/user/sinumerik/hmi/log/
-
/card/user/sinumerik/hmi/trace
-
/card/oem/sinumerik/data/archive/
-
/card/system/tmp/
-
<temp>\
You can create multiple subdirectories in this directory. -
/var/user/
-
C:\temp\datatransfer\
On PCU WIN NT -
C:\ProgramData\Siemens\MotionControl\oem\sinumerik\hmi\OMATIVE_ACM\data\
-
C:\temp\datatransfer\
On PCU WIN XP -
var\tmp\datatransfer\
For Linux -
/user/sinumerik/hmi/data/version/
-
/card/user/sinumerik/hmi/data/trace/CM
-
C:\Program Files (x86)\Siemens\MotionControl\user\sinumerik\hmi\data\version\
SINUMERIK Operate also supports the following directories:
-
D:\backups\
-
D:\description\
HMI-Advanced also supports the following directories:
-
F:\dh\
-
F:\privatesyncdata\
-
F:\oem\
-
F:\user\
-
F:\mmc2\
-
f:\hmisl\oem\sinumerik\hmi\OMATIVE_ACM\data\
-
F:\hmisl\siemens\sinumerik\hmi\trace
-
F:\\hmisl\\siemens\\simumerik\\hmi\\data\\trace\\CM
Procedure
-
Click the "File Upload" function.
-
The "File Upload" input window opens.
In the "File Upload" area, you can see the number of configurations created/number of possible configurations on the right.
-
Enter the name for the configuration.
-
Select the type of file upload:
-
Cyclic
Select the cycle length.
- OR -
-
On Change
If you activate "On Change", you can select a directory.
-
-
Activate the check boxes for the trace files that you want to transfer along with the customer-specific files.
-
Click the "+" button in the file paths area.
To simultaneously send files from multiple directories, click on this button for each directory.
Once the maximum possible number of directories is reached, the button is deactivated.
-
Enter the directory path and click the "Checkmark" icon.
-
Specify the files to be transferred for each directory:
-
Click the "+" button in the file area.
To send multiple files from this directory, click on the "+" button for each file.
Once the maximum possible number of files is reached, the button is deactivated. -
Enter the file name. You can use the asterisk symbol (*) as a placeholder.
If more than 10 files correspond to the file name with placeholder, only the last 10 most recently modified files are sent to MindSphere. -
Click the "Checkmark" icon.
-
-
Click on the "Recycle bin" icon in the appropriate line to delete a directory path or a file.
-
Click on "Save" to save the configuration.
- OR -
Click the "Cancel" button to exit the window without saving the entries.
You are taken back to the overview. -
The "Data recording saved successfully" message appears.
Click the "OK" button to complete the operation.
-
You can see an overview of the files in the "Operations Insight" application.
For more information, see Chapter: Displaying uploaded files in "Operations Insight".