Results
Time-based/cyclic trigger
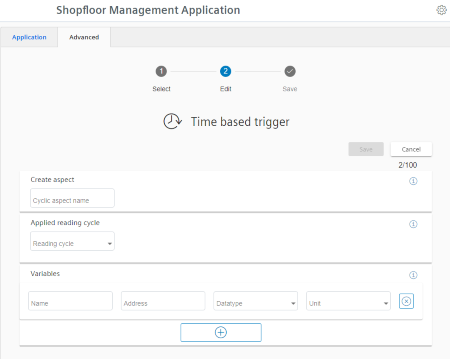
Configure the "Time-based/cyclic trigger", to periodically send variable values from the machine to MindSphere:
If you no longer require the configuration, you can deactivate this in the MindSphere application "Shopfloor Management Application" using the slider.
Parameters
|
Parameters |
Description |
|
|---|---|---|
|
Create aspect |
||
|
Aspect name |
Enter a name to designate a common group of variables. The name must be unique and not exceed 30 characters.
|
|
|
Read cycle used |
||
|
Time interval |
The sampling rate of the data acquisition is specified with this value. Select the time period from the drop-down list:
|
|
|
Variable |
||
|
Name |
In the variable set, enter a name for the variables to be acquired. The name must be unique and not exceed 30 characters.
Remark: The name of the variable must not consist solely of numbers. In this case, the text box is marked red. |
|
|
Address |
Enter the address or the path of the variable. Examples: |
|
|
Axis data: |
/Nck/MachineAxis/AATRAVELCOUNT[1] /Nck/MachineAxis/AATRAVELDIST[2] |
|
|
Channel data: |
/Channel/ChannelDiagnose/CuttingTime[u1] /Channel/ChannelDiagnose/OperatingTime[u1] |
|
|
Machine operating mode: |
/Bag/State/opMode[u1] |
|
|
Data type |
Select the data type of the variable from the drop-down list:
Note: If values exceed the floating-point number accuracy, they are displayed with faulty decimal places. |
|
|
Unit |
Select the physical unit of the variable from the drop-down list. Example: m/s3 |
|
Procedure
-
Click on the "Time-based / cyclic trigger (variables)" function.
-
The "Time-based trigger" input window opens.
-
Enter a name in the "Create aspect" input field.
-
Enter the sampling rate in the "Read cycle used" input field.
-
Enter the variable properties in the text boxes.
-
Click the "+" button to add a new variable.
Repeat this step as often as is necessary. -
Click the "Cancel" button to exit the Properties window without saving the entries.
You are taken back to the aspects overview.- OR -
Click the "Save" button to accept the entries.
The "Data recording saved successfully" message appears.
-
Click the "OK" button to complete the operation.
You are taken to an overview of the aspects.
-
NOTE
You can create a maximum of 50 variables with 5-second options.
A warning message appears when the maximum number is reached.