Results
Alarm based trigger
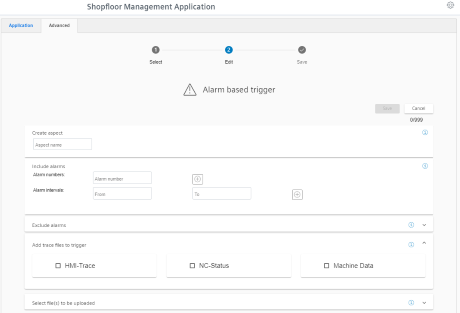
The "alarm-based trigger" reacts to all alarms programmed in the control.
With this function, you can send specific alarms for a certain aspect and acquired status data to MindSphere.
These alarms also contain the user range of alarm numbers that are assigned the machine functions for the machine diagnostics. If machine diagnostics are not performed on the basis of alarm numbers, these error messages cannot be integrated.
The alarm numbers that are triggered can be entered individually or in ranges. You can also hide individual or ranges of alarms from a selection.
When certain alarms occur, you can upload user-defined files to MindSphere.
If you no longer require the configuration, you can deactivate this in the MindSphere application "Shopfloor Management Application" using the slider.
Parameters and icons
|
Parameter |
Description |
|---|---|
|
Create aspect |
|
|
Aspect name |
Enter a descriptive name for the aspect. The name must be unique. |
|
Include alarms |
|
|
Alarm numbers: |
In the case of individual alarms, enter the alarm number or the alarm ID that activates the trigger. The alarm number must be within the range from 0 to 999999. The alarms are entered in the following notation:
The alarm list must not exceed 200 characters. |
|
Alarm intervals: |
Enter the alarm limits.
All alarms between 0 and 999999 are included. |
|
Exclude alarms |
|
|
Alarm numbers: |
Enter the alarm numbers that do not activate the trigger. Excluded alarms are not transmitted to MindSphere. The alarm number must lie within the range from 0 to 999999. The alarms are entered in the following notation:
The list of alarm numbers must not exceed 200 characters. |
|
Alarm intervals: |
Enter the alarm limits:
All alarms between 0 and 999999 are included. |
|
Adding trace files to the trigger |
|
|
Trace files |
Activate the option check box for the following data:
Activate the action log setting on the machine. More information is provided in Chapter: Setting the action log. |
|
Selecting file(s) to be uploaded The selected files that are available on the machine will be transferred to the corresponding MindSphere tenants database. |
|
|
File or directory path * |
Enter the file or directory path.
|
|
Icons |
Description |
|---|---|
 |
You will receive more information. |
 |
Closes the entry field. |
 |
Click on the down arrow to open and create further configurations. |
 |
Click on the up arrow to close the area of further configurations. |
Procedure
-
Click the "Alarm-based trigger" function to define alarm properties, such as when an alarm should be displayed.
-
The "Alarm-based trigger" input window opens.
-
Enter a name for the aspect and specify the properties.
-
Click on the "Cancel" button.
You receive a safety message that you must confirm.
Then you will be returned to the overview.- OR -
-
Click the "Save" button to accept the entries.
The "Data recording saved successfully" message appears.
-
Click the "OK" button to complete the operation.
You are taken to the overview.
-
-
Enter a file or a directory path to load data from the control to MindSphere.
