Results
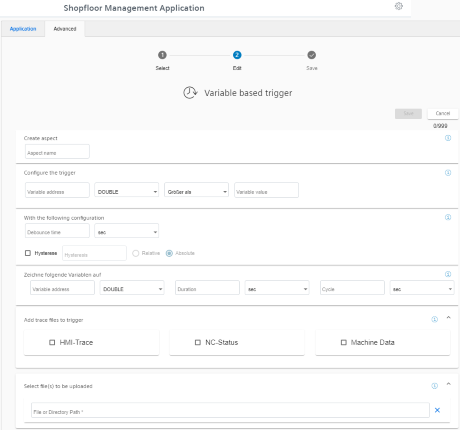
Configuring a value-based trigger (variable)
View "Variable-based trigger" provides you with functions to create user-defined condition rules based on variable values.
If a configured condition occurs, then the following data and values are sent to MindSphere:
-
Variable value
-
Machine trace files
-
User-defined file(s) in the specified directory
If you no longer require the configuration, you can deactivate this in the MindSphere application "Shopfloor Management Application" using the slider.
Parameters
|
Parameter |
Description |
|---|---|
|
Create aspect |
|
|
Aspect name |
Enter a previously created variable name. The name must be unique. If the aspect does not yet exist in MindSphere, the aspect is created when saving the configuration. |
|
Configuring a trigger With these settings, you specify the trigger conditions for the following actions. |
|
|
Variable address |
Enter the address of the variables. |
|
Data type |
From the drop-down list select the data type of the variable.
|
|
From the drop-down list, select the comparison operation that is restricted to the format of the variables:
|
|
|
Variable value |
Enter a value. |
|
With the following configuration |
|
|
Debounce time |
Enter the debounce time. Remark: After the Condition variable has reached a specified value, the control checks whether the condition is still present until the debounce time has expired. The control does not check the status again during this time. |
|
sec |
Select the time unit from the drop-down list:
|
|
Hysteresis |
Select the check box if you want to include hysteresis. |
|
The hysteresis can be a value or a percentage (absolute or relative). Example: The temperature is 30 degrees. The absolute hysteresis equals 5. In this case, the check is from 25 to 35 °C instead of 30 °C. Activate the "Quick Range" option button if the relative value in relation to the comparison value is to be recorded. Activate the "Absolute" option button if the absolute value in relation to the comparison value is to be recorded. A new trigger on the comparison value is only performed when the actual value differs from the comparison value by more than the specified hysteresis. Enter a comparison value, this is restricted according to the selection of the address format. |
|
|
Then acquire the following values The following variable is recorded and sent to MindSphere. |
|
|
Variable address |
Shows the address of the variable. |
|
Data type |
Select the data type of the variable from the drop-down list:
|
|
Duration |
Enter the recording duration. |
|
Select the time unit from the drop-down list:
Minimum of 30 seconds. Maximum of 24 hours. |
|
|
Cycle |
Enter the cycle duration. |
|
Select a time unit from the drop-down list:
30 seconds is the minimum 24 hours is the maximum |
|
|
Adding trace files to the trigger Recorded traces are sent as files to MindSphere. |
|
|
Trace files |
Activate the option check box for the following data:
Activate the action log setting on the machine. More information is provided in Chapter: Setting the action log. |
|
Selecting file(s) to be uploaded The selected files that are available on the machine will be transferred to the corresponding MindSphere tenants database. |
|
|
File or directory path * |
Enter the file or directory path.
|
|
Icons |
Description |
|---|---|
 |
You will receive more information. |
 |
Closes the entry field. |
 |
Click on the down arrow to open and create further configurations. |
 |
Click on the up arrow to close the area of further configurations. |
Procedure
-
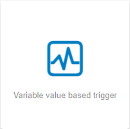
Click on function "Variable value based trigger" to specify dependencies.
-
The "Variable-based trigger" input window opens.
-
Enter a name in the "Cyclic aspect name" input field.
-
Define a variable as trigger.
-
Define the settings for the trigger.
-
Define which data is sent to MindSphere if the trigger occurs:
-
Recording variables
Enter a variable address.
-
Trace files
Activate the corresponding check box for "HMI-Trace", "NC-Status" or "Machine Data".
-
Files
Enter a file name or a directory path.
-
-
Click the "Cancel" button to exit the Properties window without saving the entries.
A safety message is output, which you must confirm
You are taken back to the aspects overview.- OR -
Click on "Save" to accept the data entered.
Message "Data recording saved successfully" is output.
Click on "OK" to exit the operation.
You are taken back to the aspects overview.