SINUMERIK control with SINUMERIK Operate
The SINUMERIK Operate operating software is delivered together with the SINUMERIK Integrate Client software.
An update is not possible.
Requirement
SINUMERIK Integrate has been enabled for use.
Integrate client with Windows XP/PCU
Ensure that the drive being used has sufficient storage space.
If this is not the case because drive C:\ has a limited size, then proceed as follows.
-
Carefully ensure that SINUMERIK Operate has not been started.
-
Open file "epsconfig.user.xml" under <SINUMERIKInstallDir>\user\sinumerik\hmi\cfg.
-
In all entries, replace "C:\" by "F:\".
With this step, you shift the directories for the temporary files to drive "F:\".
Procedure
-
The "Settings" window is open.
Press the "URLs>" softkey. -
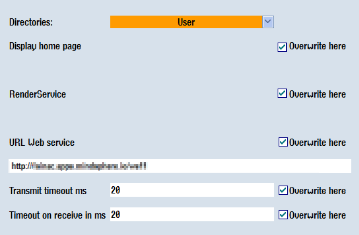
Press the "Edit" softkey and select the following settings:
-
Directory: Select the "User" entry in the "Directory" drop-down list.
-
Display home page: Select the "Overwrite here" check box.
-
RenderService: Select the "Overwrite here" check box.
-
Web service URL: Select the "Overwrite here" check box.
-
Enter the following Web service URL depending on which MindSphere system you are connected with:
MindSphere V3 Livesystem
MindSphere Alibaba -
Enter the required value in the "Transmit timeout ms" input field (default value is 200). For MindSphere, a value of "20" is recommended, and activate the "Overwrite here" option box.
-
Enter the required value in the "Timeout on receive in ms" input field (default value is 200). For MindSphere, a value of "20" is recommended, and activate the "Overwrite here" option box.

-
-
Press the "OK" softkey.
A syntax check is performed and the access data is saved. -
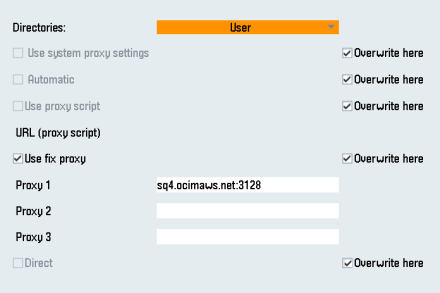
To establish a connection from the customer network, you must adapt the proxy settings.
-
Click on "Proxys>".
The saved settings are displayed.
-
-
Press the "Edit" softkey and select the following settings:
-
Select the "Use fix proxy" check box.
-
Enter your proxies in the "Proxy 1" to "Proxy 3" input fields.
-
Select the "Overwrite here" check box even if you only enter one proxy, to apply the new entry.
-
Press the "OK" softkey to save the settings.

-
-
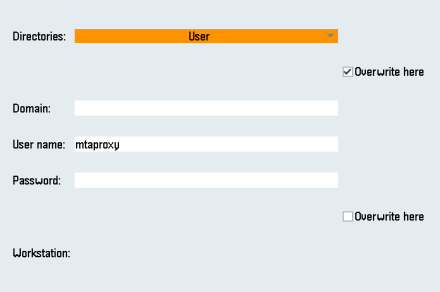
If an authentication is required for the proxy, press the "Authorization" softkey.
-
Activate the "Overwrite here" check box to apply the new entry.
-
Enter the user data in the "Domain", "User name" and "Password" input fields.
-
Press the "OK" softkey to save the settings.

-
-
Restart the control so that the access data can take effect.
NOTE
The following steps allow you to transfer
the SINUMERIK data to the MindSphere platform. Processes in which software scripts are loaded to the SINUMERIK control are performed automatically, especially by input and confirmation of the web service URL.