Reverse Proxy with Local User Management
Basics
Connection
You can connect to ReverseProxy control panel via:
https://<EDGE_BOX_IP>:5443 (secure)
Login
There’s a built-in system user (Administrator). Username: Administrator For passwords of all built-in users, please refer to default passwords Please also see the Security Advice below. You will be asked to change the password for any user during initial login.
Security Advice
It is strongly advised not to expose the factorylan ports directly to the internet, and change default passwords immediately. Password Policy: Minimum 8 characters. Includes at least one from each character set; uppercase, lowercase, digit, special.
Certificate Management
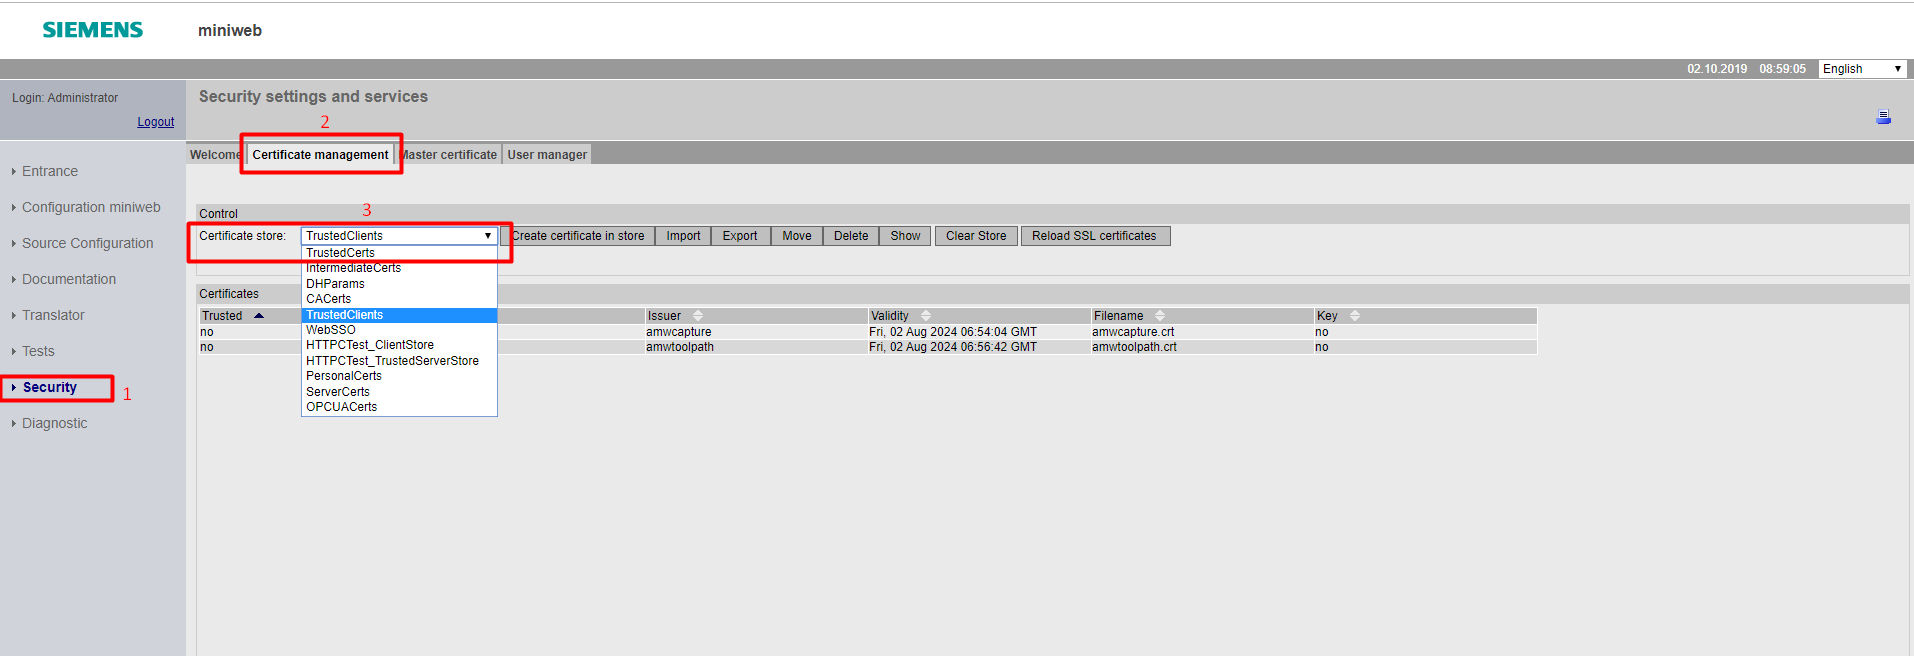
You can create or import your own certificates to reverse proxy and export existing ones. Login as system admin and browse to "Security/Certificate management". On that page, you have the option to edit the content of the desired certificate stores.
Server Certificates
Server certificates are used for authenticating the SSL server to remote clients. These certificates can be managed
under the ServerCerts certificate store from reverse proxy UI. To use a certificate as a server certificate, the
certificate file must be named as SSLServerCert.crt. By default, there is already an existing certificate named
SSLServerCert.crt. This can be deleted in order to use another one, to do so, please refer to
Importing an SSL Server Certificate.
Not having any certificate named SSLServerCert.crt will end up with an automatically generated server certificate.
For users who want to create their server certificate, please refer to
Creating an SSL Server Certificate.
Creating an SSL Server Certificate
SSL server certificates can be created either by using openssl command line utility, or by using reverse proxy UI.
Reverse Proxy UI
All below steps are must be run via an Administrator account, make sure the account in effect has administrative rights.
- Navigate to
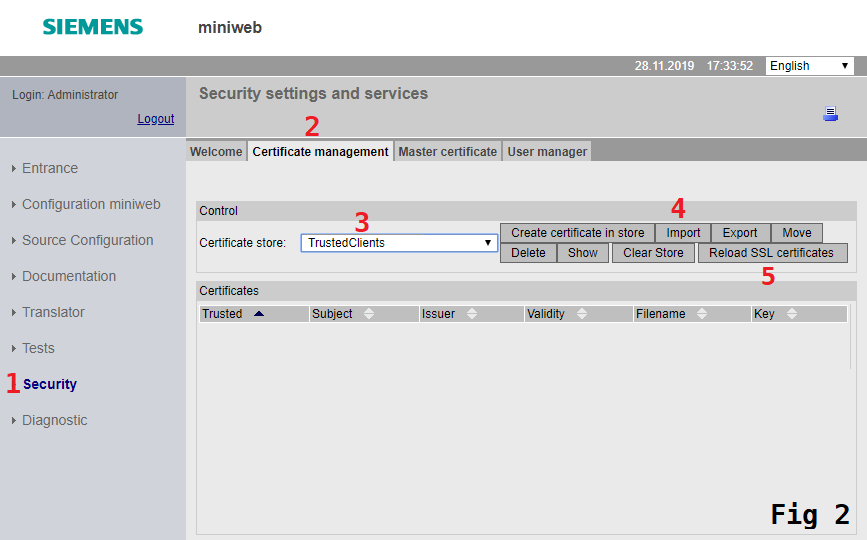
Securitypage. (Fig 1) - Open
Certificate Managementtab. (Fig 1) - Click
Certificate Storedrop down box and selectServerCertsstore. (Fig 1) -
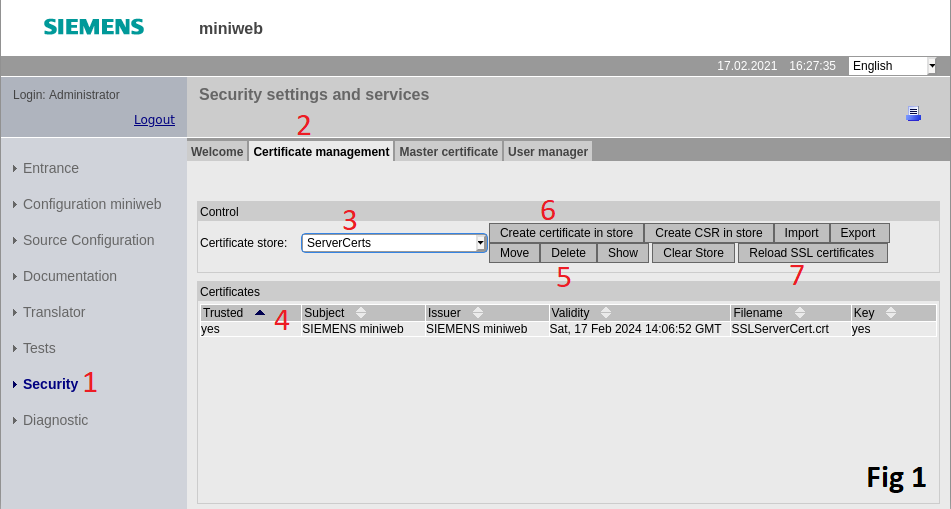
Click existing row where certificate name matches with
SSLServerCert.crt. (Fig 1)By default, reverse proxy will have a SSL server certificate created. In order to override this pre-existing certificate must be deleted. In case of lack of certificate, reverse proxy will automatically create one. 5. Click
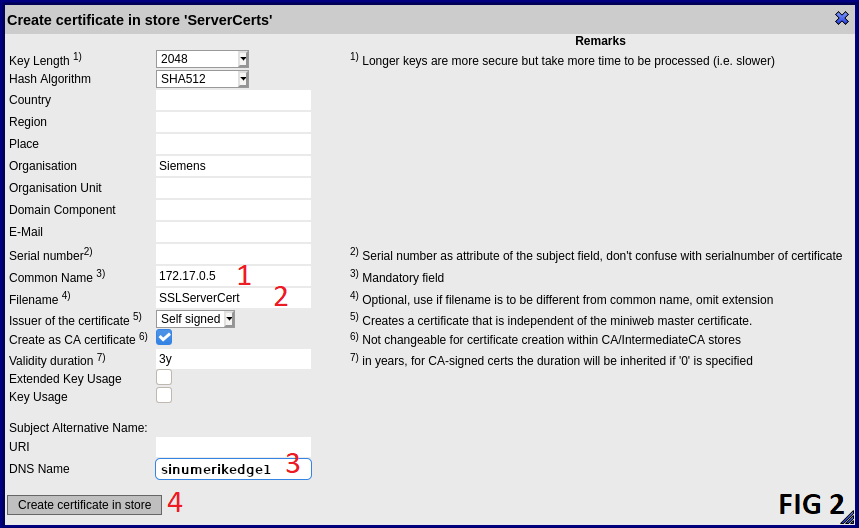
Deletebutton. (Fig 1) 6. Start creation of new certificate by clickingCreate certificate in storebutton. (Fig 1) 1. FillCommon Namefield with IP address of your device in case of IP based access is desired, otherwise anything arbitrary can be written. (Fig 2) 2. FillFilenamefield exactly as "SSLServerCert". (Fig 2) 3. FillDNS Namefield with DNS name of your device in case of DNS based access is desired, otherwise this field can be left blank. (Fig 2) 4. ClickCreate certificate in storebutton. (Fig 2) 7. ClickReload SSL certificatesbutton to make the created certificate to take in effect. (Fig 1) 1. Check the checkbox labeled 1. (Fig 3) 1. ClickReload SSL certificatesbutton. (Fig 3)

OpenSSL command line
In order to create an SSL server certificate, the below instructions can be followed.
-
openssl req -x509 -subj '/CN=Certificate Authority' -days 365 -newkey rsa:4096 -nodes -keyout ca.pem -out ca.crtThis creates a certificate authority. The certificate authority (CA) is a certificate that is used for issuing and verifying SSL server certificates. To create a certificate authority, this command can be issued.
The command should create two files, namely
ca.crt, which is a certificate authority andca.pem, which is a private key for certificate authorityca.crt. These files are to be used for issuing an SSL server certificate. -
openssl req -subj '/CN=<PUBLIC-HOSTNAME-OR-IP-ADDRESS-OF-NANOBOX>' -days 365 -newkey rsa:4096 -nodes -keyout server.pem -out server.csrThis creates an SSL Server certificate. In order to create an SSL server certificate for reverse proxy usage, this command can be issued. Beware that the common name (CN) field of the certificate must match with the hostname or IP address of edge device. Otherwise, the certificate would fail to authenticate.
The command should create two files, namely
server.csr, which is a certificate signing request (CSR) andserver.pem, which is a private key forserver.csr. The CSR is to be signed by the CA to create a certificate for reverse proxy. -
openssl x509 -req -days 365 -in server.csr -extfile <(printf 'subjectAltName=DNS:<DNS>,IP:<IP>') -CA ca.crt -CAkey ca.pem -CAcreateserial -out server.crtThis signs the SSL server CSR with CA. In order to issue a signed SSL server certificate for reverse proxy, this command can be issued.
The command should create a file named
server.crt, which is a signed SSL server certificate. Recent web browsers like Chrome require certificates to includesubjectAltNameextension, hence users are required to specify their DNS name/IP address in resulting certificate. TheDNS:<DNS>can be omitted if not used. The created certificate should be verifiable by the CA certificate. To do that, the below command can be issued.openssl verify -CAfile ca.crt server.crtThe command should output
server.crt: OKindicating that the certificate is indeed verifiable by CA.
Importing an SSL Server Certificate
In order to import an SSL server certificate to reverse proxy, the certificate and its key file need to be bundled as
PKCS#12 format. To do that, the following command can be issued. The command is interactive and should prompt the user's
input for a PKCS#12 password. This password must be non-zero length since reverse proxy requires a PKCS#12 file to be
password protected. Beware that the file must be named as SSLServerCert.p12 since reverse proxy with its default
settings uses this predefined name.
openssl pkcs12 -export -clcerts -in server.crt -inkey server.pem -out SSLServerCert.p12
After getting the file ready, users can import the PKCS#12 file from reverse proxy UI. This can be done from the certificate management page. Users can navigate to this page by following the steps below.
- Click
Securityon the navigation menu - Click
Certificate managementtab - Choose
ServerCertsas the certificate store
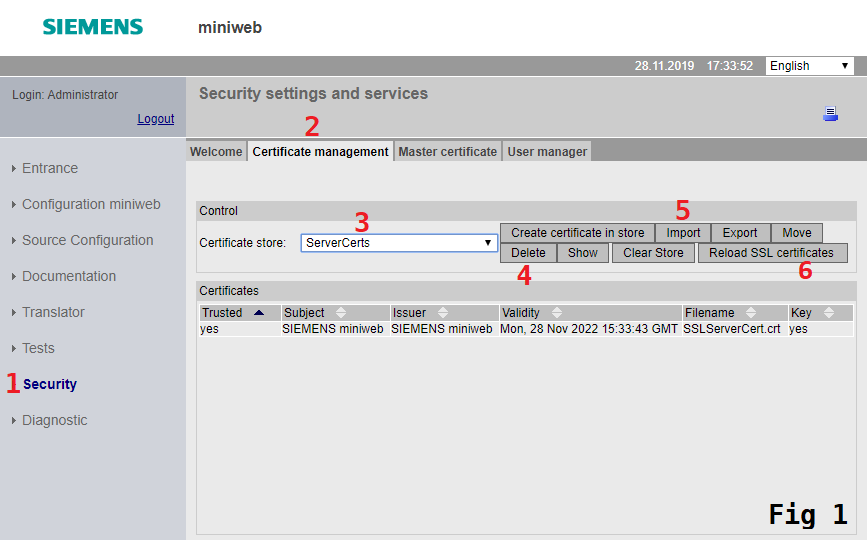
Users should notice an existing auto-generated server certificate in the store named SSLServerCert.crt. In order to import
another certificate, this should be removed. To do so, users can click on the certificate and then click the
Delete (4) button. After this, users can get to import certificate dialog by clicking on the Import button (5). See
Fig 1 below. In the dialog, should users select SSLServerCert.p12 file and fill the passphrase field. Beware that
Destination store should read as ServerCerts and SaveAs should read as SSLServerCert.crt. Users can click the
Import button to finalize the upload stage.
Upon successful upload, a pop-up should appear notifying Certificate successfully imported!. After this, the
Reload SSL Certificates (6) button should be clicked. Clicking this will create a confirmation prompt. After confirming,
a pop-up could appear saying Error on ReinitSSL: ReInitSSL failed, will be deferred until no connections active..
This means the imported certificate can't be used until all the active SSL connections closed. Closing all browsers
connected to reverse proxy at this point should suffice. Please note that closing a tab would not guarantee the
connection is closed, so the whole browser process should be terminated.
Verifying Reverse Proxy SSL Server Certificate
The certificate authority (CA) file is used to verify the SSL server certificate of reverse proxy, and it is used for connecting reverse proxy securely. The CA file can be used by the client application such as browsers. For the most part, this can be achieved by importing CA files into user's system by using user's operating system.
An example with curl without using CA file should result in SSL error.
$ curl -L https://reverseproxy:5443/
curl: (60) SSL certificate problem: unable to get local issuer certificate
More details here: https://curl.haxx.se/docs/sslcerts.html

curl failed to verify the legitimacy of the server and therefore could not
establish a secure connection to it. To learn more about this situation and
how to fix it, please visit the web page mentioned above.
An example with curl using CA file should verify and connect reverse proxy using SSL.
$ curl --cacert ca.crt -L https://reverseproxy:5443/
<!DOCTYPE html><html xmlns="http...
Trusted Client Certificates
Trusted client certificates are used for making authenticated requests to reverse proxy. These certificates can be
managed under the TrustedClients certificate store from reverse proxy UI. For users who want to create their
client certificate, please refer to Creating Client Certificate. To import a client
certificate, please refer to Importing Trusted Client Certificate.
Creating Client Certificate
In order to create a client certificate, the below instructions can be followed.
-
openssl req -newkey rsa:4096 -keyout key.pem -out cert.csr -nodes -days 365This creates a private key & a certificate signing request. Client certificates work in pairs with private keys and certificates. In order to create a private key and certificate signing request (CSR), this command can be issued. A CSR is an intermediate certificate file that is to be signed to create a final certificate.
The command is interactive and will ask users to fill in several fields. The only field relevant for the reverse proxy is currently
Common Name(CN) field. CN field matches the user name that will be seen by the applications behind reverse proxy while using a client certificate based authentication mechanism. Users are free to provide the appropriate information for other fields.The command should create two files, namely
cert.csr, which is a certificate signing request (CSR) andkey.pem, which is a private key for the certificate. -
openssl x509 -req -in cert.csr -signkey key.pem -out cert.crt -days 365This creates a self-signed certificate. In order to create a self-signed certificate using private key and CSR files, this command can be issued.
The command should create a file named
cert.crt, which is a self-signed certificate. This certificate can be imported to reverse proxy in order to allow it to verify the client.
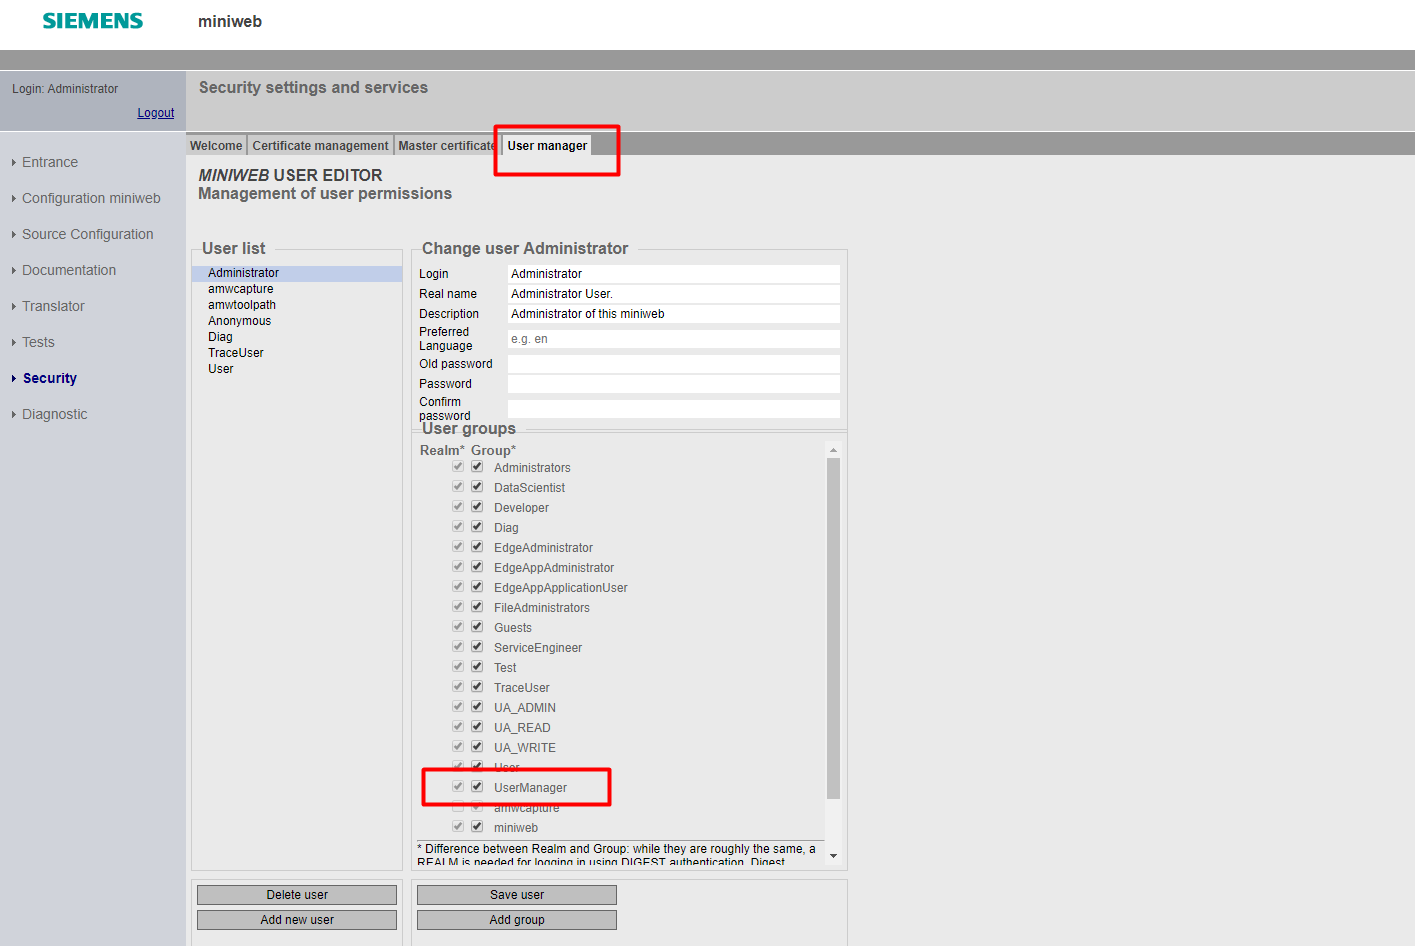
Importing Trusted Client Certificate
In order to allow the reverse proxy to verify the user authenticity, the certificate file must be imported to it. This can
be done from the certificate management page. Users can navigate to this page by clicking Security on the navigation
menu (1), clicking on the Certificate management tab (2) and choosing the TrustedClients as the certificate store (3).
Import dialog can be opened up by clicking on the Import button (4). For image, please see Fig 2 below. The certificate import is
completed upon selecting the appropriate certificate and clicking the Import button in the dialog menu. In order to imported certificates to take effect,
users are required to reload certificates by clicking Reload SSL certificates (5) button and confirming popup.
Importing the PKCS#12 File to Windows
In order to authenticate using the client certificate, the certificate and key files need to be bundled as a PKCS#12
file. After having a PKCS#12 file, it can be imported by users operating system to enable browsers to use client
certificate authentication mechanisms using those pairs. This file also can be used by applications like curl.
For this documentation, Windows is chosen as an example.
The below command can be issued to create a PKCS#12 file from key and certificate pairs.
openssl pkcs12 -export -out bundle.p12 -in cert.crt -inkey key.pem
The command should create a file named bundle.p12, which can be double-clicked on to import it in the Windows operating
system. After importing, the certificate can be used for authenticating the client.
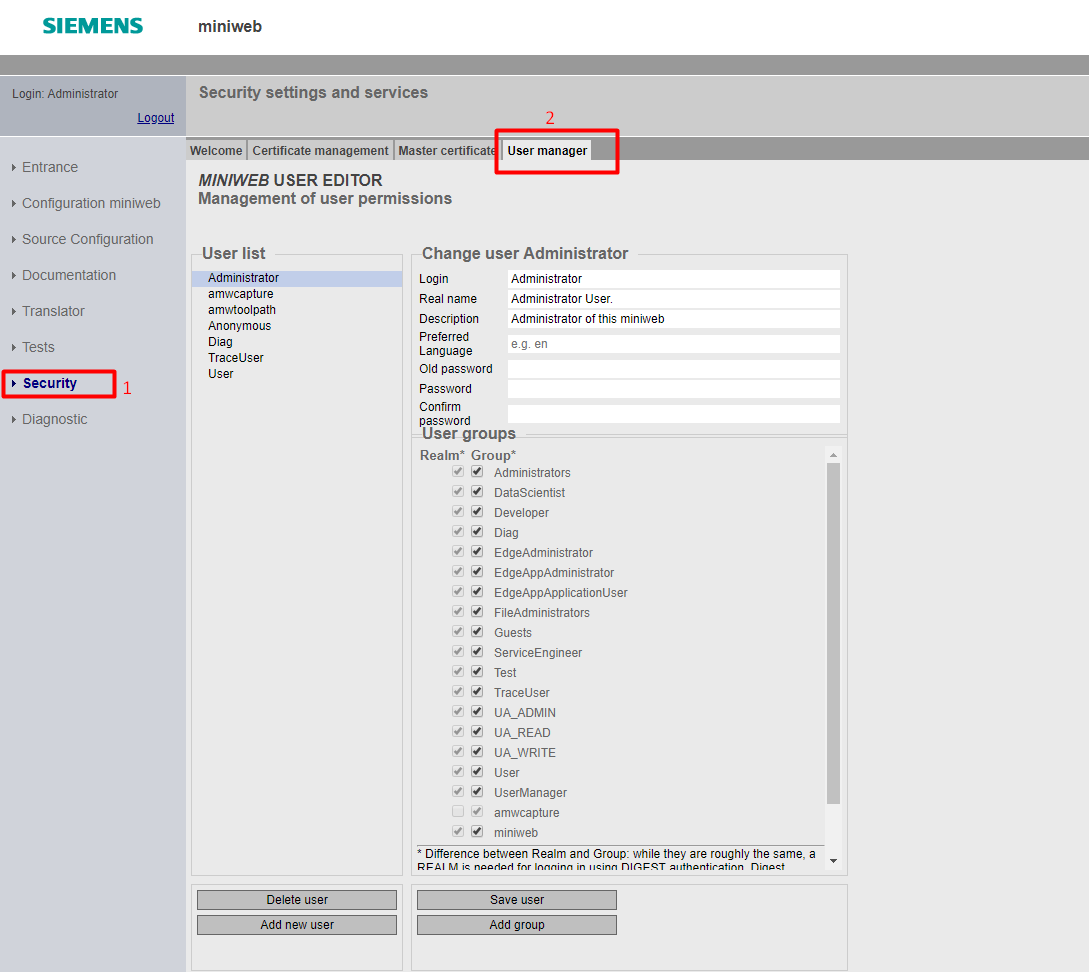
Users
Administrator and Users
There’s a built-in root user (Administrator) who can manage user accounts, their rights, and the overall system security. User cannot be deleted and is a member of all the user groups. This user is surely there (as long as you have an interactive user management). User can also create a "twin" administrator that is a member of the same groups as user is. But this twin won’t receive all the new group memberships and won’t be protected from deletion. However, the root user will be able to delete this twin, since, in order to be able to manage a user, the user executing the action must share all groups with that user.
So, you can create an own administrator by using the UserEditor. This admin can be authorized for your application's specific user groups. You can protect the user groups and users from other administrators.
User Credentials
A User who has UserManager group rights can set a new password for other users without knowing the old one under the UserEditor menu. There is no "Forgot Password" feature for users. Users can reset their password on their own, only if they know the old password. Also, there is a timeout limit for user sessions. It cannot be configured in runtime.
User Groups
There are predefined user groups for the system overall such as miniweb, User, Administrator, etc.. There are also app specific groups defined for several roles on Edge Applications:
Edge Administrator, Edge App User, Edge App Restricted User, Edge App Administrator
You may develop the application in accordance with the "X-User-Groups" header which transports group info. Moreover, you can add own user groups by using the UserEditor.
Language
The language is determined by the order of the precedence of a cookie, a websso login, an "accept-language" header or a system default in the system configuration. The preferred language in User Editor is not related to the user sessions.
User/Group Management and Privileges

- The administrator (root) is a member of All existing and newly created groups in the server including:
- miniweb: all users of the user database, including Anonymous
- Users: all authenticated users
- The administrator can manage all users in the server
- Can create an equal twin which can be managed or deleted by the root administrator but the other way is not possible
- For other privileged tasks (shutdown server, manage certificates, ...), the membership of group administrators is sufficient!

- The user lacks the membership of Group1 and UserManager, so cannot manage any other user
- The user is a member of Administrators, can call privileged actions

- The user lacks the membership of Group2 and Administrators, so can manage and create users which user shares all groups with (therefore not User2)
- Can create an equal twin by inheriting all of his groups to the twin and can be deleted by that twin
- Cannot manage the "Administrator" since user lacks the Group2 membership
- Cannot call privileged actions
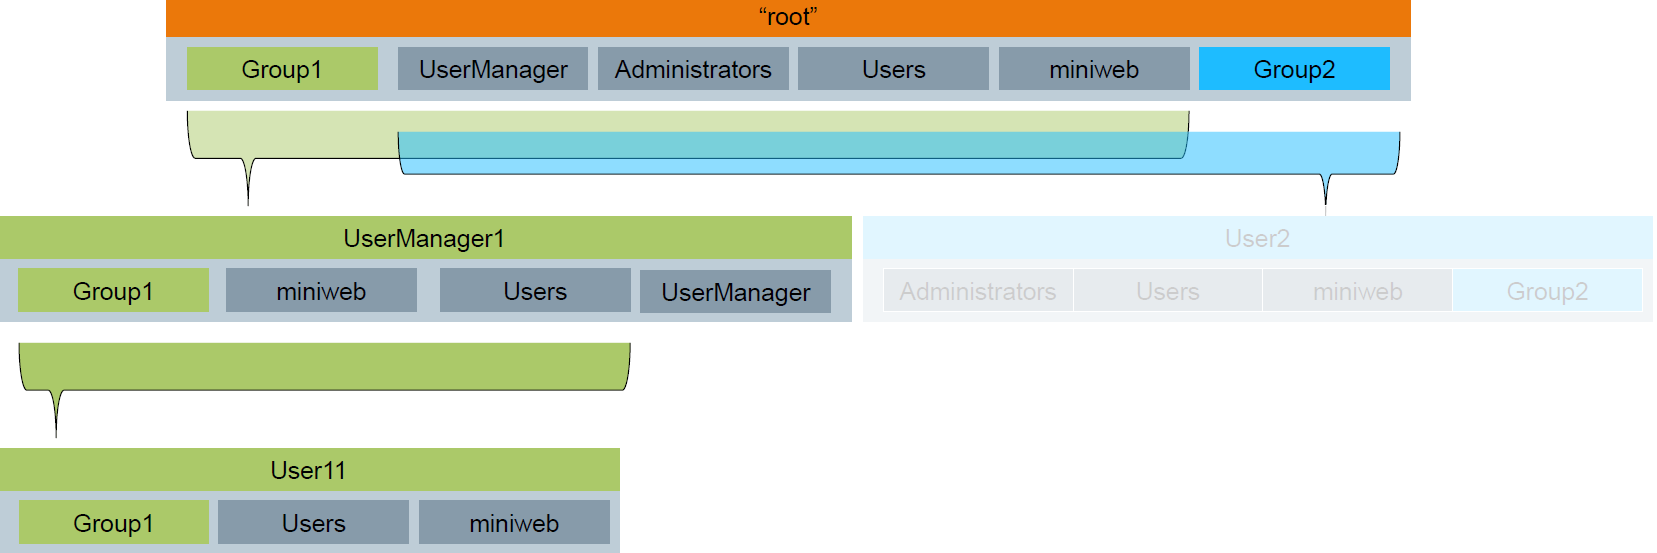
- A regular user is only member of Group1
- Can only use resources allowed for Group1 or Users
Any questions left?
Except where otherwise noted, content on this site is licensed under the The Siemens Inner Source License - 1.1.