AppSDK Overview
Introduction
The Application Software Development Kit, which will be mentioned as AppSDK for the rest of this document, is a collection of API’s that enables the application developers to gather and process data. The AppSDK allows developers to quickly create new applications. With the AppSDK facade, Application developers are able to use Databus and Adapter Framework.
AppSDK Terminology
Before going in detail it would be beneficial to define common understanding on AppSDK terminology.
| Term | Explanation |
|---|---|
| Payload | Message carrying meaningful data block |
| Push | Sending a message to Databus |
| Pop | Receiving a message from Databus |
| MessageID | Unique queue ID is used when sending(push) and receiving(pop) data (queue identifier). Also corresponds to name of the subscription in subscriptions part |
| Consumer | Mandatory object that is used for receiving(consuming) data |
| Producer | Mandatory object that is used for sending(producing) data |
Overview of AppSDK Facade
General Methods
| Method |
|---|
| Initialize |
| Terminate |
| GetUuid |
| GetAppName |
| GetSystemTimestamp |
| SendHearthbeat |
Databus
Databus is the component that enables the user to read high frequency data using AppSDK. It has 3 child components as "Producer", "Consumer" and "CallbackConsumer". Producer pushes data to Databus, while Consumer and CallbackConsumer are reading the data. Different from the Consumer, the CallbackConsumer does not block the application and works with callback principle.
DataSourceAccess
"DataSourceAccess" is the component that enables the user to read Parameter Service data using AppSDK. It provides device and ParameterService and fetches data according to a Parameter definition from the user.
Logging
Logging is also one of the main components of AppSDK. By using logging, application logs are automatically written into journald with a predefined format. This format enables logs to be uploaded to the Insights Hub.
Note
By default Sinumerik Edge platform has default log rate limit for per application container that is 10.000 lines over 30 seconds. Exceeding logs in 30 second timeframe will be ignored and will be shown as 'Suppressed
Event Handling
Sending events is also available with AppSDK. Events can be sent from one application to another. Also Edge Status can be used for decision-making in the application.
Language Specific Documentations and Code Samples
Here you can find documentation links to all languages supported by AppSDK.
| Programming Language | Documentation |
|---|---|
| Python | GO TO PAGE |
| Java | GO TO PAGE |
| C++ | GO TO PAGE |
Dependencies
Following dependencies can be installed automatically with AppSDK development environment install script. If you don't use AppSDK Development Environment you can still install them manually with following steps.
- AppSDK Library Dependencies (For all AppSDK Languages)
sudo apt-get install libsystemd0 openssl
- Java (Only for using Java AppSDK)
sudo apt-get install openjdk-11-jre
- Python3 (Only for using Python AppSDK)
sudo apt-get install python3
- virtualenv (Required package for indapp-builder)
sudo apt-get install virtualenv
- Indapp builder (Available in AppSDK Package - Downloadable from App Publish UI)
After downloading or getting indapp-builder .deb package use following command to install it.
sudo dpkg -i indapp-build_<verison>_amd64.deb
Note
AppSDK libraries are built with glibc v2.28. So please ensure that your build and runtime environments contain glibc v2.28 or later versions.
Additional build time dependencies
Following additional packages are build time dependencies for C++ (Only needed while building application) If you are not using AppSDK C++ version you can just skip following packages.
- cmake
- build-essential
sudo apt-get install cmake build-essential
Following additional package is build time dependencies for Java (Only needed while building application) If you are not using AppSDK Java version you can just skip following package.
AppSDK Java version requires minimum JDK version 8 for compile time dependencies. Debian 10 (Buster) repository contains openjdk-11-jdk can also be used.
- openjdk-11-jdk
sudo apt-get install openjdk-11-jdk
Event Handling Functionality
AppSDK offers alternative way to communicate between Edge applications with decreased coding complexity.
By using Event Handling interface, system apps can also send events such as "application about to restart" or "configuration of the application has changed".
Event Handling interface has payload limitation of maximum "1 megabytes" of data per message. So, keep in mind that event messages exceeding that limit will fail.
Usage of Event Handling functionality can be found in language specific documentation
| Action | Subscribed Event | Result |
|---|---|---|
| specificConfig or loggingConfig changes | onConfigChange | App receives onConfigChange event and does not get restarted |
| specificConfig or loggingConfig changes | onAppShutdown | App receives onAppShutdown event and gets restarted after a time specified in eventConfig. |
| specificConfig or loggingConfig changes | None | App gets restarted without any event notification. |
| dataSourceConfig changes | onConfigChange | This app and all apps containing databusConfig gets restarted. |
| dataSourceConfig changes | onAppShutdown | App gets restarted after a time specified in eventConfig. |
| dataSourceConfig changes | None | All apps with databusConfig and gets restarted. |
Note:
-
If a new app installed with "databusConfig", all apps with "databusConfig" restarts.
-
Apps can send events to other apps. Performing required tasks at receiving side is receiving app's responsibility.
-
Apps can not send "onConfigChange" and "onAppShutdown" events, since these events are reserved.
-
If an app is subscribed to "onAppShutdown" event, it gets "onAppShutdown" event before restart. Performing necessary tasks is expected from the event receiving apps before shutdown occurs.
-
If multiple apps are subscribed to "onAppShutdown", all apps will be restarted after a specified wait time in the configuration file. If multiple events have different wait times, longest wait time is being used for restarting and all apps get restarted at same time.
-
Even if there is no "onAppShutdown" event subscription, if another app exists with "onAppShutdown" event subscribed, all apps gets restarted after a time specified in "eventConfig".
In order to send event you need to modify "metaconfig" and define receiving application there under subscriptions element.
    "DestinationAppName_message_data": {
      "source": "DestinationAppName_message_source",
      "quality": "btss",
      "payload": [
        {
          "sinumerikUid": "DestinationAppName_message",
          "period": 2
        }
      ]
    }
Also, you need to add relevant permission configuration(s) for the added subscription element(s).
{
  "source": "DestinationAppName_message_source",
  "quality": "quality_all",
  "permission": "write"
}
Logging Functionality
AppSDK also has a class called "Logger". This class gives the control of logging with different appenders and severity levels. The appenders are for different usages for logging and debugging. The severity is for the levels of logging in log API. You can define the severity in the application's configuration file under loggingConfig .
While coding below appender types and log severity levels can be used in AppSDK logging API.
Appender Types
| Name | Description |
|---|---|
| CONSOLE | Appender for printing logs only to console. |
| LOGFILE | Appender for uploading the logs to a file, which is on the same directory with the application. Also prints the logs to console. |
| JOURNAL | Appender for uploading the logs only to journald. |
| SYSLOG | Appender for uploading logs to journald with their system time. Also prints the logs to console. |
Log Severity
| Name | Description |
|---|---|
| "INFO" | This level enables the logging for all levels except Debug level. |
| "DEBUG" | This level enables the usage of all logging levels. |
| "WARN" | This is the level for printing only warnings and errors. |
| "ERROR" | This level is only for error messages. |
Log Details And Format
In SINUMERIK Edge device, all system and application logs are gathered on Journal. Meanwhile, log entries are picked up and separated according to a journald parameter (SYSTEMD_UNIT). Final step is to write separated log entries into a file. There are two criteria and one of them takes places to close existing file and open new file.
- If written logs in a file reaches to 8MB.
- If a file has been open for 5 minutes.
JSON formatted LogFiles are compressed and sent to Insights Hub. It can be seen on Files tab on Fleet Manager. Log Format is in the file :
  [
        {
            "GUID":"_SYSTEMD_UNIT_A","entries" : [
                ["REALTIME OF MESSAGE1","LOG SEVERITY","MESSAGE1","PID","CATEGORY"]
                ["REALTIME OF MESSAGE2","LOG SEVERITY","MESSAGE2","PID","CATEGORY"]
            ]
        },
        {
            "GUID":"_SYSTEMD_UNIT_B","entries" : [
                ["REALTIME OF MESSAGE1","LOG SEVERITY","MESSAGE1","PID","CATEGORY"]
                ["REALTIME OF MESSAGE2","LOG SEVERITY","MESSAGE2","PID","CATEGORY"]
            ]
        }
    ]
[
        { "GUID":"logcollector.service","entries" : [
            ["2020-01-29T08:00:06.680UTC","INFO","Connected to Socket Successfully","12645","LogQueue"]]
        },
        { "GUID":"fileUploader","entries" : [
            ["2020-01-29T08:00:07.285UTC","ERROR","CNI environment:","5449","_EXENIA-NET"],
            ["2020-01-29T08:00:07.328UTC","ERROR","CNI_COMMAND=DEL","5477","_EXENIA-NET"],
            ["2020-01-29T08:00:07.440UTC","ERROR","CNI_IFNAME=eth0","5518","_EXENIA-NET"]
        }
    ]
Resource Management
First 33 processes are picked up once a minute and written into a file. Because the deadline of the open file is 30 minutes, Each systemUsage file includes 30 different samples. These files also can be seen on Files tab on Fleet Manager like log files.
File Upload Functionality
Warning
In order for an application to use upload functionality, generated indapp should have a volume mapping as /var/fileuploader/files/official_app_name/:/var/fileuploader/files/official_app_name/
It is possible to upload files from Edge application to Insights Hub using AppSDK file upload functionality. Upload operation can be done either synchronously or asynchronously. This feature also includes a timeout functionality on sync uploads. If an application does not get an response for 60 seconds. upload will fail and application will keep working as expected. There are some checks for the file application intends to upload. These checks are mainly:
| Checks | Explanation |
|---|---|
| 10 files at a time | Upload service only allows 10 simultanious file uploads at a time. If application exceeds this amount upload call/callback returns an error |
| 8 Mb at most per file | Upload service only allows files equal or less than 8 Mb to be uploaded. In case this limit is exceeded upload call/callback returns an error |
| Pretty file name | File should not have any dots '.' character in their name except dot for extension. In case file name includes dots upload call/callback returns an error |
| 8 MB at most per 10 sec | Upload service only allows 8 MB of file upload per 10 seconds independent of file count. After 8 MB file transfer in 10 second, rest of the file will be delayed. |
If you encounter an error while uploading a file and logs does not explain situation clearly please change application log level to DEBUG from configuration.
There are a lot of error messages also logged automatically(also written to the returning EdgeStatus object). These are:
| Message | Detailed explanation |
|---|---|
| failed to copy file | The file cannot be copied therefore cannot be uploaded to Insights Hub. |
| At least one file filter fails | One of the filters specified above fails. Therefore file interpreted as invalid. |
| Callback is not set yet | ClearAsyncResponseHandler method is called before setting an async handler |
| Timeout exceeded for file: foo | For the file foo 60 seconds timeout is reached so it is interpreted as failed upload |
File name size file_name_size is exceeding max file name limit max_limit |
File name size must be lower than max file name limit defined by platform. |
Implementation details for this feature can be found in language specific documentation
To observe uploaded files, Fleet Manager on Insights Hub can be used as explained in Logfiles section.
Uploaded files are renamed in below format on Insights Hub;
<uploader_edge_application_name>_<uploading_timestamp>_<uploading_file_name>
Example:
myfileuploaderapp_2020-04-15T18:42:03.331000Z_myfiletoupload.jpeg
Note
uploader_edge_application_name and uploading_timestamp fields in uploaded file name are added by AppSDK. Uploaded file name has to be shorter than 100 characters due to Insights Hub API restrictions. Number of characters in uploading_timestamp plus seperator charaters ("_") which are added by AppSDK takes 29 characters in total. So (uploading_file_name + uploader_edge_application_name + 29 ) has to be shorter than 100 characters. Edge application should make necessary checks while setting uploading file name.
MqttClient Functionality
It is possible to send MQTT messages to an external MQTT broker through factorylan using AppSDK's MqttClient API and SINUMERIK Edge MQTT Client application. Please refer to API documentation of AppSDK and SINUMERIK Edge MQTT Client for further details.
Limitations on message throughput
The message throughput of MQTT can be limited by various factors.
- The throughput may be limitted by the local area network depending on network infrastructure such as routers and switches that are used in LAN.
- The throughput may be limitted by the resources of the device depending on usage of the other system/user applications.
- The throughput may be limitted by the external MQTT broker.
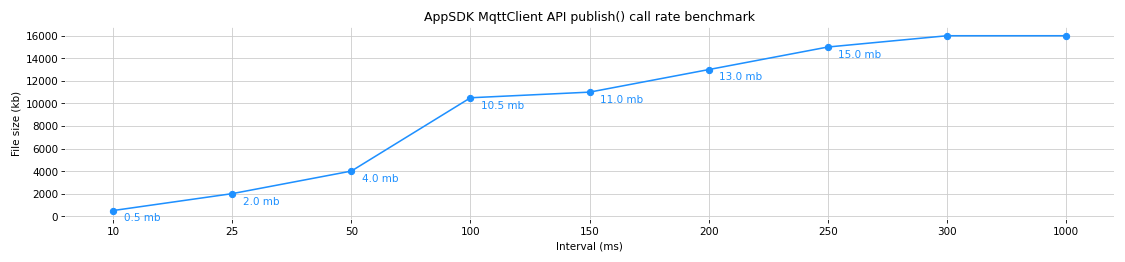
Due to these reasons, it is advised to use reasonable message sizes/frequency while using MqttClient API. The frequency support is limited to maximum 100 messages per second and file size support is limited to maximum 16 megabytes. It should be noted using both these limits at the same time (100 msg/s with 16 mb file) are not advised and not supported.
Below chart can be taken as a reference point for a default container with a default 250 mb memory limit. Exceeding these message sizes/frequency combinations are likely to be killed by the system for excessive memory usage and not supported.
Watchdog Functionality
AppSDK includes built-in "watchdog" functionality. This gives you the option to notify the system about your application's status. You can tweak timing parameters so you decide when to restart your application and the timespan before each restart. By this way you can keep your application alive in case it fails. Application sends heartbeat with result "1" if the application is alive. If the result is not "1", the return codes are Linux error codes. The result can be checked with AppSDK library. For further information you can see language specific documentations' "sendHearthbeat" function.
GPU Acceleration Usage
To Configure GPU acceleration application container should be listed under gpuConfig map.
Note
Currently, GPU acceleration can be used for 3D rendering only.
Warning!
Names listed under gpuConfig configuration should match with the application container name (referred as container_name at the example below)
"gpuConfig": {
    "container_name1": {},
    "container_name2": {}
}
container_name: container name of the application
VNC Server Usage
To enable VNC access, every container should be configured seperately.
Warning!
Names listed under VNC server configuration should match with the application container name (referred as container_name at the example below)
"vncServerConfig": {
    "container_name1": {
        "resolution": "1920x1024",
        "colorDepthInBit": 24,
        "password": "Edge123!",
        "pixelFormat":"RGB888"
    },
    "container_name2": {
        "resolution": "1024x768",
        "colorDepthInBit": 16,
        "password": "Edge123!",
        "pixelFormat":"RGB565"
    }
}
container_name: container name of the application
resolution: Resolution expected from VNC output. Resolution is a string field and its format should be as <width>x<height> and between 100x100 and 9999x9999
This field is optional with default value of 1280x720.
colorDepthInBit: Colordepth of connection. Color depth is an integer field and it can be one of: 8(for BGR233), 15(for RGB555), 16(for RGB565), 24 (for RGB888)
This field is optional.
password: password for VNC connection. Password is a string field and it should meet the following criteria: 8 char string with at least 1 number, 1 uppercase letter, 1 lowercase letter, 1 special character.
pixelFormat: Pixel format of stream. Pixel format is a string field. Its first 3 characters should be one of permutations of RGB characters. ie. GBR is valid whereas GR is not. Sum of last three digits of this field should be equal to colorDepthInBit field.
This field is optional.
Reverse Proxy Usage
If your Indapp is meant to use reverse proxy, your Metaconfig file should include a "webserverConfig" field below and your docker-compose file should include "proxy-net" on the networks area. Also you need to expose the port which your application runs on. To expose a port use the "EXPOSE
  "webserverConfig": {
    "enable": true,
    "reverseProxyForward": {
      "name": "<officialappname>",
      "base": "/<officialappname>/",
      "to": "http://<container_name>.<officialappname>[.proxy-net.industrialedge.io]:<port>/"
      }
  }
Warning!
Indapp build will generate an empty section for webserverConfig in Metaconfig. This section should be configured by developer.
enable: When this field is set as "true" rest of the "webserverConfig" should also be included
name: Official application name of the application.
base: Route that will get your application with MiniWeb. The naming of this path solely depends on the user's preference.
to: Main address for the application which includes container_name, application name and user-defined port. To field must contain container name and application name of application, which can be found in Metaconfig, such as "to": "http://container_name.officialappname:5000/". If there is different value in this field, Indapp will give impersonation error while installing. Allowed values are as follows.
http://<container_name>.<officialappname>:<port>
http://<container_name>.<officialappname>.proxy-net:<port>
http://<container_name>.<officialappname>.proxy-net.industrialedge.io:<port>
port: Where the indapp is running and exposed as explained above.
Illegal configuration
It's an illegal configuration for reverse proxy to not have a trailing path seperator for base field where to field has a trailing path sepeartor.
E.g
  "webserverConfig": {
    "enable": true,
    "reverseProxyForward": {
      "name": "illegalconfiguration",
      "base": "/illegalconfiguration",
      "to": "http://illegalconfiguration:8080/"
    }
  }
Relative Path Warning
While using Reverse Proxy, it should be cautious about using absolute paths such as '/css/app.css'. Instead of using such absolute path consider to use relative paths such as './css/app.css'. You may use below stylesheet definition as relative path example.
<link rel="stylesheet" href="./css/app.css">
<base href="/YourAppEndpoint">
Request Parameters
  "webserverConfig": {
    "enable": true,
    "reverseProxyForward": {
      "name": "<officialappname>",
      "base": "/<officialappname>/",
      "to": "http://<container_name>.<officialappname>[.proxy-net.industrialedge.io]:<port>/",
      "requestParams": [
        {
          "name": "X-AppBaseUrl",
          "value": "$MW_PROXY_BASE" /*See below for possible values*/
        }
      ]
    }
  }
requestParams field is an optinal field that can take predefined values by Reverse Proxy. Multiple fields are allowed as shown in example below.
...
  "requestParams": [
    {
      "name": "X-AppBaseUrl",
      "value": "$MW_PROXY_BASE"
    },
    {
      "name": "X-Logged-In-User",
      "value": "$MW_USER_NAME"
    }
  ]
...
These fields can be configured to make Reverse Proxy forward various information to indapp within HTTP headers. Indapps can read those values by reading incoming HTTP headers as configured in name field.
List of possible values with descriptions can be found below.
| Value | Description |
|---|---|
| $MW_PROXY_BASE | X-AppBaseUrl |
| $MW_USER_NAME | X-Logged-In-User |
| $MW_USER_GROUPS | X-User-Groups |
| $MW_LOCAL_ADDR | X-Real-IP |
| $MW_HTTPS | X-Forwarded-SSL |
Authorization
There are two ways to implement authorization mechanism for indapps using Reverse Proxy.
Indapp Based Authorization
Reverse proxy can be configured to forward logged in user information to indapps within $MW_USER_NAME HTTP request header. See, Request Parameters.
Indapss can decide whether to allow users or not by returning HTTP 401 Unauthorized response. In case of 401, Reverse proxy can redirect user to Reverse proxy's login page to indicate an unauthorized login.
In case of not logged in (anonymous) user, this field would be blank. Indapps can return HTTP 401 Unauthorized response to make Reverse Proxy to start login sequence.
After the login, indapps can again decide whether to allow incoming user or not by returning HTTP 200 or HTTP 401 response.
Reverse Proxy Based Authorization
Reverse proxy can provide authorization mechanism on behalf of applications which don't implement it itself. This can be beneficial for applications which don't want to put burden of authorization to underlying web application.
The mechanism works as authorizing users under specified groups. Any existing user under specified groups can be authorized to login into application. Users which don't belong these groups would be rejected by Reverse Proxy authorization.
groups field is an optional field that can take available groups under Reverse Proxy.
  "webserverConfig": {
    "enable": true,
    "reverseProxyForward": {
      "name": "<officialappname>",
      "base": "/<officialappname>/",
      "to": "http://<container_name>.<officialappname>[.proxy-net.industrialedge.io]:<port>/",
      "groups": ["group1", "group2", ".."]
    }
  }
Only expection is when groups is set to ["*"], this would mean all existing users under Reverse Proxy can be authorized to login into indapp.
Note
groups field can be also set to ["User"] to indicate all users, ["*"] pratically an alias for User group.
To indicate administrators, ["Administrators"] group can be used.
An example could be;
  "webserverConfig": {
    "enable": true,
    "reverseProxyForward": {
      "name": "<officialappname>",
      "base": "/<officialappname>/",
      "to": "http://<container_name>.<officialappname>[.proxy-net.industrialedge.io]:<port>/"
      "groups": ["MyGroup"]
    }
  }
This would enable all users under MyGroup group to be authorized to login into indapp.
An authorized user information can be forwarded to application using $MW_USER_NAME request parameter. For details, please refer to Request Parameters.
Multiple Endpoint Support
By design, indapps can have at most one endpoint exposed with Reverse Proxy. For users who want to expose multiple endpoints, they can opt for an additional intermediate proxy sitting in between Reverse Proxy and application container. With this, users can route incoming traffic to other applications/containers and achieve exposing multiple endpoints for their indapp.
Example with Nginx
As an example, Nginx can be configured to route incoming traffic to other applications by their URL with the configurations below.
For Nginx, it is recommended to have proxy_*_timeout, client_max_body_size and proxy_request_buffering settings as specified in example.
events {
}

http {

    access_log /dev/stdout;
    server {
        listen <nginx-listen-port>;
        location /<app1>/ {
                        proxy_pass http://<hostname>:<listening-app1-port>/;
                        proxy_read_timeout 6000;
                        proxy_send_timeout 6000;
                        proxy_connect_timeout 6000;
                        client_max_body_size 1000m;
                        proxy_request_buffering off;

        }
        location /<app2>/ {
                        proxy_pass http://<hostname>:<listening-app2-port>/;
                        proxy_read_timeout 6000;
                        proxy_send_timeout 6000;
                        proxy_connect_timeout 6000;
                        client_max_body_size 1000m;
                        proxy_request_buffering off;

        }
        .
        .
        .
    }
}
After Nginx, Reverse Proxy should be configured to connect Nginx instead of application(s) directly.
With this, users can reach multiple endpoints from their indapps as show below.
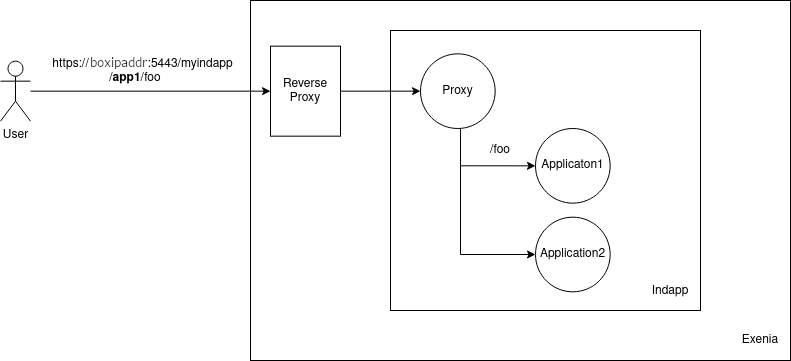
$ curl https://boxipaddr:5443/myindapp/app1/
Hello from app1
$ curl https://boxipaddr:5443/myindapp/app2/
Hello from app2
Application Publish
Firstly, the related application needs to be prepared as an indapp to be published to the Insights Hub. Afterwards, application's meta-config and .swu files should be prepared.
Warning
There are some restrictions enforced while creating indapps or running created indapps on Sinumerik Edge. Please refer to the restrictions page and make sure that created applications comply with these restrictions.
Creating Indapp
To create an Indapp you need to install the Indapp build tool. You can find the Indapp build debian file in AppSDK package or alternatively you can download it from Insights Hub App Publish UI.
Note
Indapp build is not language specific.
Compatibility
Indapp build with > V1.2.0 is not backward compatible with SINUMERIK Edge V2.0.x releases. If indapp-build version 1.2.2 is used, SINUMERIK Edge V2.1 shall be used.
Prerequisites
You need to create a docker-compose file and a Dockerfile to build an Indapp.
Docker Compose File
There is an example docker-compose file below
version: '3'
services:
  OfficialAppName:
    build: .
    networks:
      - indapp-net
      - proxy-net
    ports:
      - "8080:80"
    volumes:
      - /etc/config/indapps/OfficialAppName:/etc/runtime/config
      - /var/run/systemd/journal/socket:/var/run/systemd/journal/socket

networks:
  indapp-net:
    driver: bridge
  proxy-net:
    driver: bridge
- version: The version of compose file format.
- services: The services that will be in Indapp should be defined here.
- OfficialAppName: The name of your application. You can give any name to your application. This field is important. Because if you want to install your application to SINUMERIK Edge. the indapp you built and your application, which in Insights Hub must have the same.
- build: The path to your Dockerfile
- networks: In this section you need to specify which networks you will use.
- indapp-net: This field is mandatory and is fixed for applications that will communicate through Databus.
- proxy-net: This field is mandatory for applications that will use reverse-proxy
- volumes: You need to specify the path maps here. Configuration path mapping is mandatory. The file
/etc/config/indapps/OfficialAppNameneeds to be created manually on the host. - networks: Fixed field
Building Indapp
To build an Indapp, you need to run the following command on your local machine. Indapp name and the application you will create or created in Insights Hub must match with your "OfficialAppName" in your docker-compose file. If they don't match, installation to the SINUMERIK Edge will fail.
indapp-build -n <officialappname>
This command will create ".indapp" package at the current directory.
If you are using up-to-date version of "indapp-build", the command indapp-build -n <official_appname> -m will generate a metaconfig json file alongside of your Indapp. Generated file only contains standard information needed to deploy your application to Insights Hub. It is possible to make additions to this file according to your application's needs.
Also it is possible to generate this configuration for an existing Indapp via indapp-config <indapp_path> command.
If you do not have indapp-config or -m parameter in indapp-build, please request latest version of Indapp Builder.
By using -m parameter, you can also inject configuration into metaconfig.
Usage:
indapp-build -n <officialappname> -m <config_type> <argument> <config_type> <argument> ...
Please see below table for possible
-
It is possible to add multiple certifcate file using ´opc-ua-cert´ parameter
-
Only one information model is allowed in the configuration in case ´opc-ua´ parameter is used more than once last parameter in the arguments will be the only one in the configuration file
| Config Type Option | Description |
|---|---|
| opc-ua information_model_filepath | Encode opc-ua information model with base64 and add it to the metaconfig |
| opc-ua-cert opc_ua_certificate_filepath | Encode a certificate with base64 and add it opcuaserverConfig part of the metaconfig |
Example usage:
indapp-build -n <officialappname> -m opc-ua <information_model_file_path>
Merging a Custom Configuration To Default Metaconfig
As discussed in the previous section, while creating indapp, default Metaconfig file can be created with -m parameter.
Only creating Metaconfig file is not enough, before publishing application to Insights Hub, default Metaconfig file should be edited according to applications needs.
Editing this default Metaconfig file with every new build can be time-consuming and prone to errors depending length of custom configuration that needs to be added to newly created Metaconfig file.
To ease this process, the latest version of indapp-builder offers -d parameter where custom configuration can be supplied with JSON file path. While creating new Metaconfig file, indapp-builder takes supplied custom configuration file and merges it with created Metaconfig.
indapp-build -n <officialappname> -d <path to your costom config json file > -m
Example usage:
Let's assume that there is an application called sometestapp and in order to make this application work, specific configuration below needs to be added to metaconfig file for every build.
{
    "specificConfig": {
      "foo": [
        "bar",
        "baz",
      ]
    }
}
Instead of merging with the configuration above manually, this configuration section can be saved to any file, for this example my-custom-config.json file.
Using command below, new indapp file, swu file and metaconfig file will be created, and this newly created metaconfig file will include config section provided with the -d parameter.
indapp-build -n sometestapp -d my-custom-config.json -m
Building Indapp With .swu Archive
While deploying your application swu archive is needed. In that case you can create your indapp file and swu archive at the same time.
Example usage:
indapp-build -n <officialappname> -swu <version>
While you are creating ".indapp", if indapp-build container in development environment packages is used, a ".swu" archive gets created automatically.
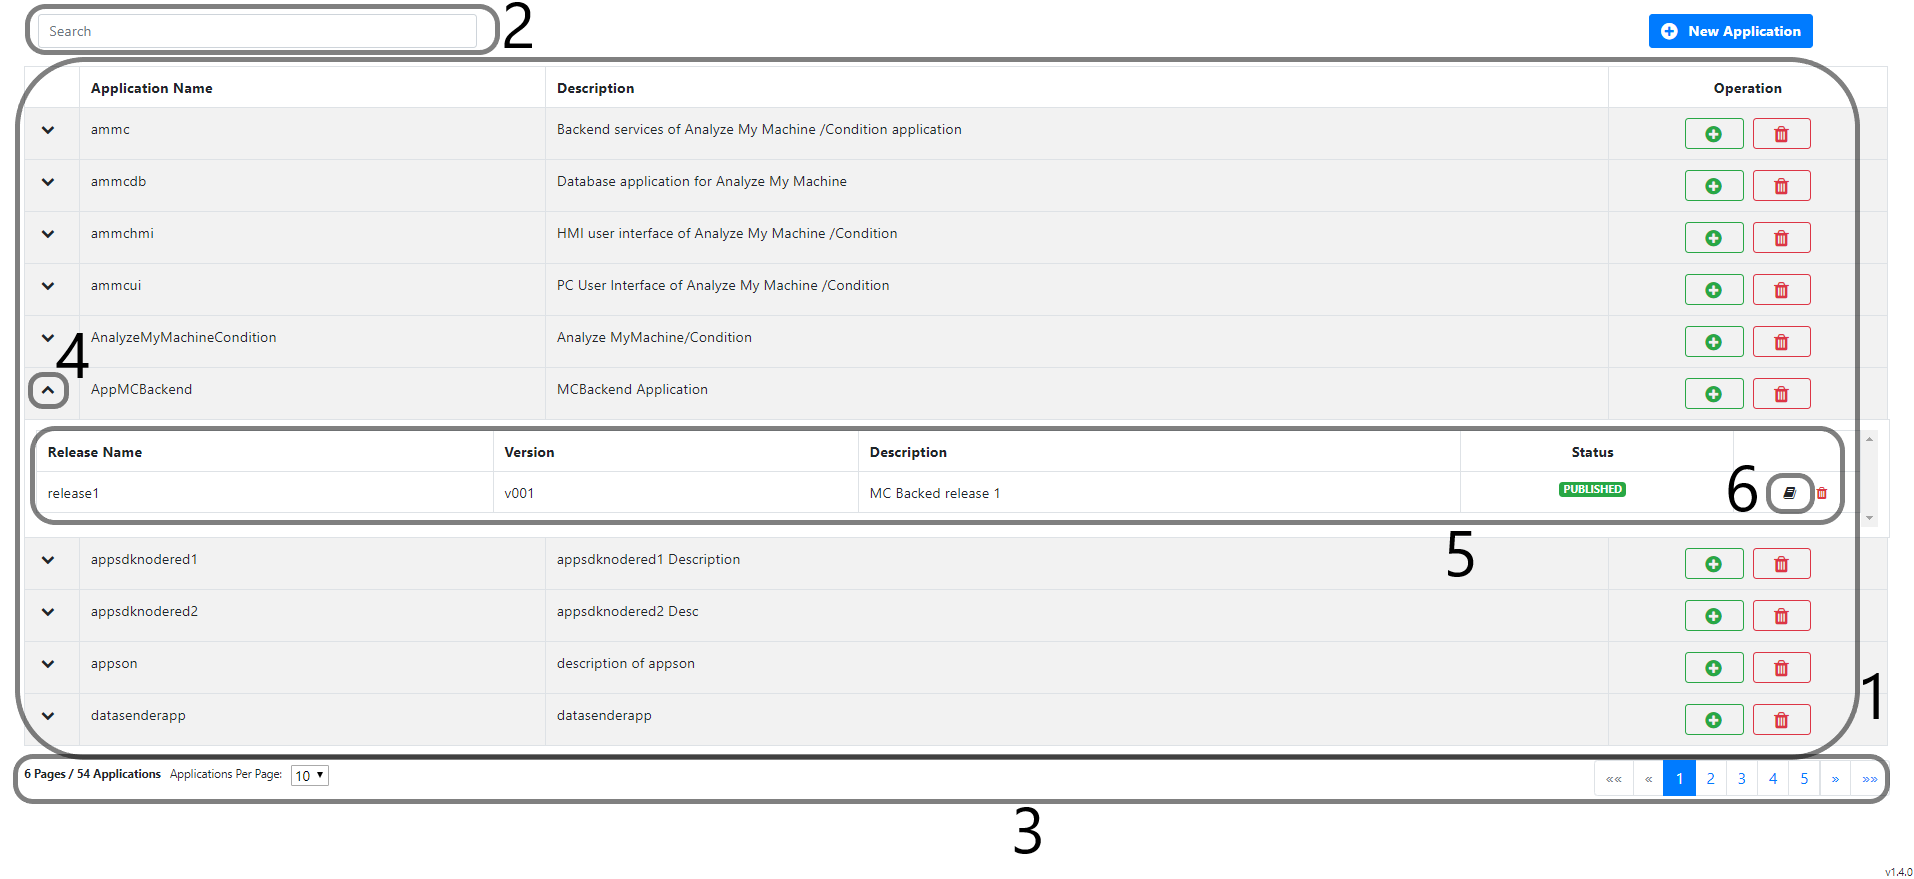
Listing Applications
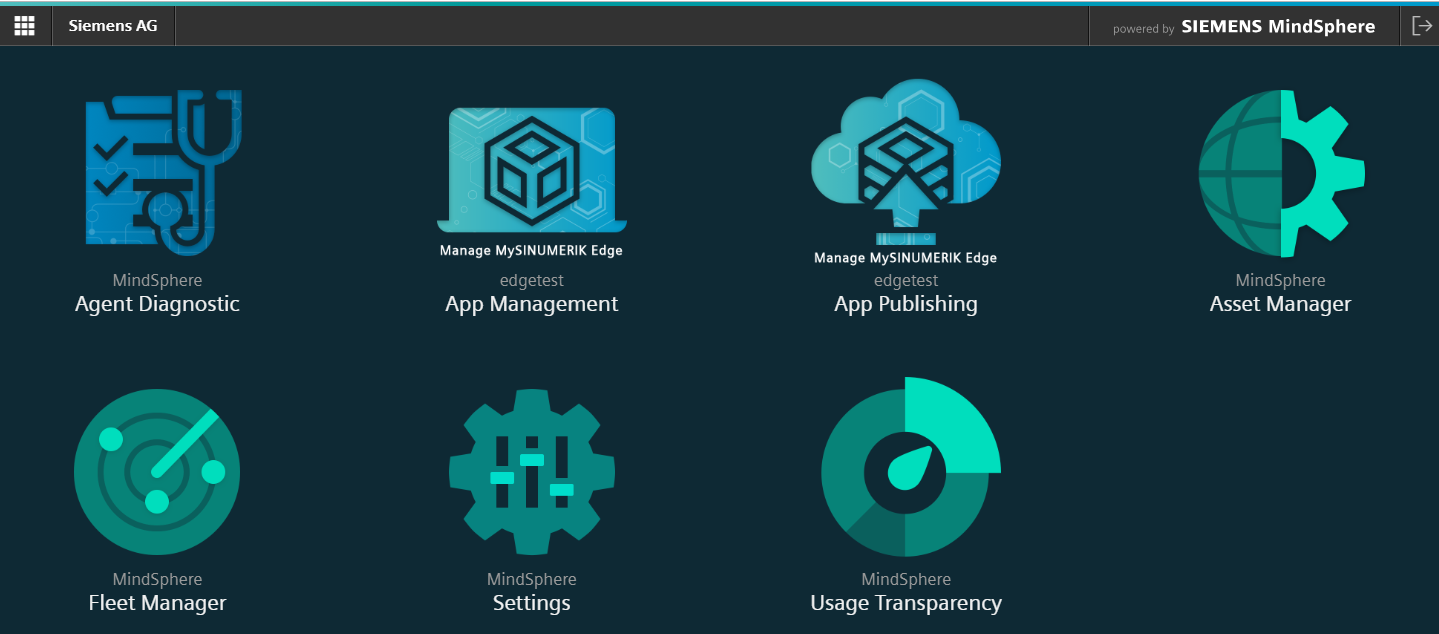
From the Insights Hub Launchpad choose the Manage MySINUMERIK Edge /App Publishing application.
This feature is used for displaying the applications that belong to your tenant.
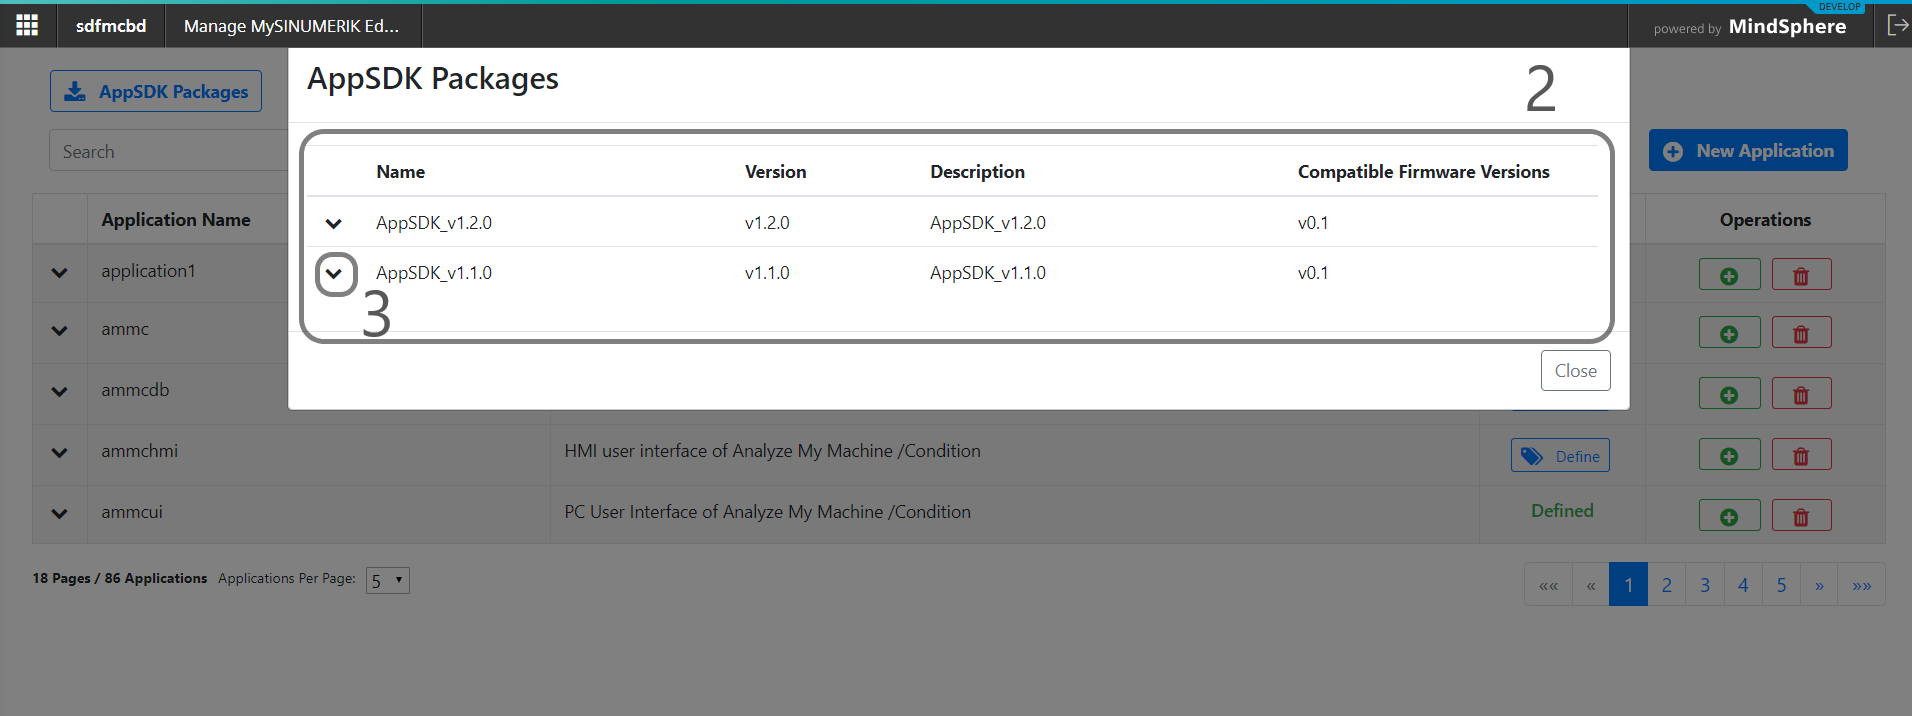
1) When the user opens the page, applications are automatically displayed.
2) The user can search applications by typing keywords in the Search text box. The application names containing the given keywords are filtered automatically.
3) It is possible to move in pages to see different applications in the list.
4) When the user clicks the Expand / Collapse icon, the application releases will be displayed or hidden.
5) Details of the application releases are shown.
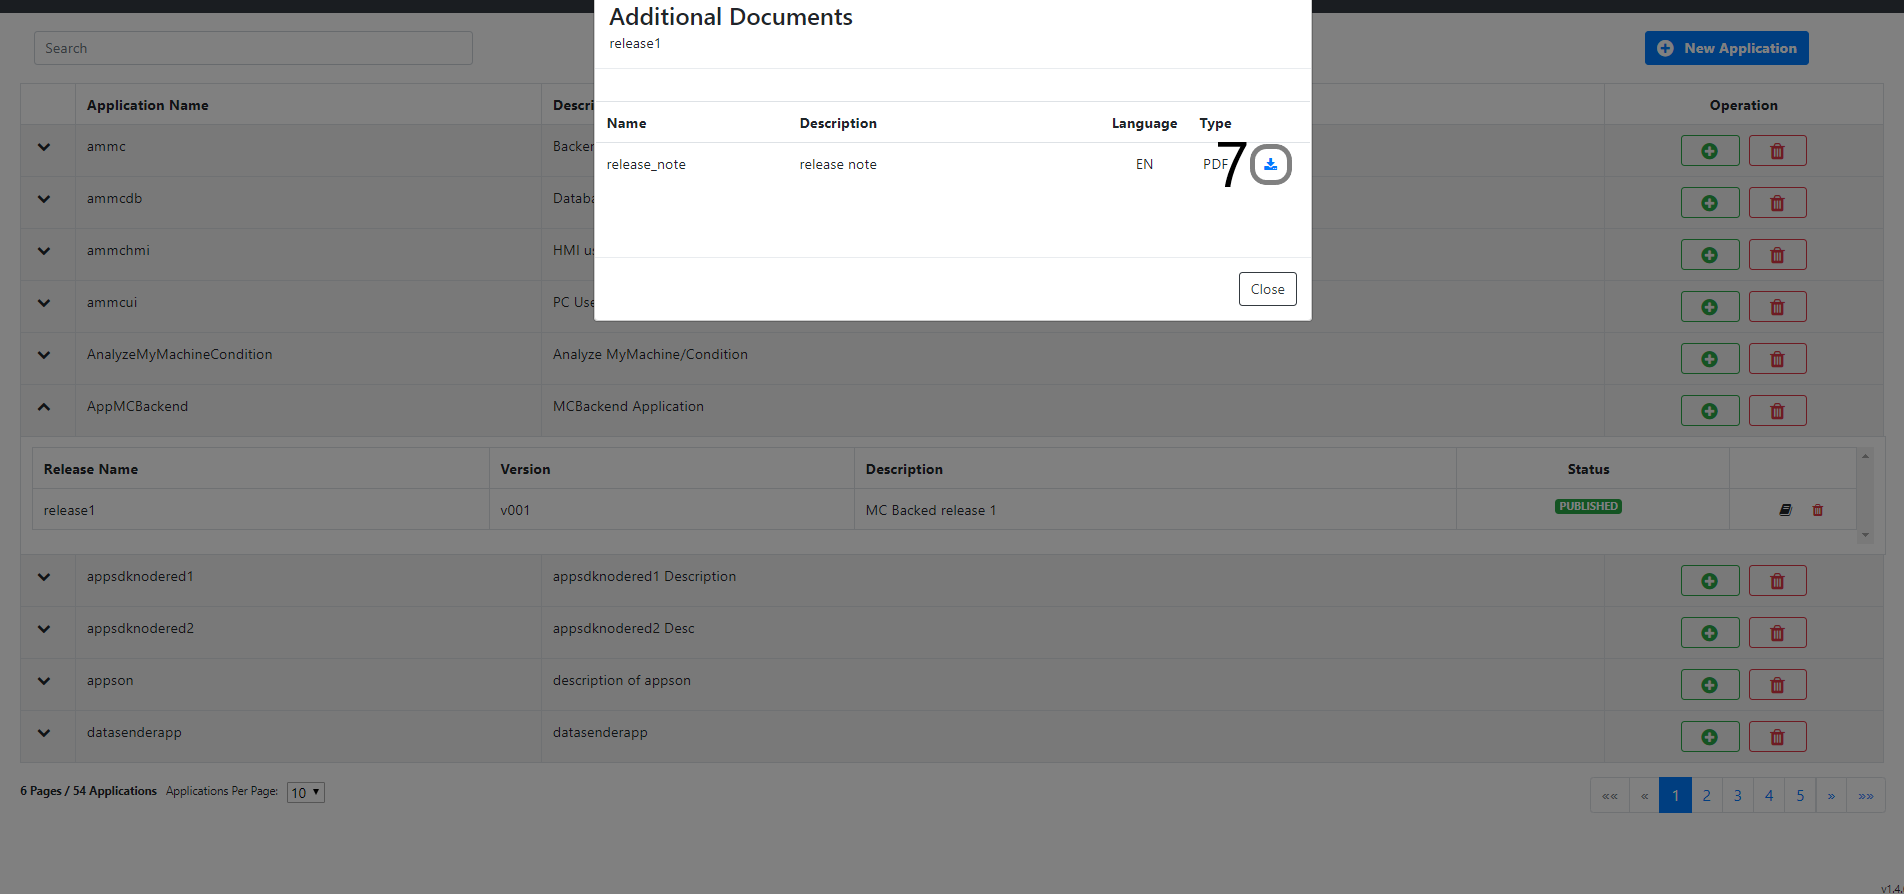
6) Click the Additional Documents icon to open the additional documents list to download.
7) Click the Download icon to download the relevant documents.
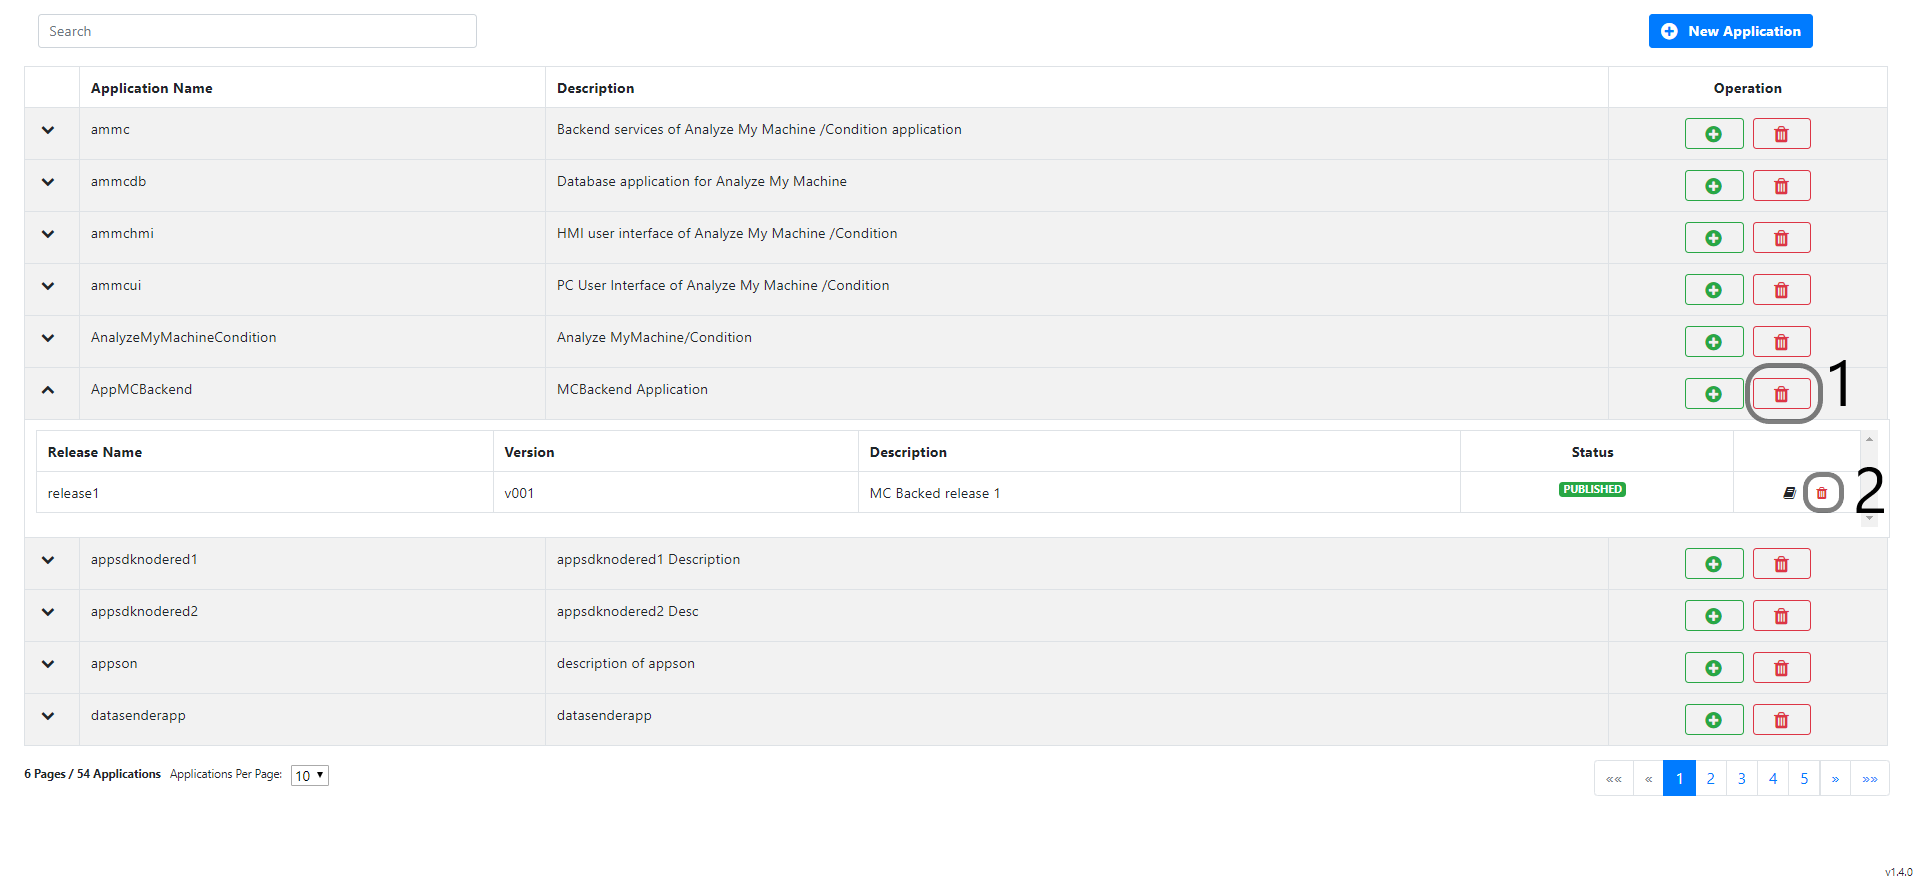
Remove Application and Application Release
1) Click the Remove Application button to delete an application
2) Click the Remove Release icon to delete application releases
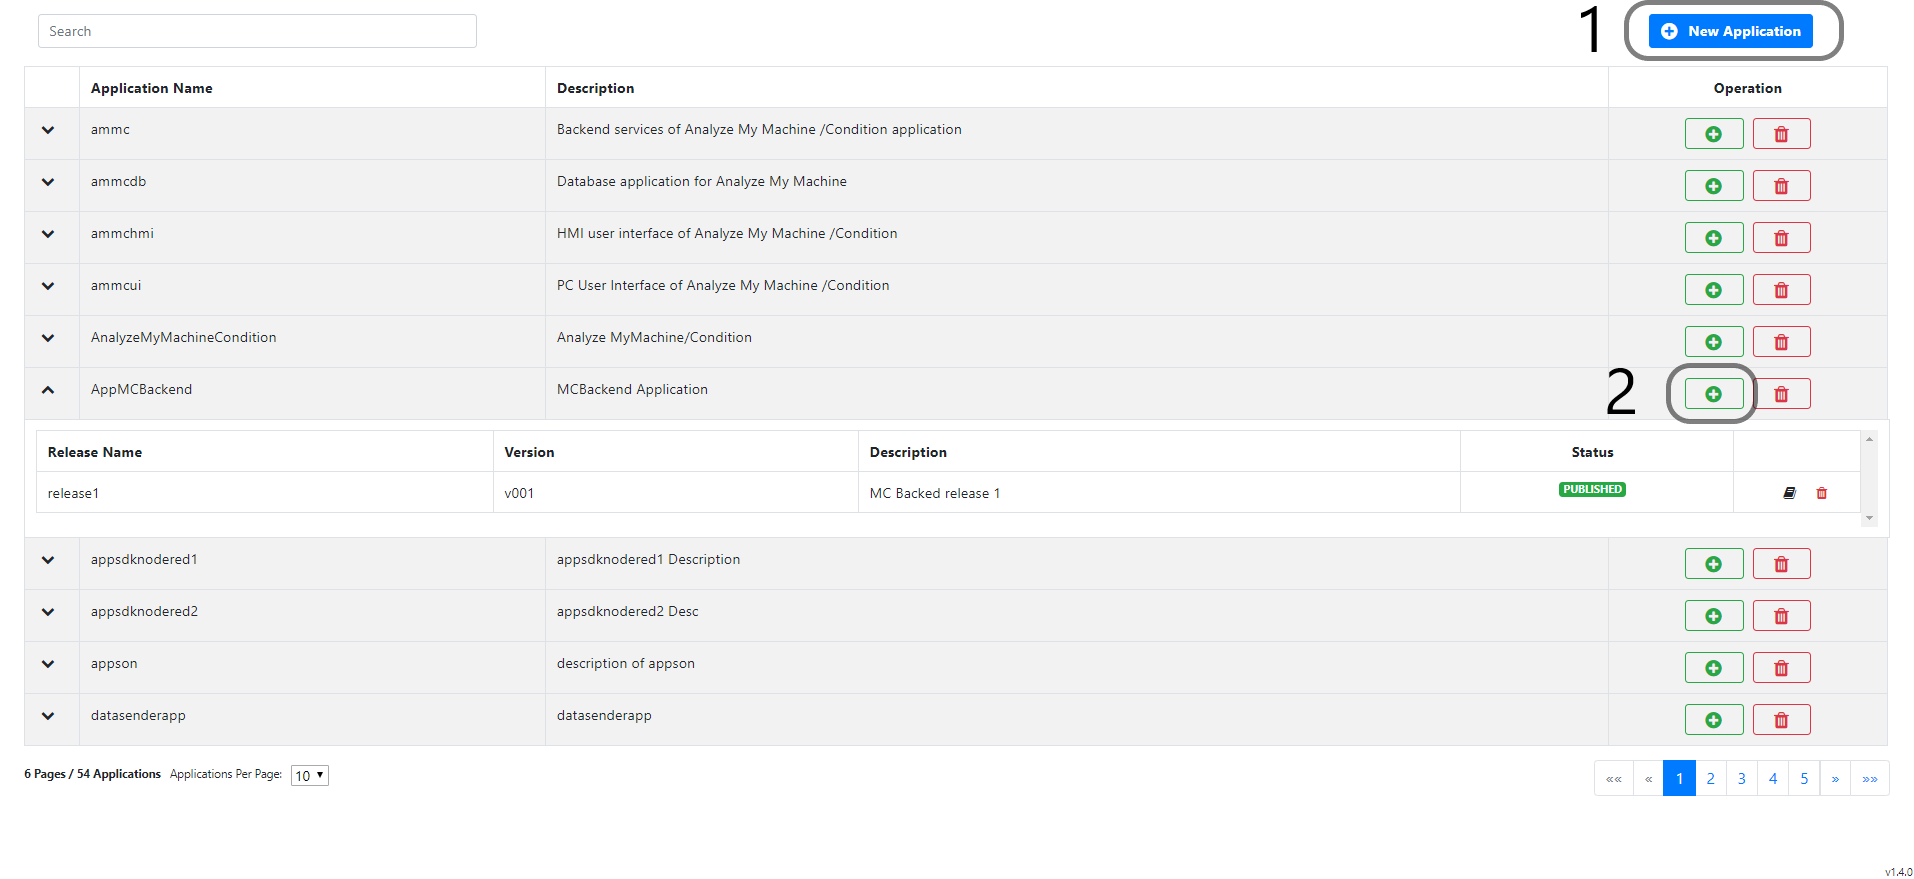
Publishing an Application and Application Release
1) Click the New Application button to publish a new application.
2) If you want to add a new application release to an existing application click the Add New Release button to publish a new release to the related application.
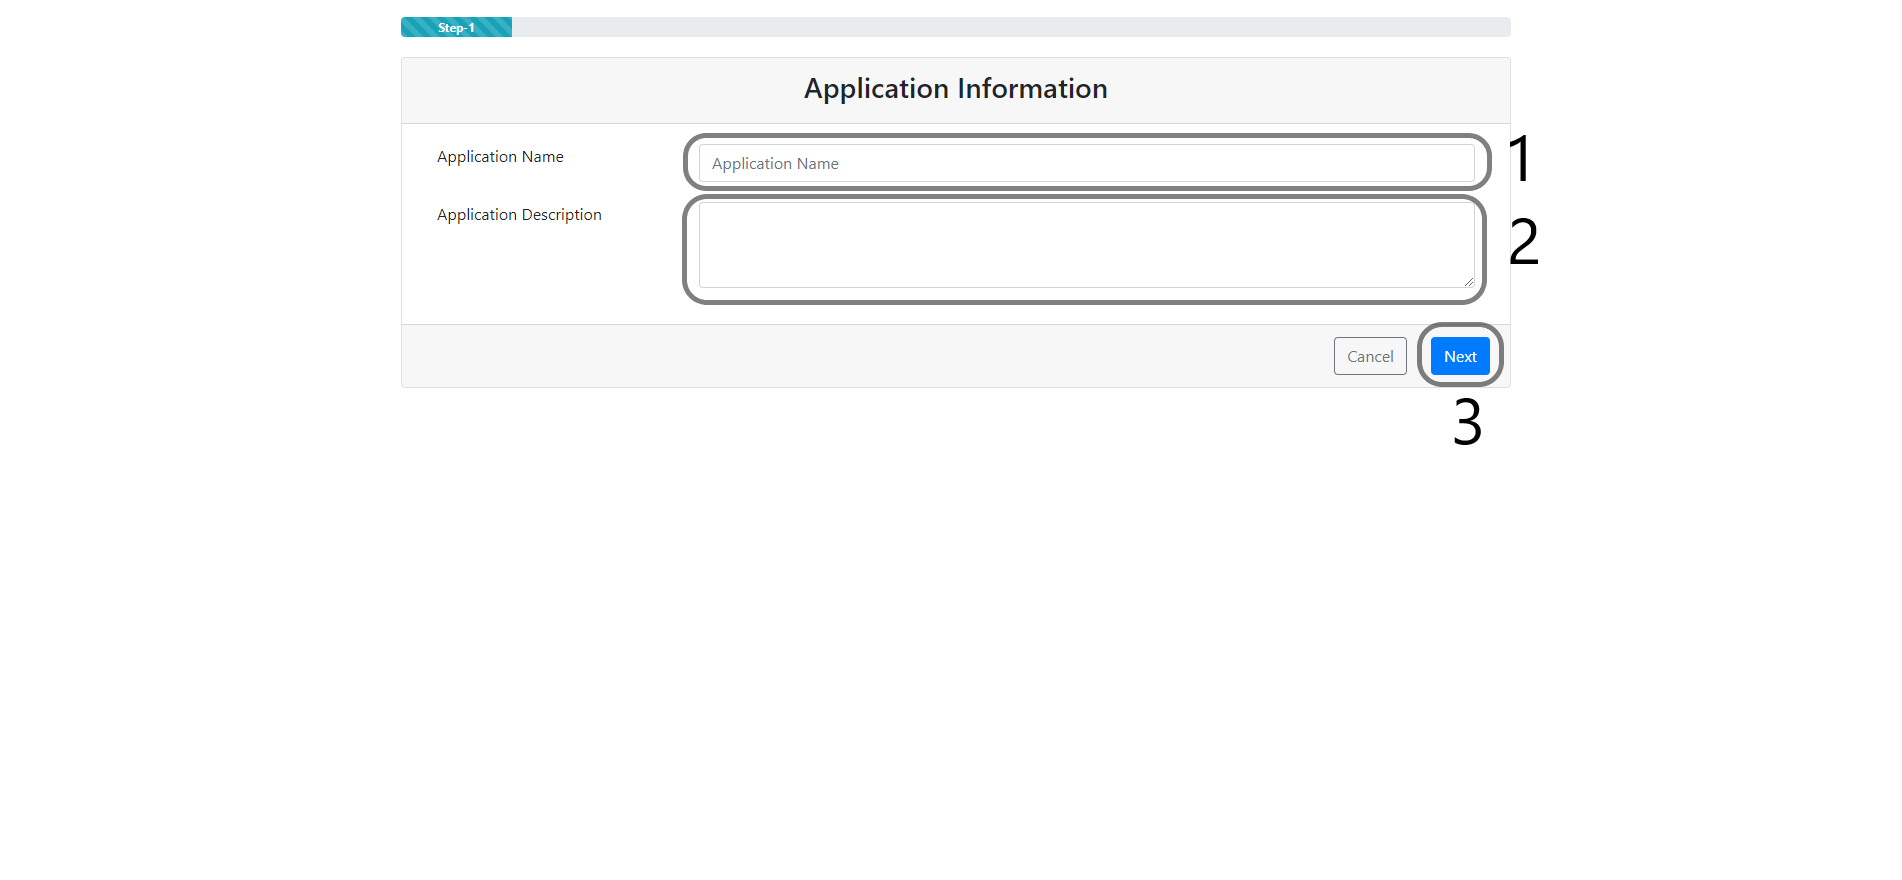
Application Information
1) Fill in the Application Name field without whitespace and special characters. Application names can not start with numbers.
2) Fill in the Application Description field.
3) Click the Next button to proceed to fill the release information step.
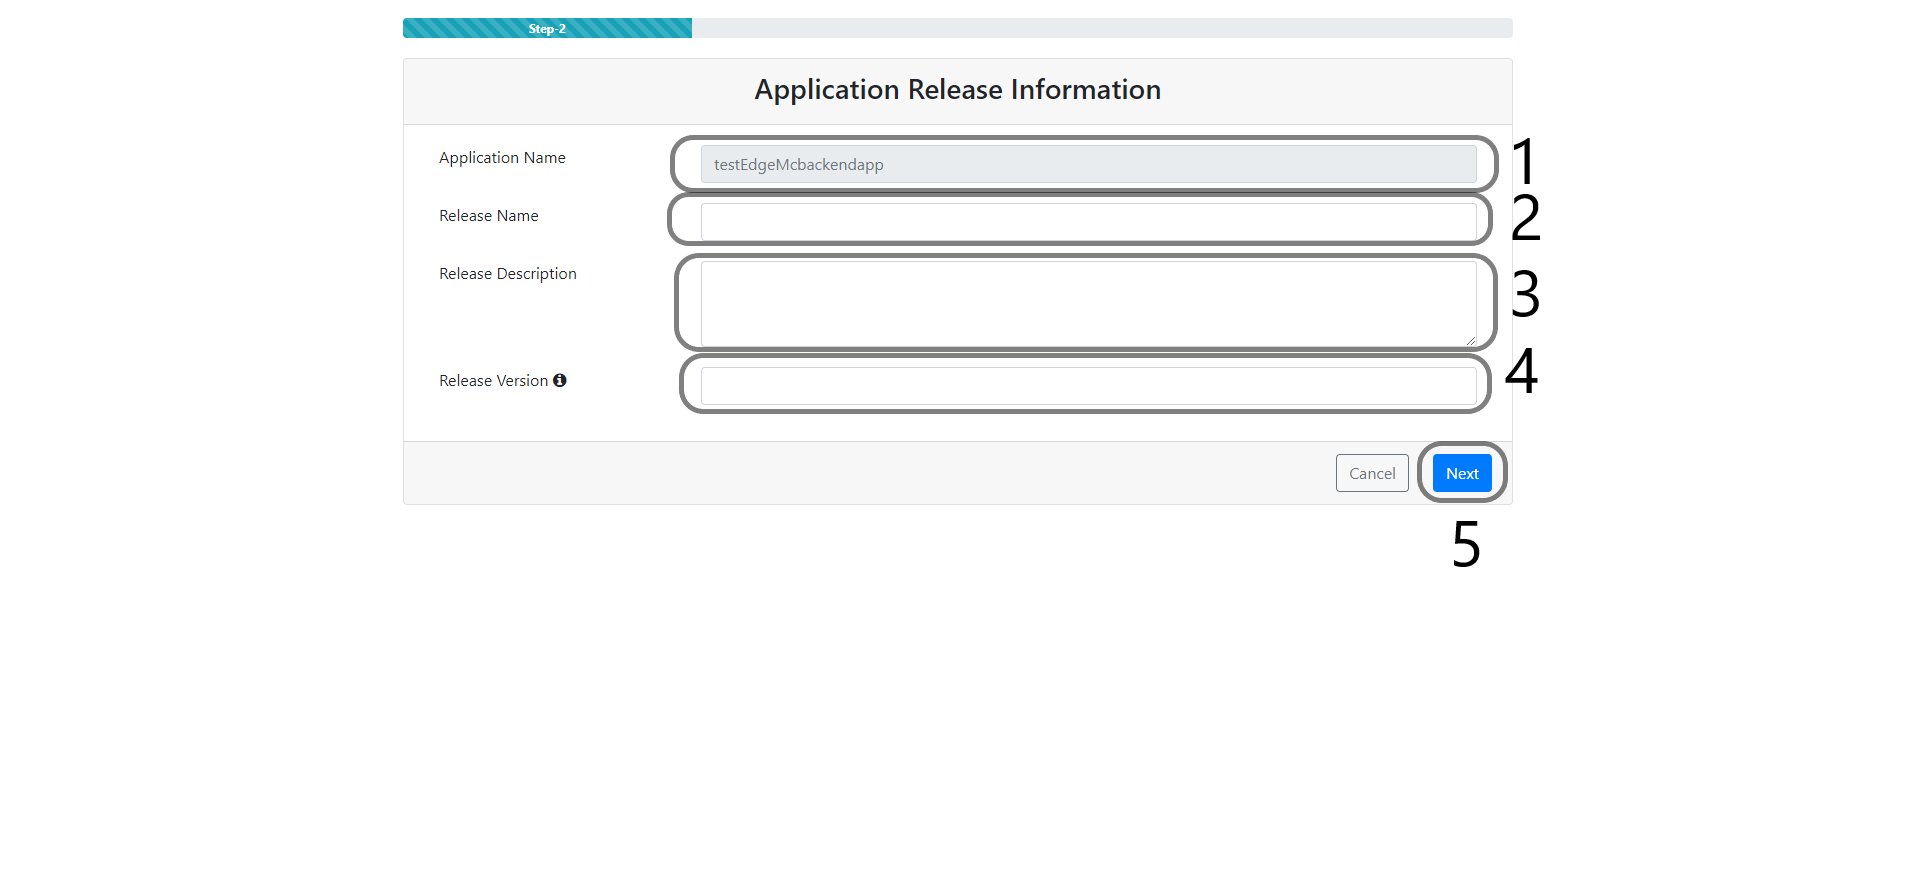
Application Release Information
1) The Application Name is filled in automatically from the previous page or the selected application name from the list
2) Fill in the Release Name field without whitespaces or special characters.
3) Fill in the Release Description field.
4) Fill in the Release Version, there is no special format but it should be unique for each version.
5) Click the Next button to proceed to upload an application bundle step.
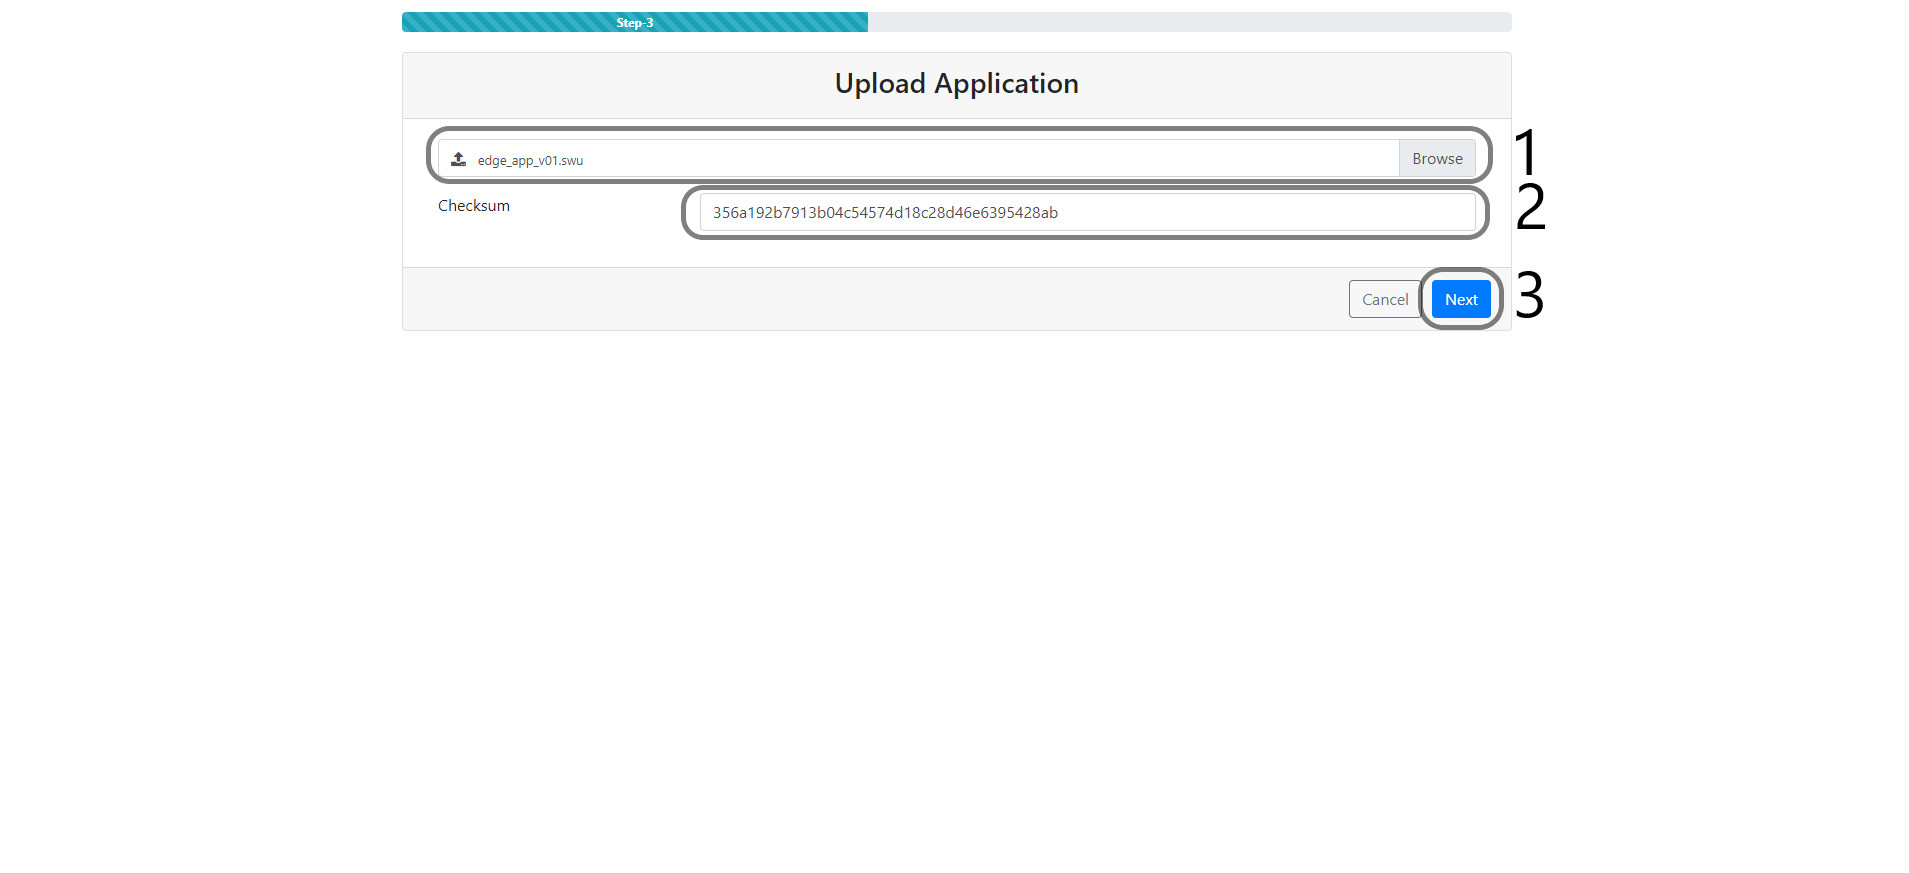
Upload Application
1) Browse the file system and select the application bundle file to upload.
2) Checksum is shown automatically and the calculation is done by system.
3) Click theNext button to proceed to create and upload the Terms and Conditions documents step. Uploading operation may take some time, you need to wait some time to continue with the next step.
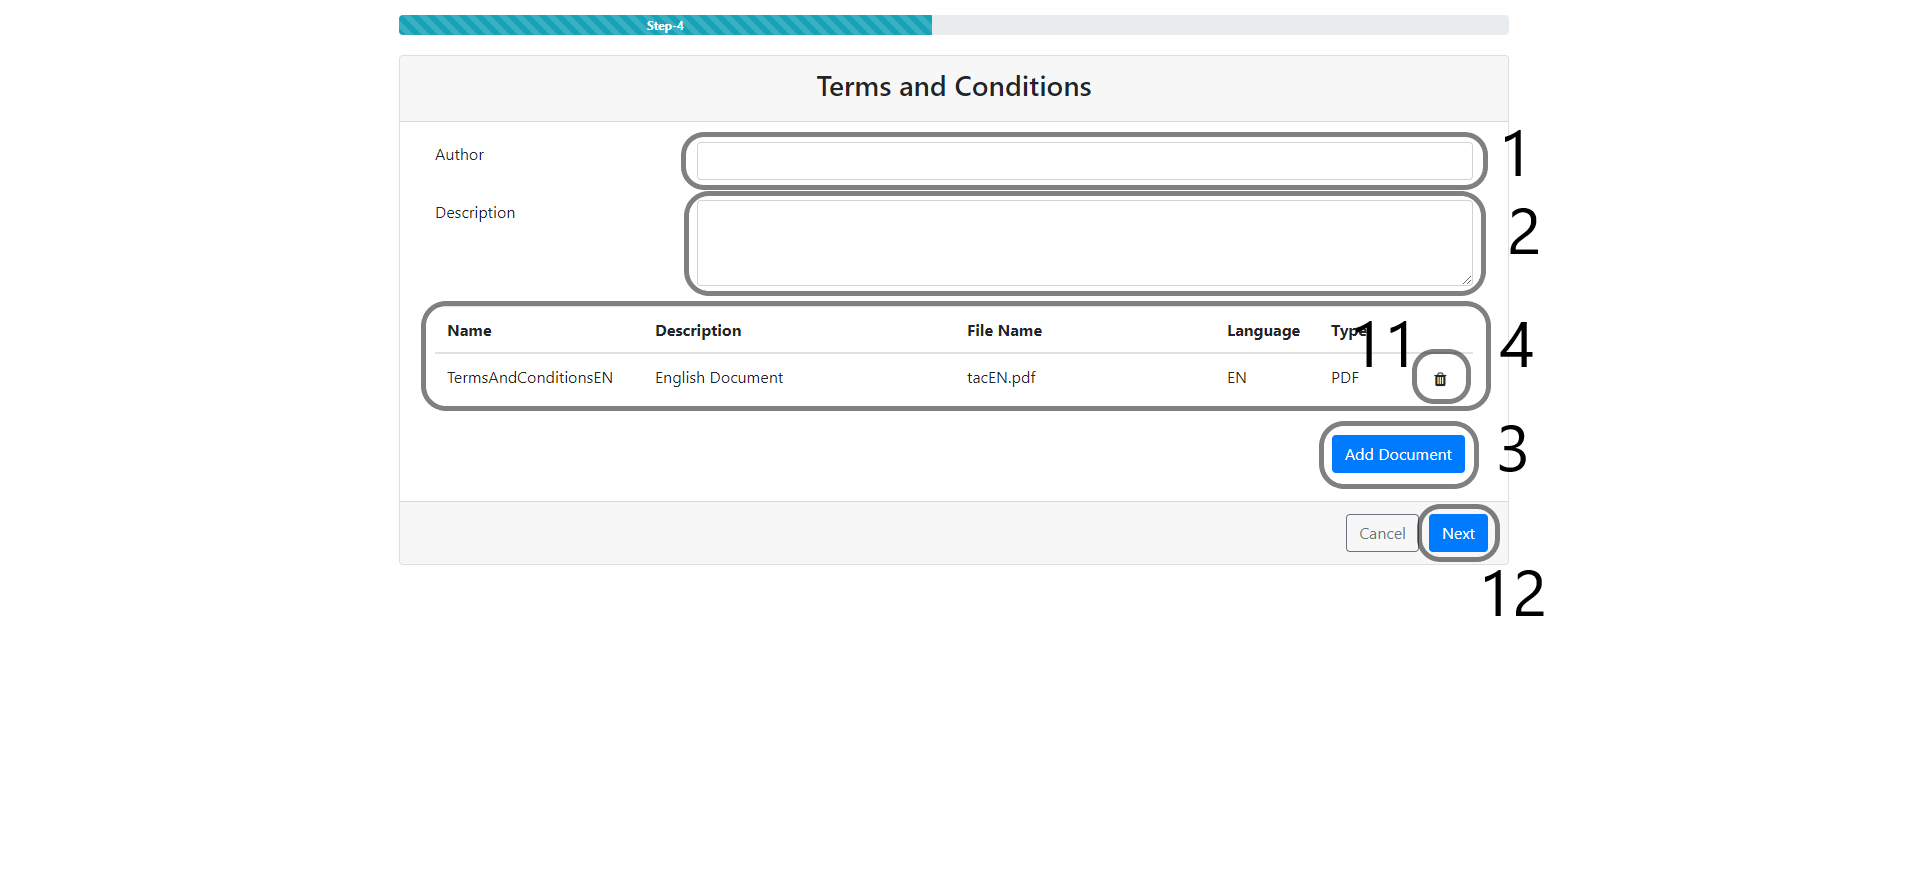
Terms and Conditions
1) Fill in the Author field for Terms and Conditions documents.
2) Fill in the Description field for Terms and Conditions documents.
3) Click the Add Document button to add the Terms and Conditions document.
4) This section lists the added documents and related information.
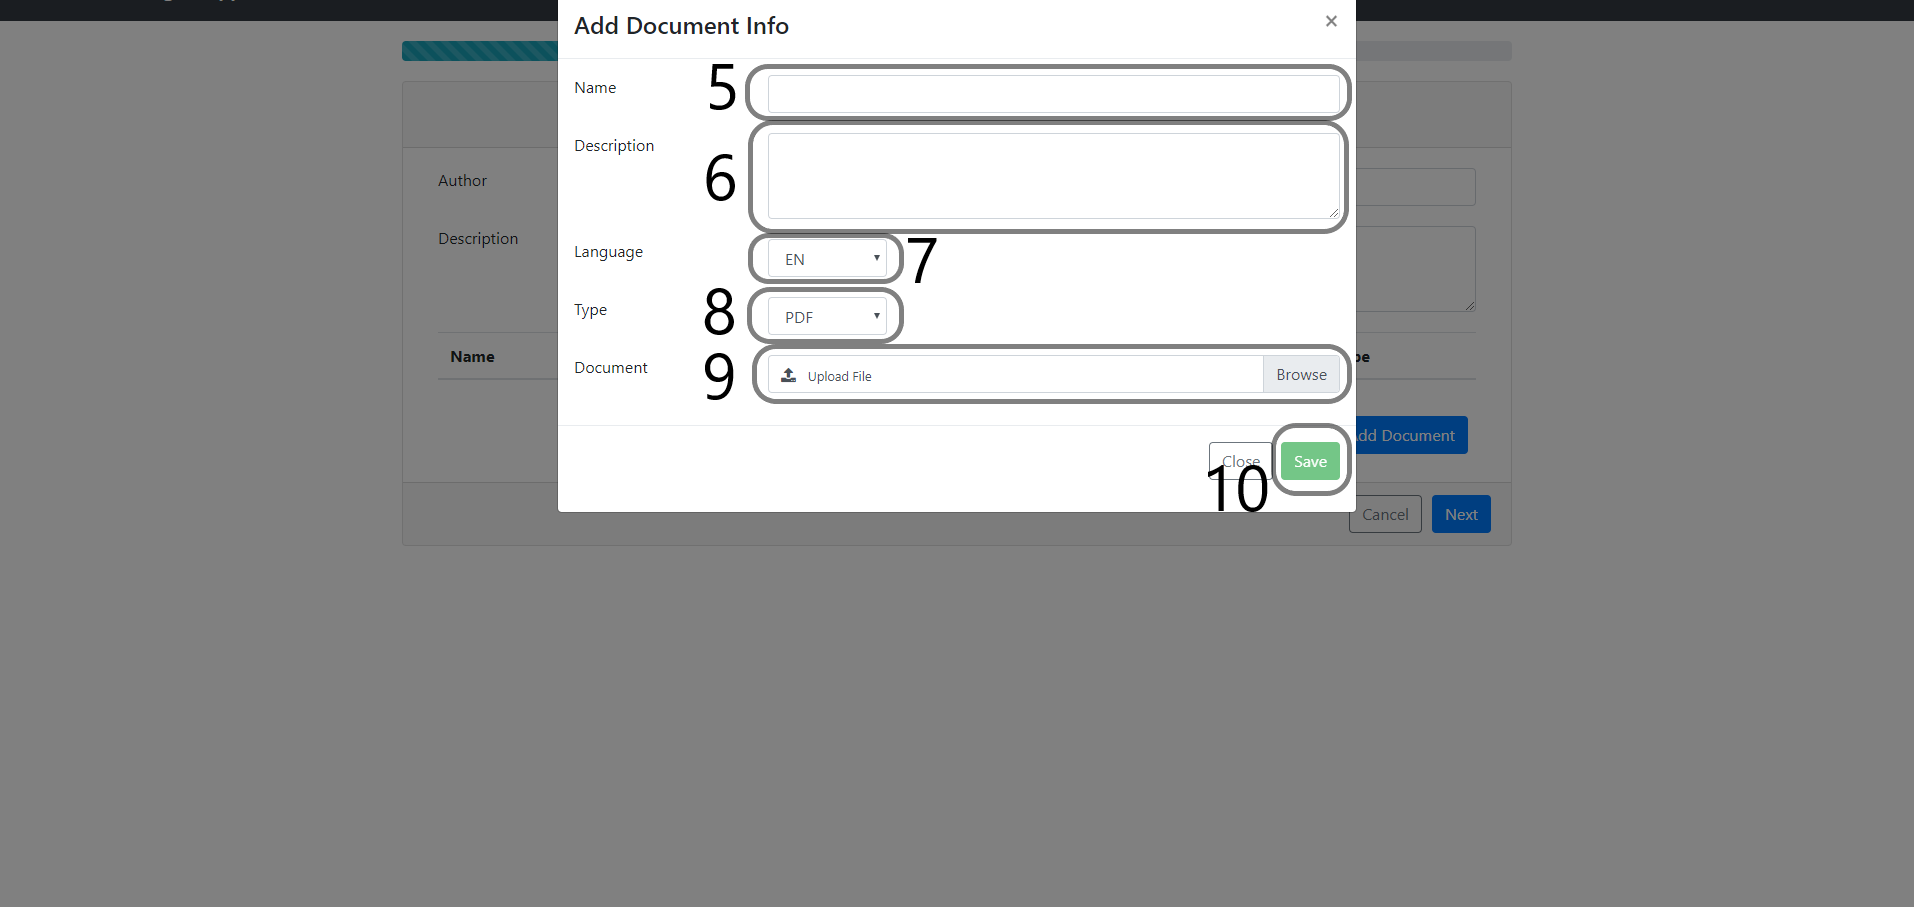
5) In the "Add Document Info" pop up, fill in the Name field for the document name.
6) In the "Add Document Info" pop up, Fill in the Description field.
7) In the "Add Document Info" pop up, select the document's language.
8) In the "Add Document Info" pop up, select the document type like PDF, txt etc.
9) In the "Add Document Info" pop up, browse the file system to upload the Terms and Conditions document.
10) In the "Add Document Info" pop up, click the Save button to add a document into bundle list.
11) Click the Thrash icon to delete an added item (optional).
12) Click the Next button to proceed to the create and upload application additional documents step.
Additional Documents
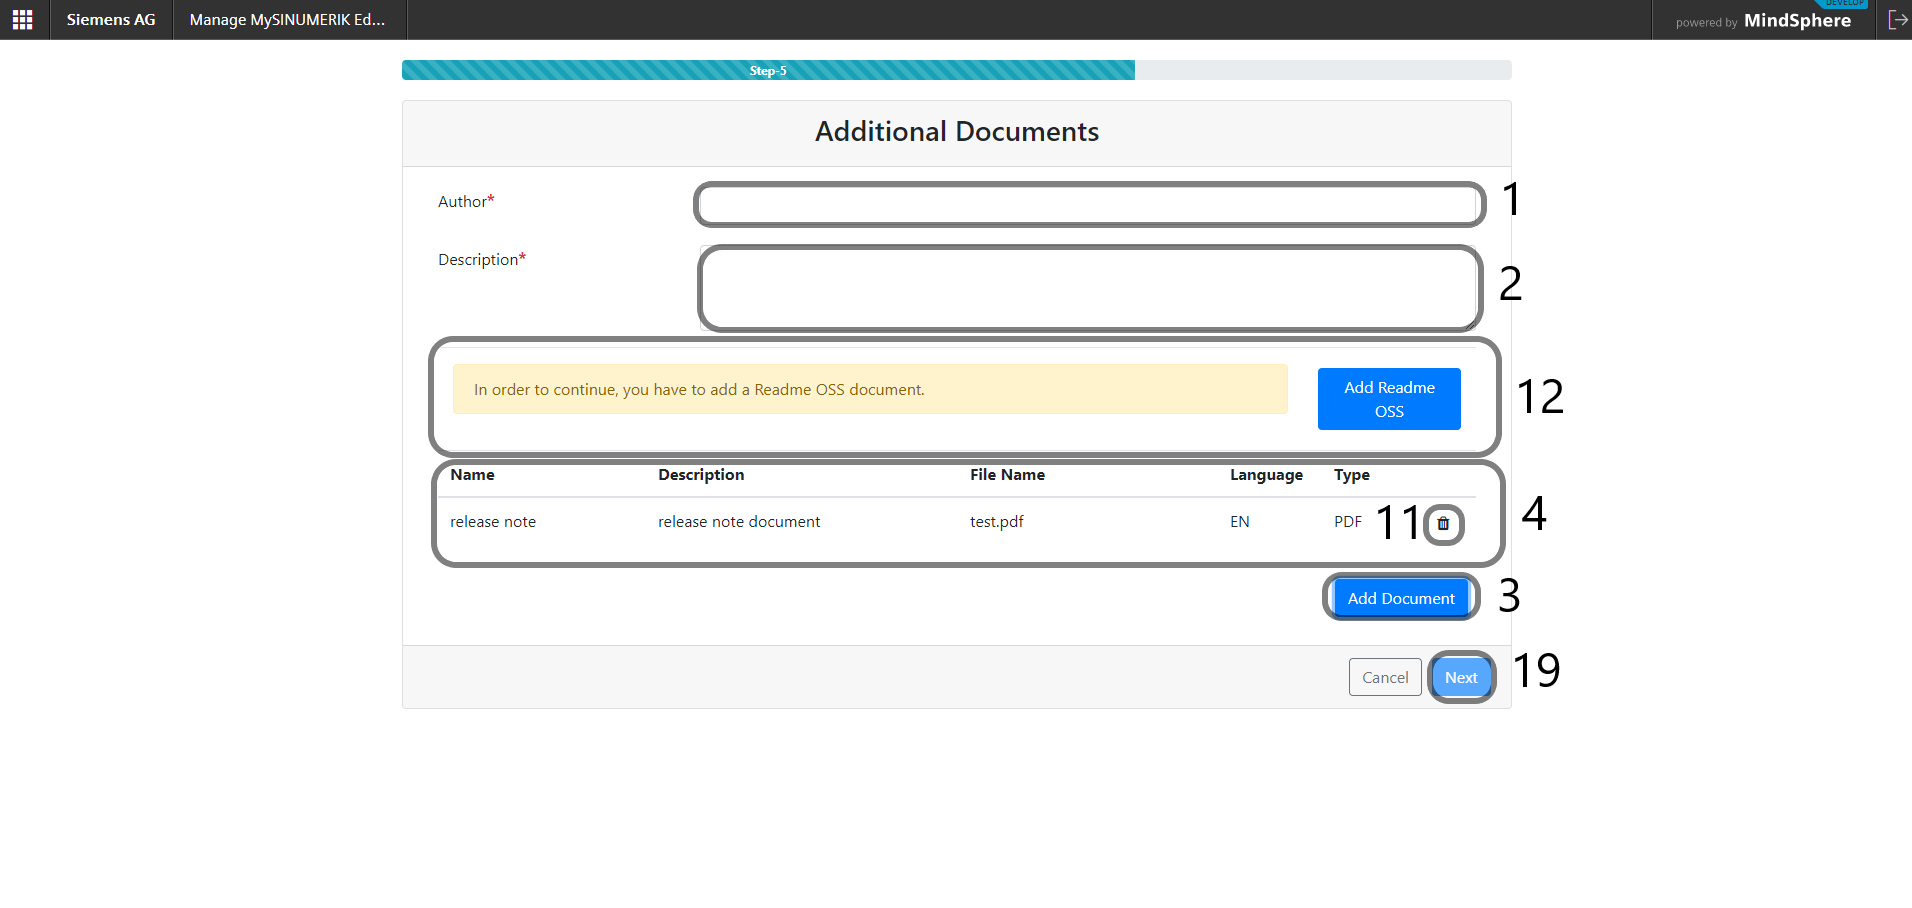
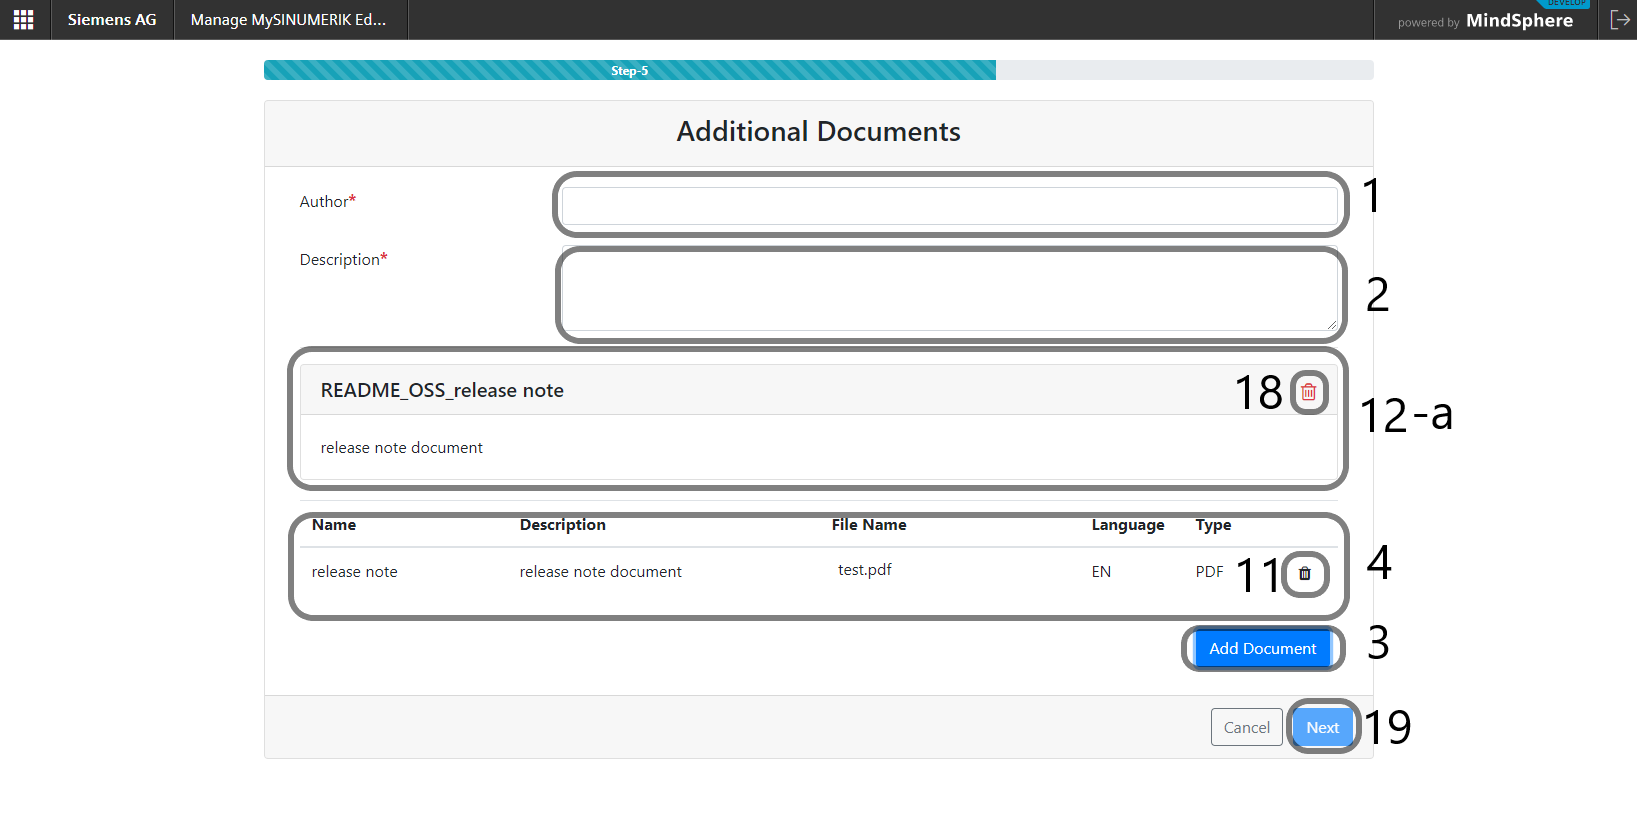
1) Fill in the Author field for the Additional Documents.
2) Fill in the Description field for the Additional Documents.
3) Click the Add Document button.
4) This section lists added documents and related information.
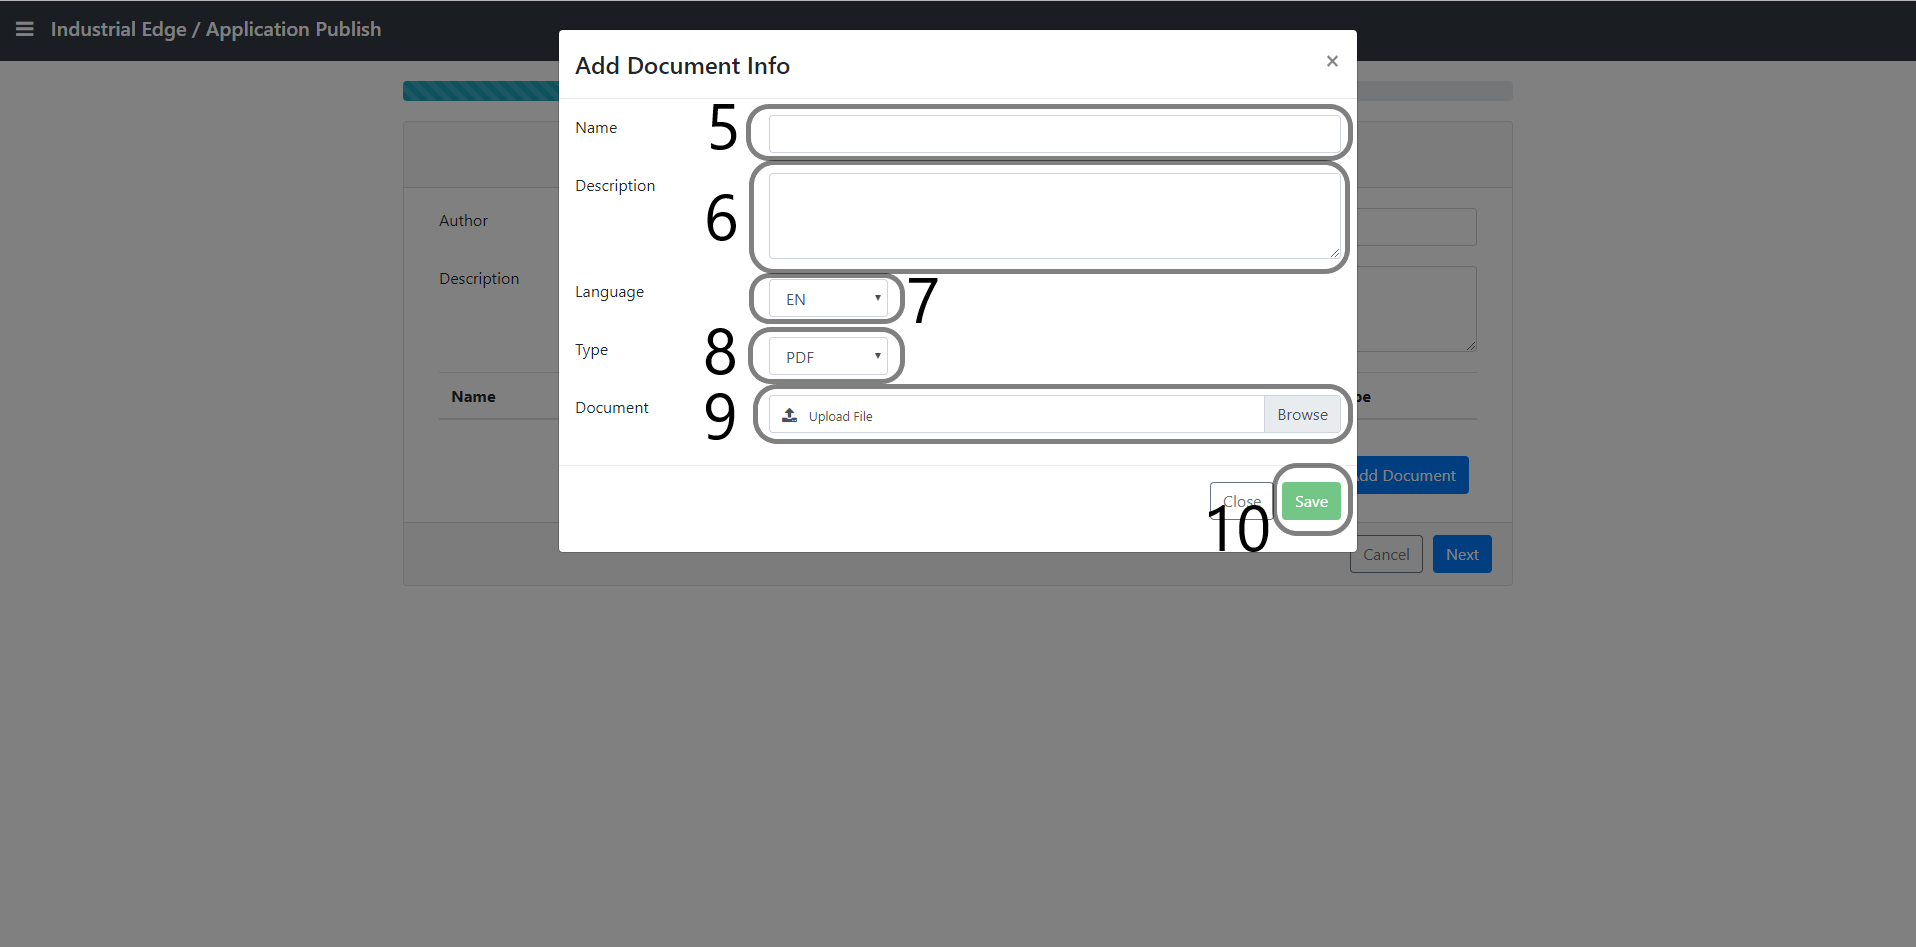
5) In the "Add Document Info" pop up, fill in the Name field for the document's name.
6) In the "Add Document Info" pop up, fill in the Description field.
7) In the "Add Document Info" pop up, select the document's language.
8) In the "Add Document Info" pop up, select the document type like PDF, txt etc.
9) In the "Add Document Info" pop up, browse the file system to upload the document.
10) In the "Add Document Info" pop up, click the Save button to add a document into bundle list.
11) Click the Thrash icon to delete an added item (optional).
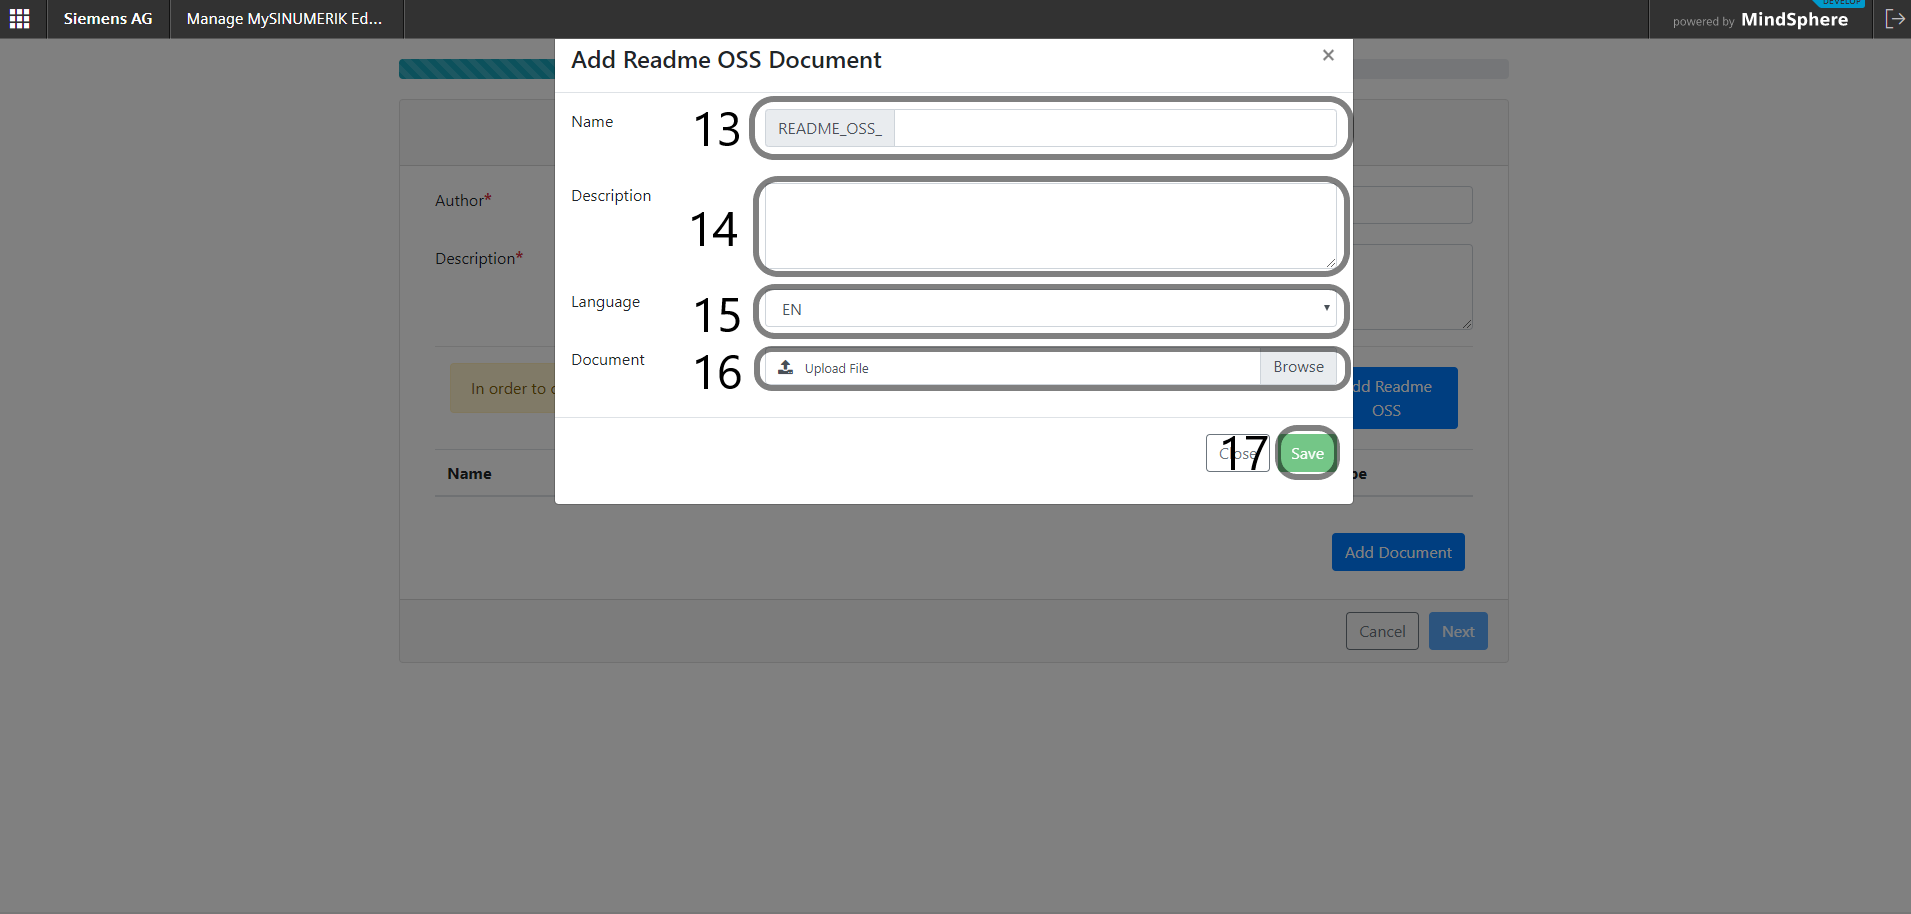
12) Click the Add Readme OSS button.
- This section lists added documents and related information.
13) In the "Add Readme OSS Document" pop up, fill in the Name field for the document's name.
14) In the "Add Readme OSS Document" pop up, fill in the Description field.
15) In the "Add Readme OSS Document" pop up, select the document's language.
16) In the "Add Readme OSS Document" pop up, browse the file system to upload the document.
17) In the "Add Readme OSS Document" pop up, click the Save button to add a document into bundle list.
18) Click the Thrash icon to delete an added item (optional).
19) Click the Next button to proceed to add the application metadata step.
Application Metadata
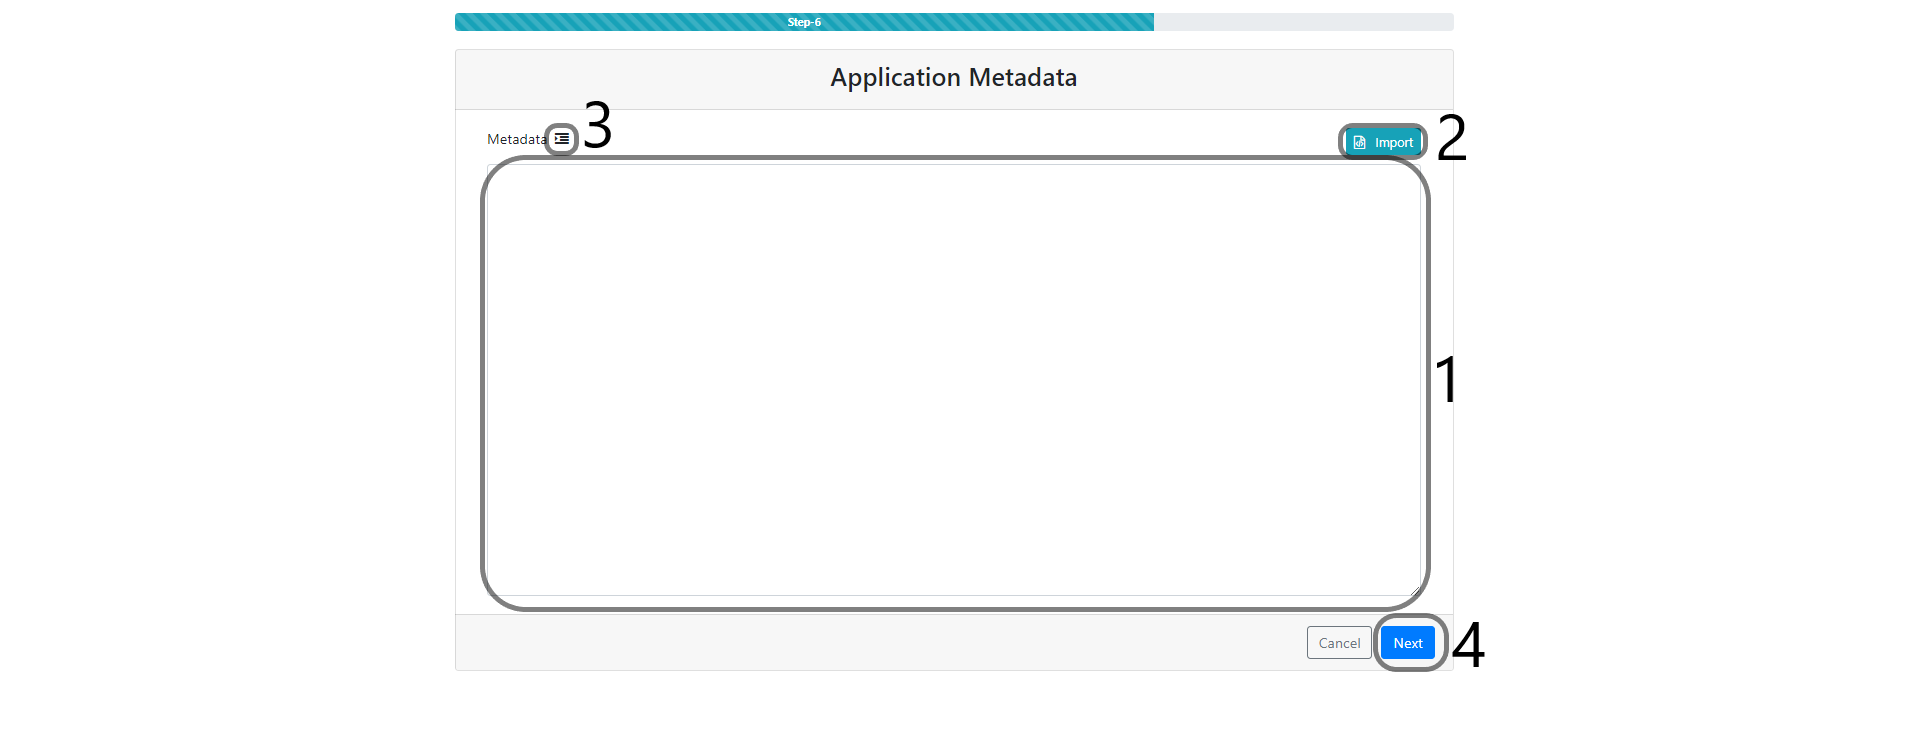
1) Insert Metadata in json format.
2) Import application metadata in json format.
3) Click the Beautify icon to check json and errors.
4) Click the Next button to see the application description summary.
- Metadata has been validated by defined schemas. If the metedata does not pass validation; it shows the required fields in alert.

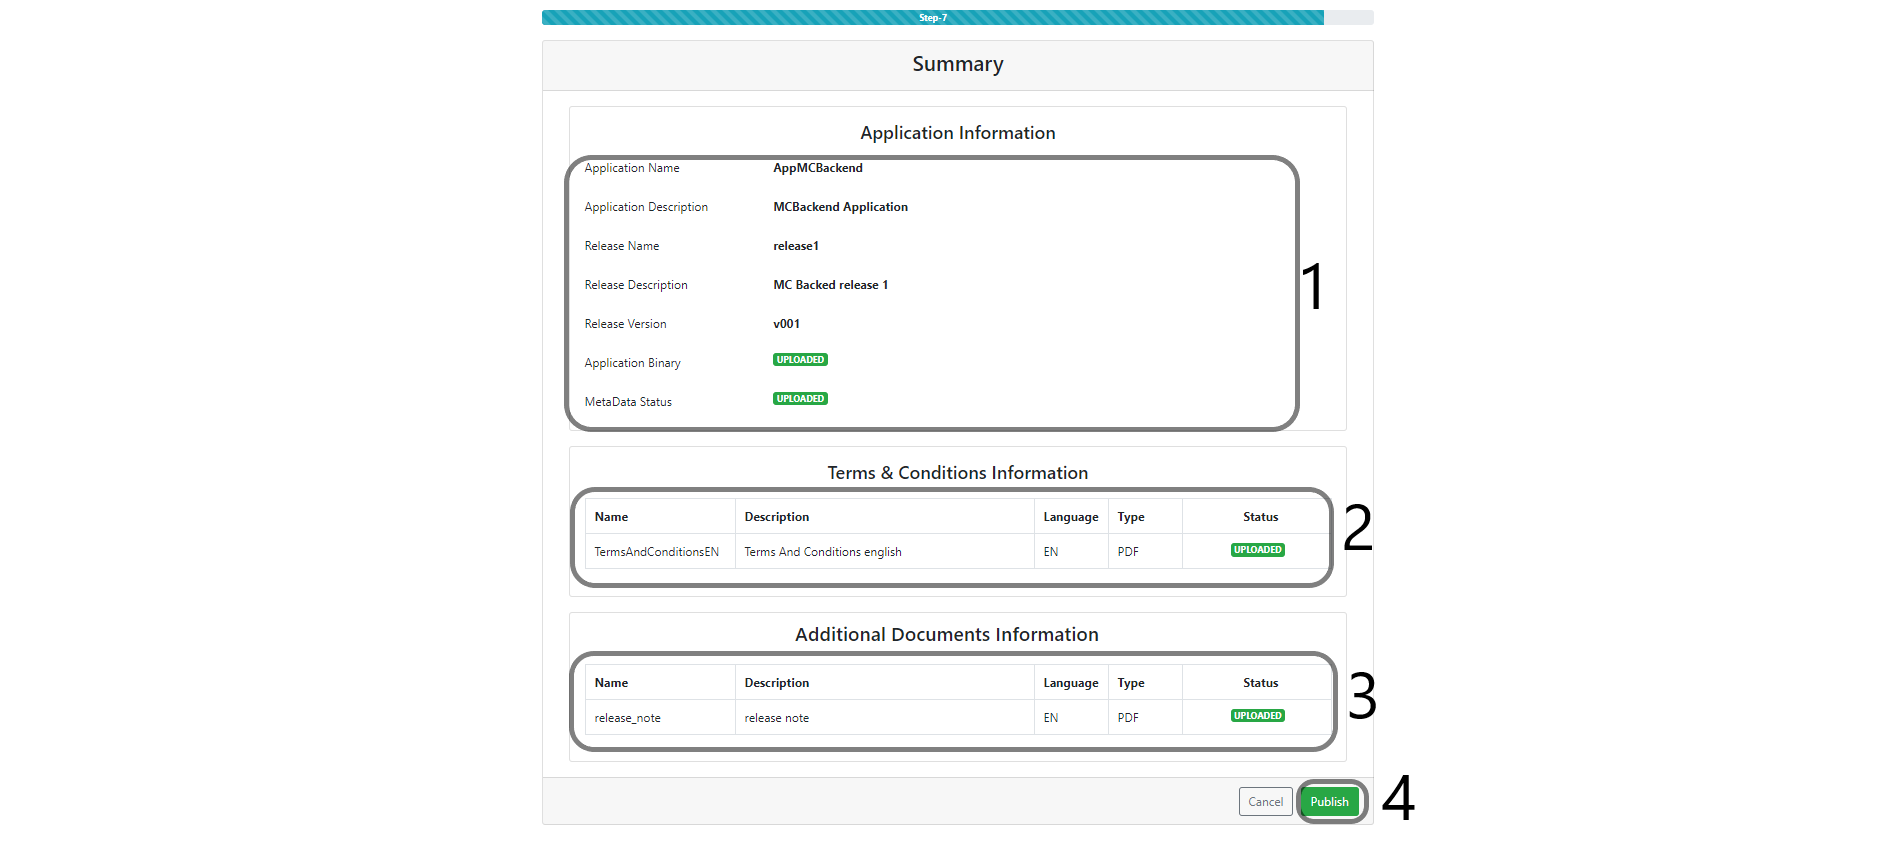
Summary
1) The application information is listed.
2) Terms and Conditions documents and upload states are listed.
3) The Additional documents and upload states are listed.
4) Click the Publish button to publish the application and it's release.
App Publishing API Documentation
App Publishing API documentation can be found in below link.
Download AppSDK packages
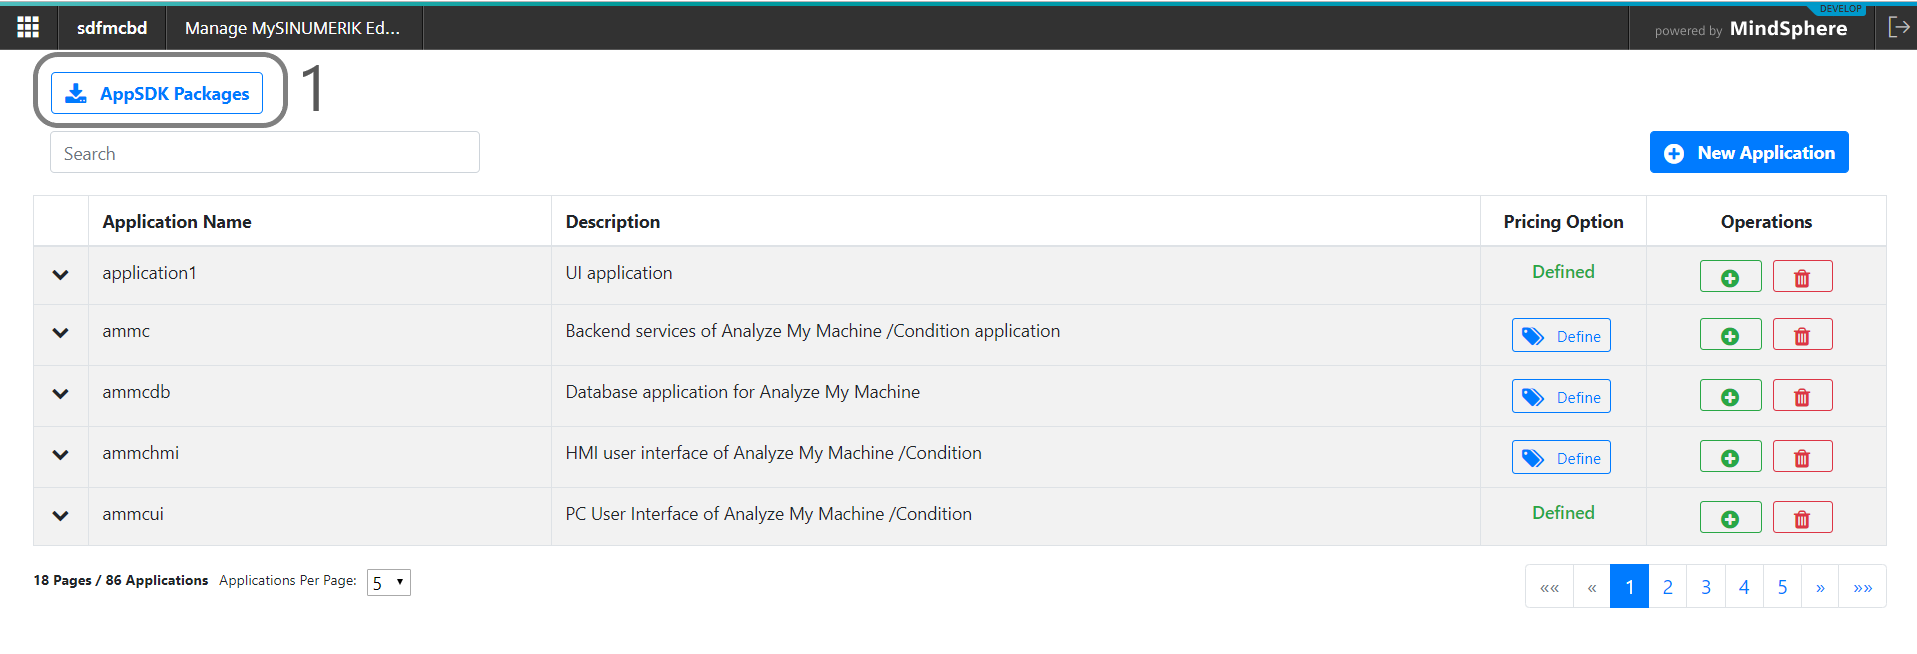
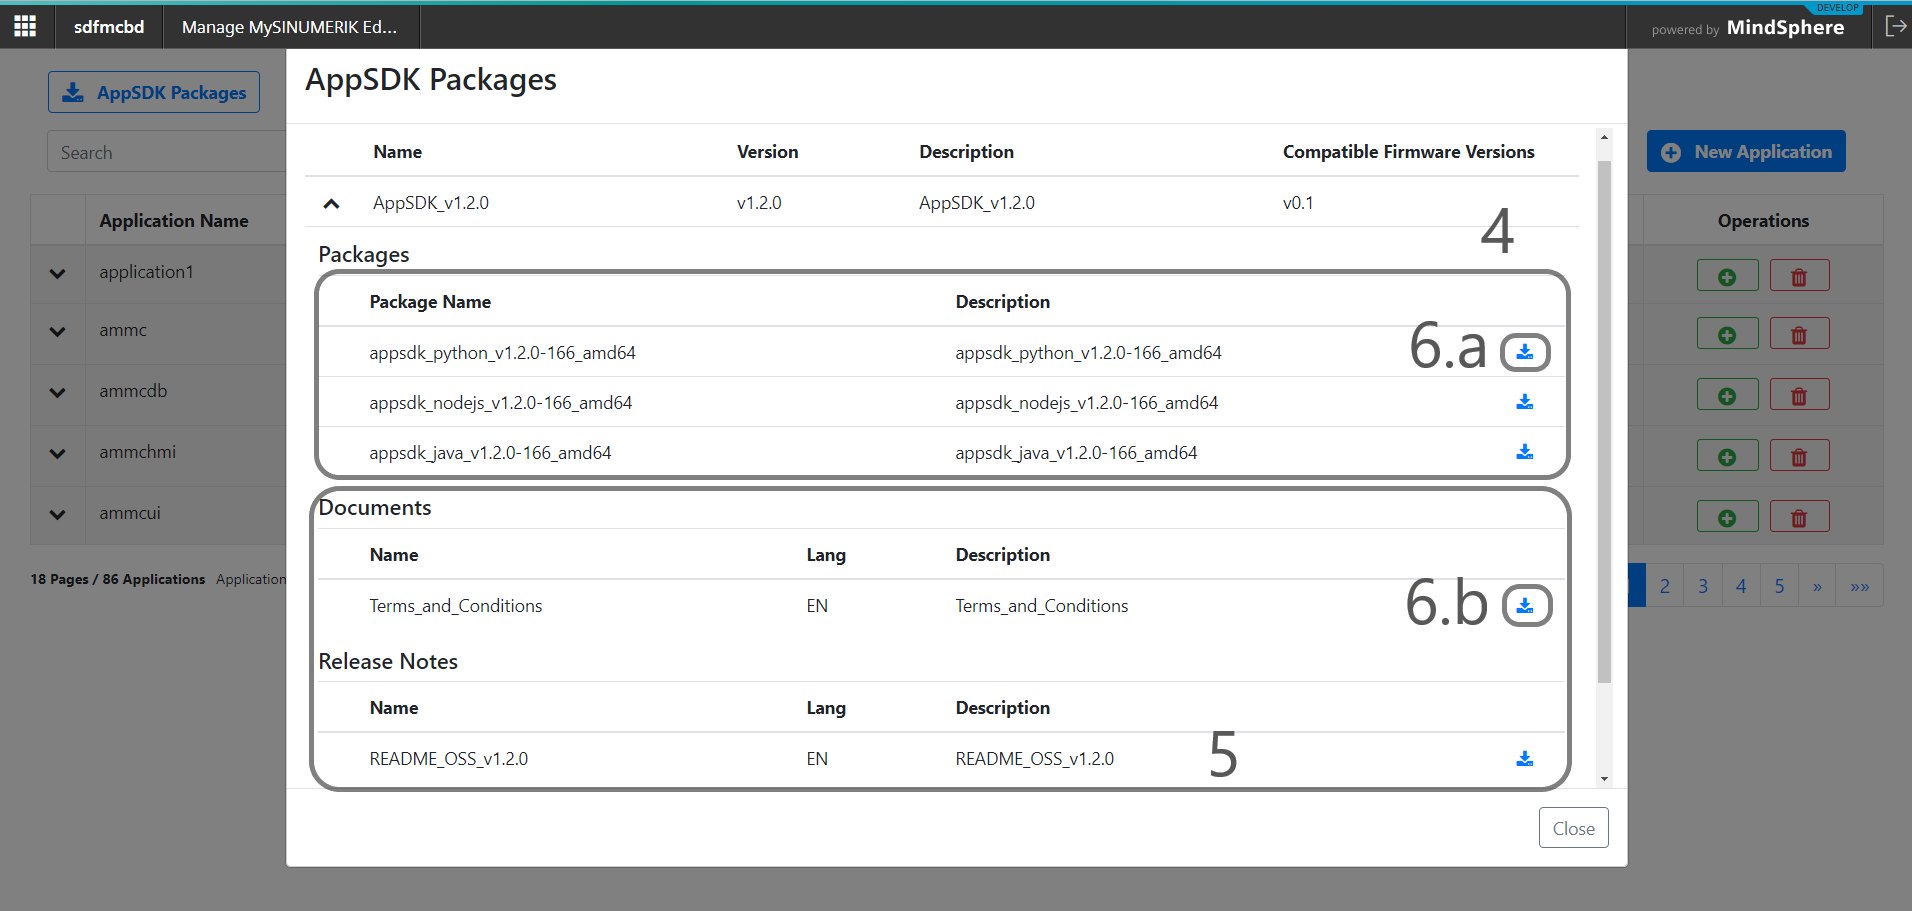
1) Click 'AppSDK Packages' button to download AppSDK packages.
2) AppSDK packages are listed.
3) When the user clicks the Expand / Collapse icon, AppSDK packages and documents for related versions will be displayed.
4) AppSDK binaries are listed.
5) Terms and Conditions / Release Notes are listed.
6) Click 'Download' icon to download:
- specific AppSDK packages in local.
- specific AppSDK packages's documents in local.
Dockerfile
You should create a Dockerfile that will do following steps.
- Insert your commands to handle the installation of Dependencies using the package manager.
- Insert your commands for copying your application to a created container.
- Insert your commands for running your application.
For more info regarding creating Dockerfiles use following reference:
Sample Dockerfile for python application
FROM debian:buster-slim

RUN apt-get update && apt-get install -y -f apt-transport-https

#AppSDK python version dependencies
RUN apt-get install python3 -y

RUN mkdir -p /opt/App/EdgeAPI
COPY Sample.py /opt/App/
COPY EdgeAPI /opt/App/EdgeAPI

WORKDIR /opt/App

CMD python3 Sample.py
Diagnose Application on SINUMERIK Edge
To diagnose your application running on SINUMERIK Edge you need to check logs on Insights Hub. Please go to link to see how to check logs on Insights Hub.
You can also ensure that your application is started successfully by checking Insights Hub log files with SINUMERIK Edge date and time. You should expect to see log message starting with "Started Containerized service
Return Codes Of AppSDK
High Frequency Return Codes
Returns Status Enum.
| Status | Description |
|---|---|
| Status_OK | operation is successful |
| Status_FAIL | operation is failed |
| Status_ERROR | fatal internal error occurred |
| Status_CREATED | consumer or producer is created successfully |
| Status_REGISTERED | consumer or producer is registered |
| Status_DEREGISTERED | consumer or producer is deregistered |
| Status_WARNING | non-fatal internal error occurred |
| Status_DATABUS_DISCONNECTED | databus is disconnected |
Data Source Access Return Codes
Returns ErrorObject Object. This object contains below status codes.
| Code (Hex) | Code (Dec) | Meaning | Explanation |
|---|---|---|---|
| 0x0 | 0 | Success | Operation is successful. |
| 0x1 | 1 | Undefined error | Undefined error occurred. |
| 0x2 | 2 | Permission denied | You do not have the permission for the requested function. |
| 0X3 | 3 | Function or value not supported | A non existent function is called or function called with wrong parameters |
| 0x400 | 1024 | Initialization error | An initialization problem occurred in the AdapterFramework |
| 0x401 | 1025 | Function not implemented error | The AdapterFramework publishes a function definition, but this is not implemented yet |
| 0x402 | 1026 | Device not registered error | The requested datasource is not known by the AdapterFramework, so no communication can be initiated with the requested datasource by the client app. |
| 0x403 | 1027 | Service not implemented error | The requested service is not supported by the requested datasource instance. |
| 0x404 | 1028 | Function parameter error | A value of a parameter in json payload is out of range or a parameter is of the wrong datatype. |
| 0x405 | 1029 | Communication error | The datasource is known by the AdapterFramework but it can not communicate with it. Network error occurred or the datasource is down. |
| 0x406 | 1030 | Routing error | Request is blocked by firewall. Check the configuration. |
Parameter Service Return Codes
Returns ErrorObject Object. Detailed information regarding status codes can be found link below.
Parameter Service Return Codes
Edge API Return Codes
Returns EdgeStatus Object. This object contains below status codes.
| Status | Description |
|---|---|
| EDGE_SUCCESS | operation is success |
| EDGE_ERROR | operation is failed |
| EDGE_FAILURE | internal error while performing operation |
Any questions left?
Except where otherwise noted, content on this site is licensed under the The Siemens Inner Source License - 1.1.