Manage MySINUMERIK Edge Insights Hub Applications
Overview Insights Hub Overall

For further details about Insights Hub please refer to the pages listed below:
Industrial Edge Backend Applications
Required roles need to be assigned to the user account to continue using the Industrial Edge backend applications.
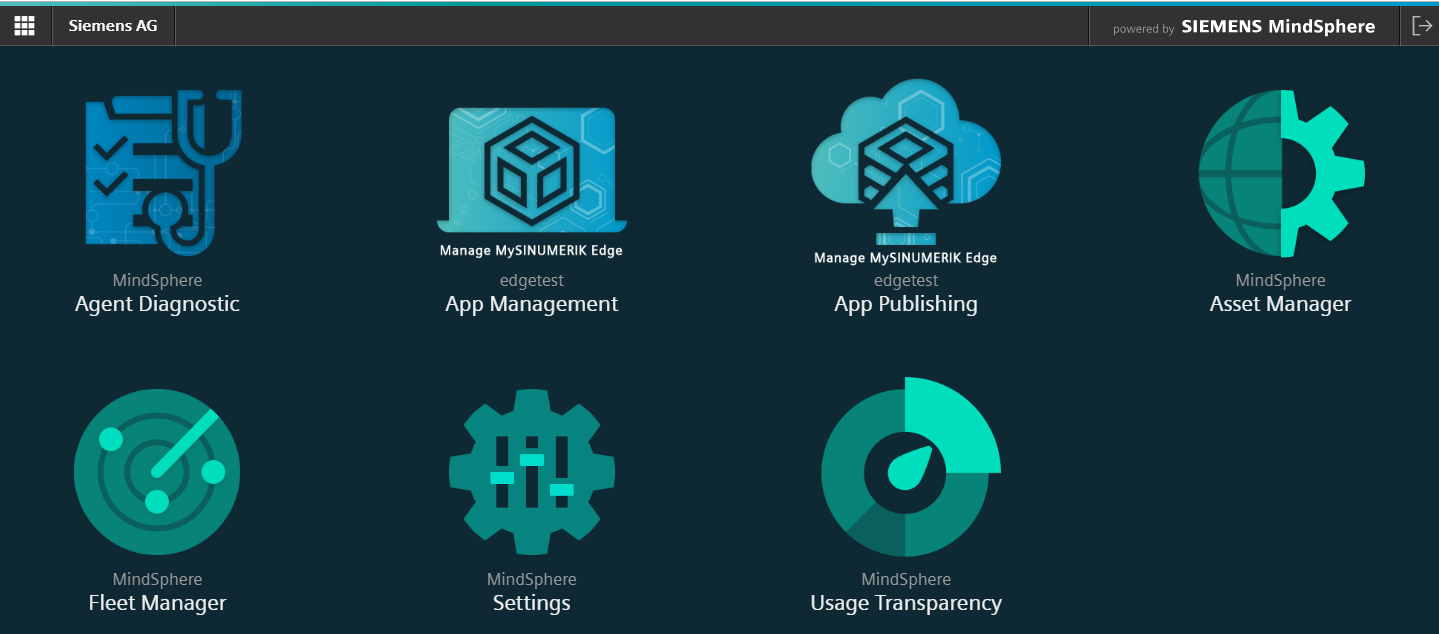
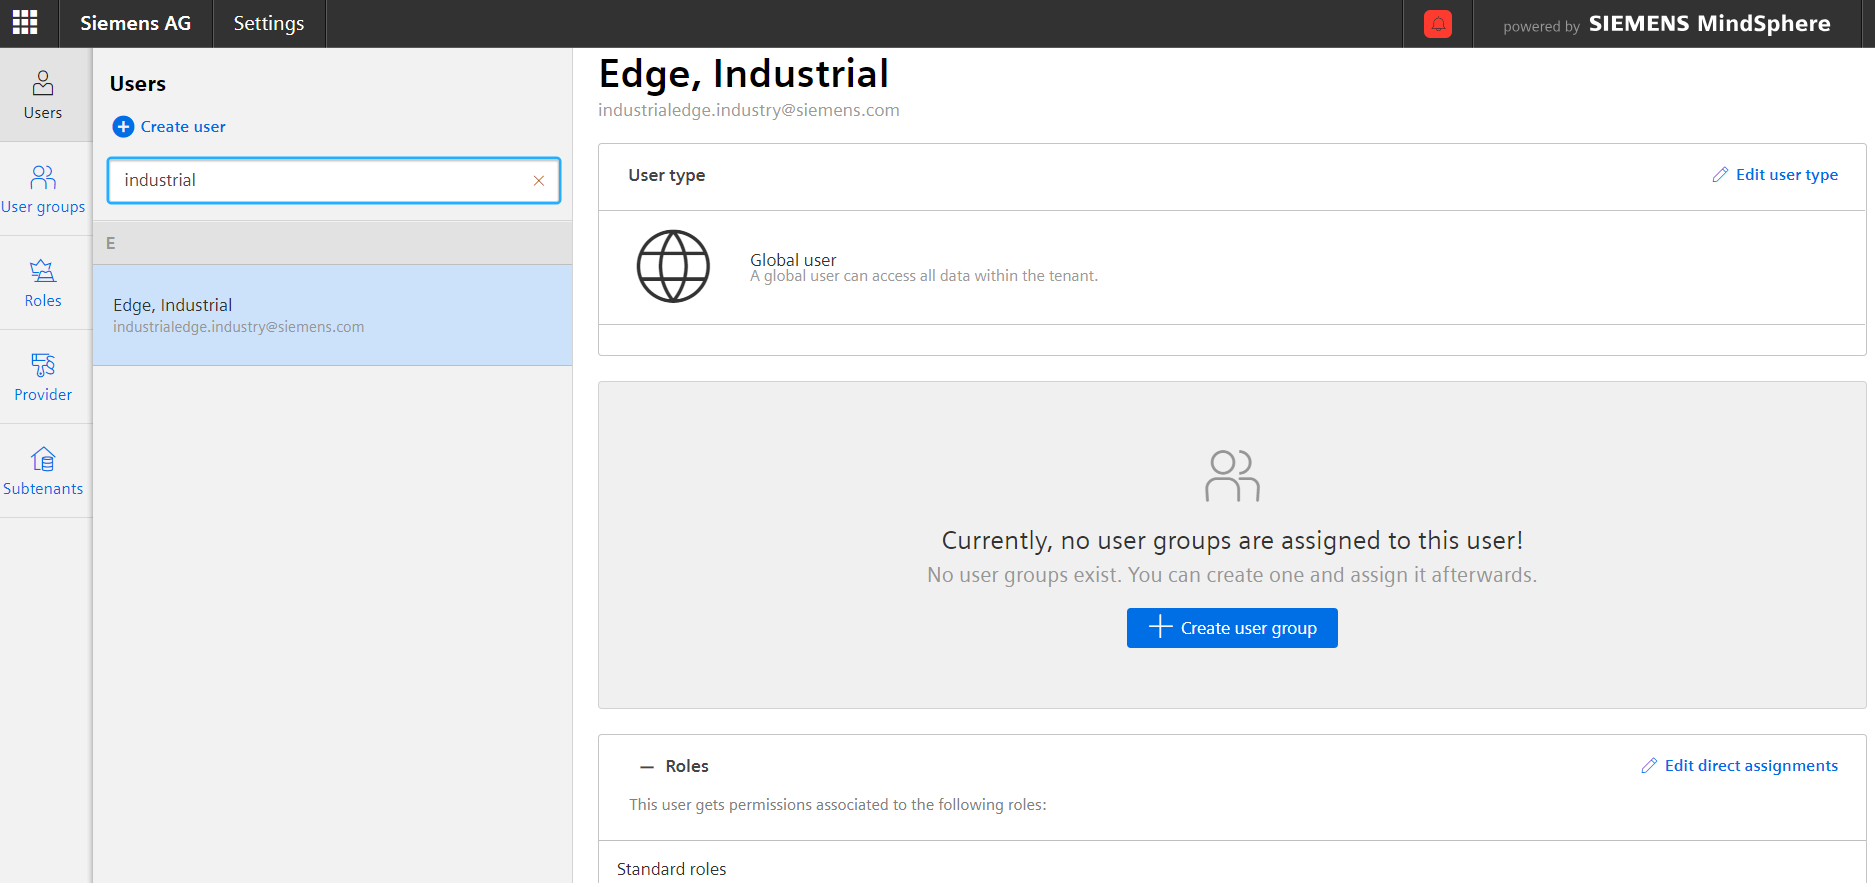
1) Login to Insights Hub with your credentials. Then from the Insights Hub Launchpad choose Settings.
Note: As a prerequisite, to create new asset , the AssetManager (mdsp:core:assetmanager.admin) role should be assigned to your user. Tenant admin(s) of each IoT tenant can enable this role for their tenants by following the steps below:
- Login to the IoT tenant with a tenant admin account, Open Settings from Insights Hub Launch Pad
- Select Roles and open the Configurations Menu
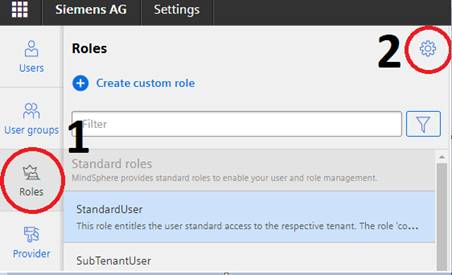
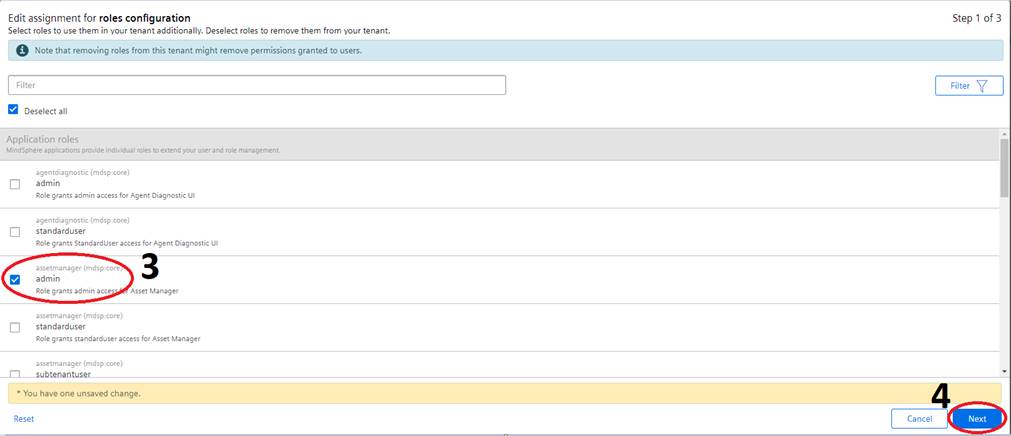
- Enable “assetmanager-admin” role, Click “Next” button and then click “Save” Button.
2) Search for the account name from the left search bar under Users and click Edit direct assignments.
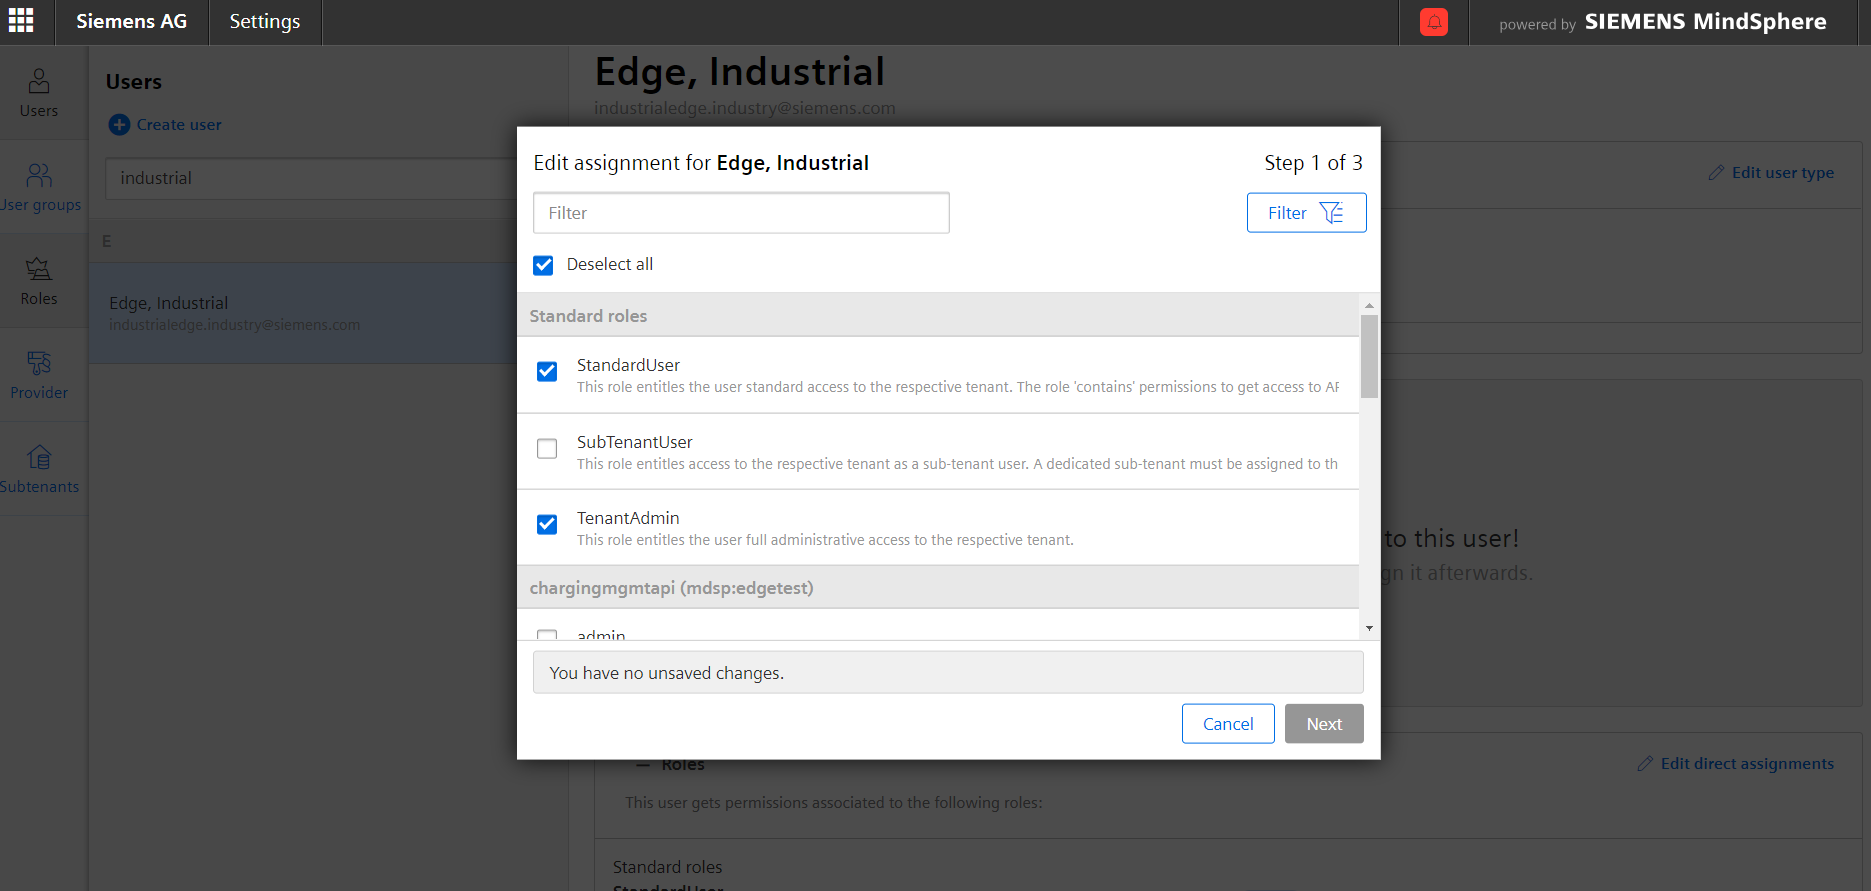
3) Edit assignment window helps to select required roles for applications to be used. Additional to "StandardUser" role, all user and admin roles listed under the related application name should be selected. For instance, the application related roles for an application are likely to be: * mdsp.[OPERATOR_TENANT_NAME].[APPLICATION_NAME].user and * mdsp.[OPERATOR_TENANT_NAME].[APPLICATION_NAME].admin.
4) To use the Manage MySINUMERIK Edge /App Management and Manage MySINUMERIK Edge /App Publishing applications, the roles listed below should be assigned respectively for each application in the Edit role assignment window:
Roles for Manage MySINUMERIK Edge /App Management:
- mdsp:edgetest:edgeappmgmt.user
- mdsp:edgetest:edgeappmgmt.admin
Roles for Manage MySINUMERIK Edge /App Publishing:
- mdsp:edgetest:edgeapppublish.user
- mdsp:edgetest:edgeapppublish.admin
Additionally, to enable and use Industrial Edge plugin of Asset Manager, below roles should be assigned in same window:
Roles for Asset Manager Industrial Edge plugin:
- mdsp:edgetest:edgeassetconfig.user
- mdsp:edgetest:edgeassetconfig.admin
- mdsp:core:assetmanager.admin

5) Click Close and log-out. After the first log-in, the related applications will be ready to use in the Insights Hub Launchpad.
Onboarding
Create and Onboard Industrial Edge Asset
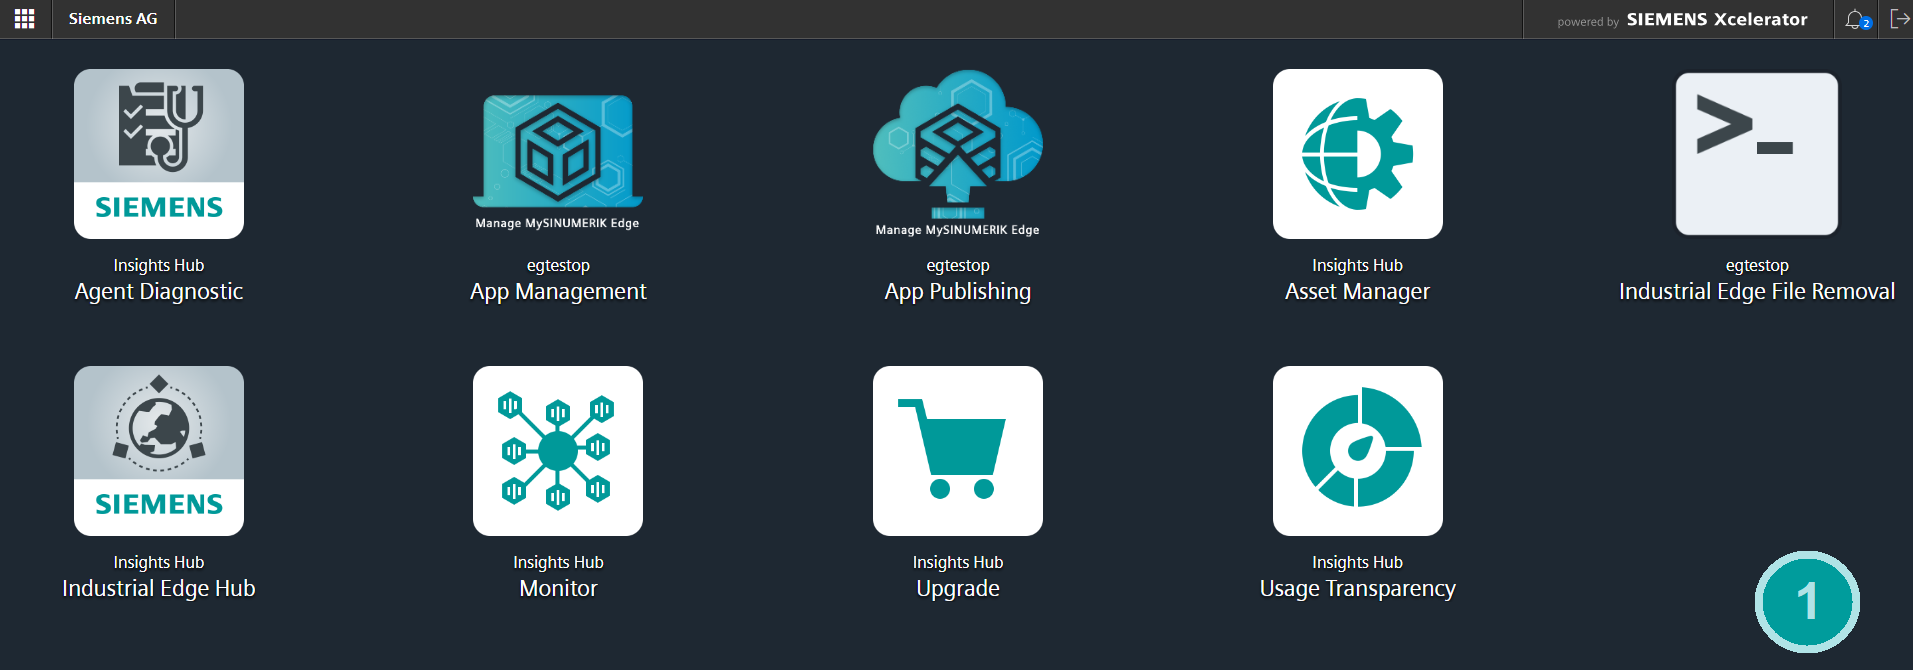
1) Login to Insights Hub with your credentials. Then choose Asset Manager from the Insights Hub Launchpad.
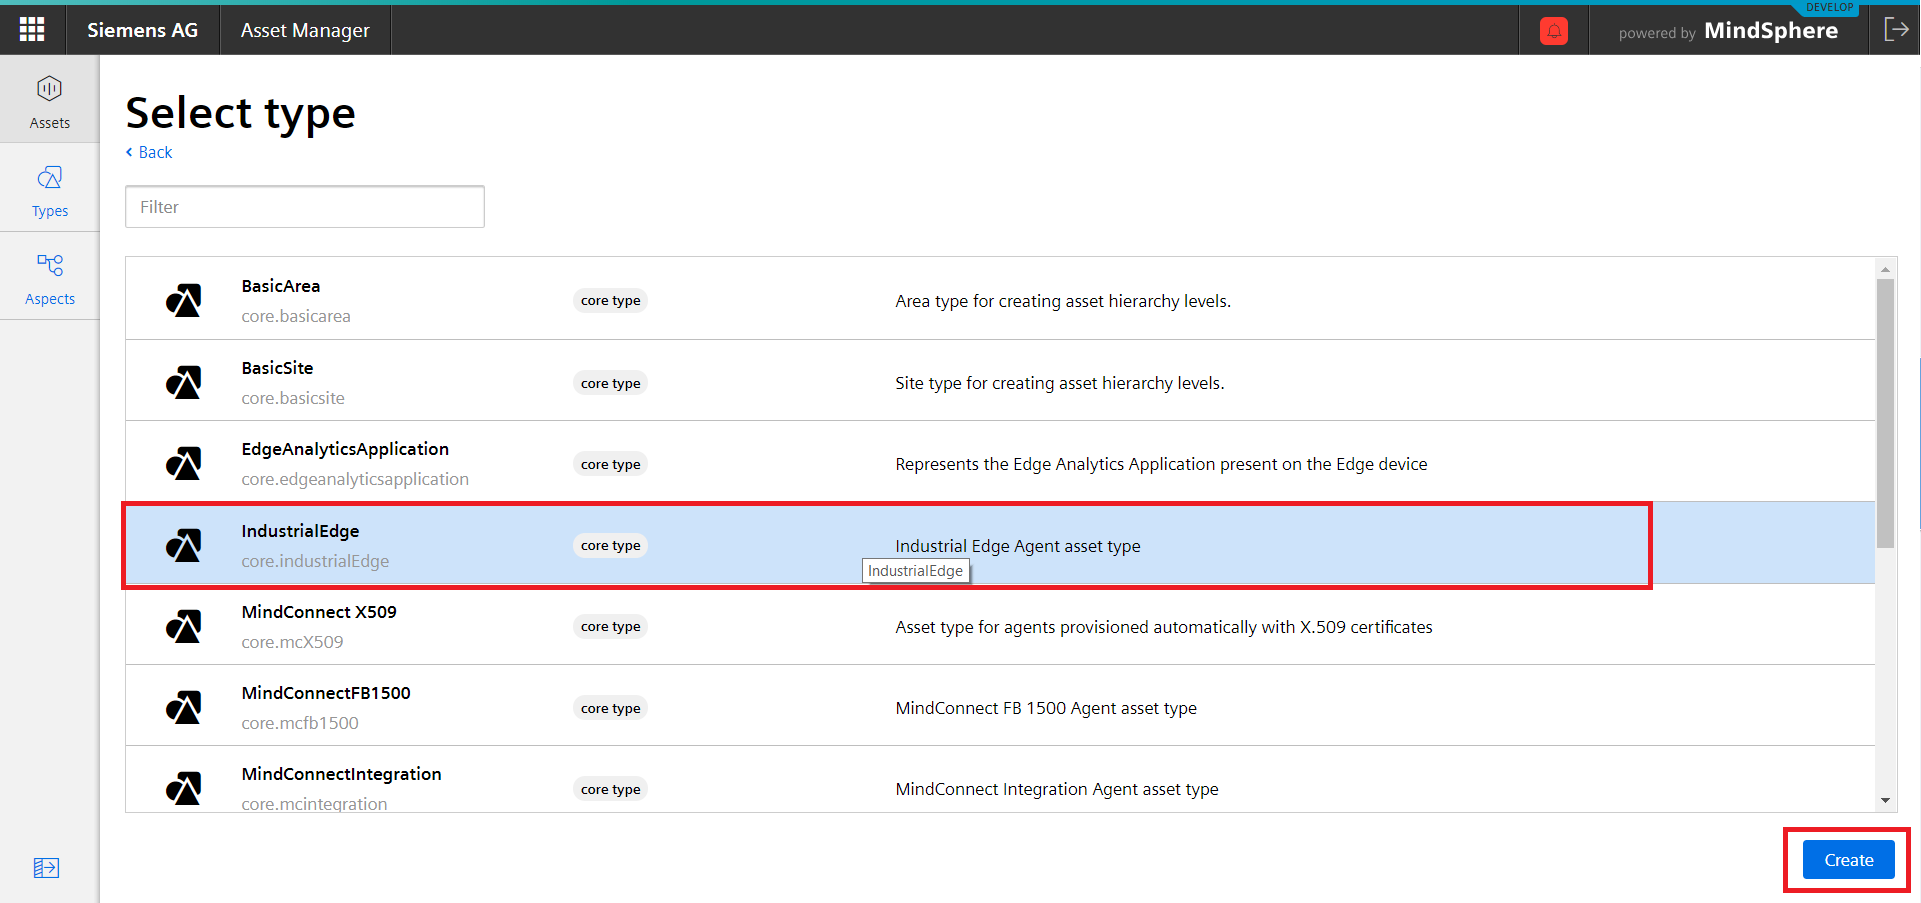
2) Click the “+” icon to create a new asset.
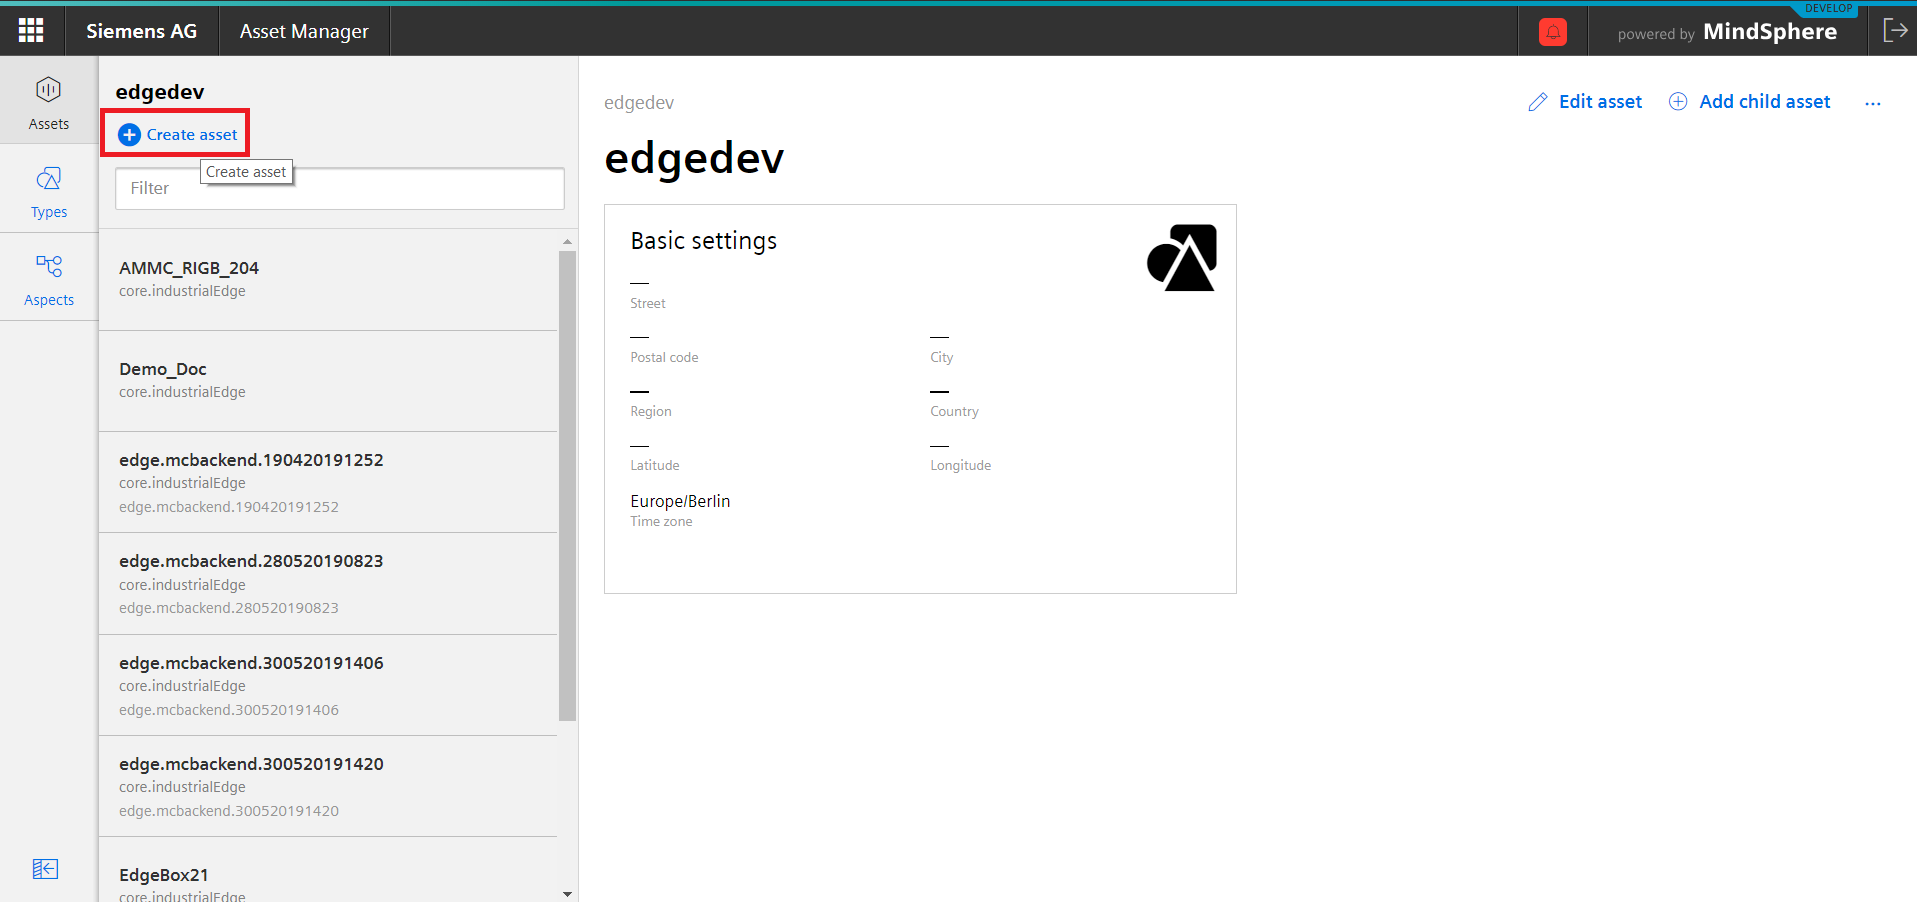
3) Select Industrial Edge as type.
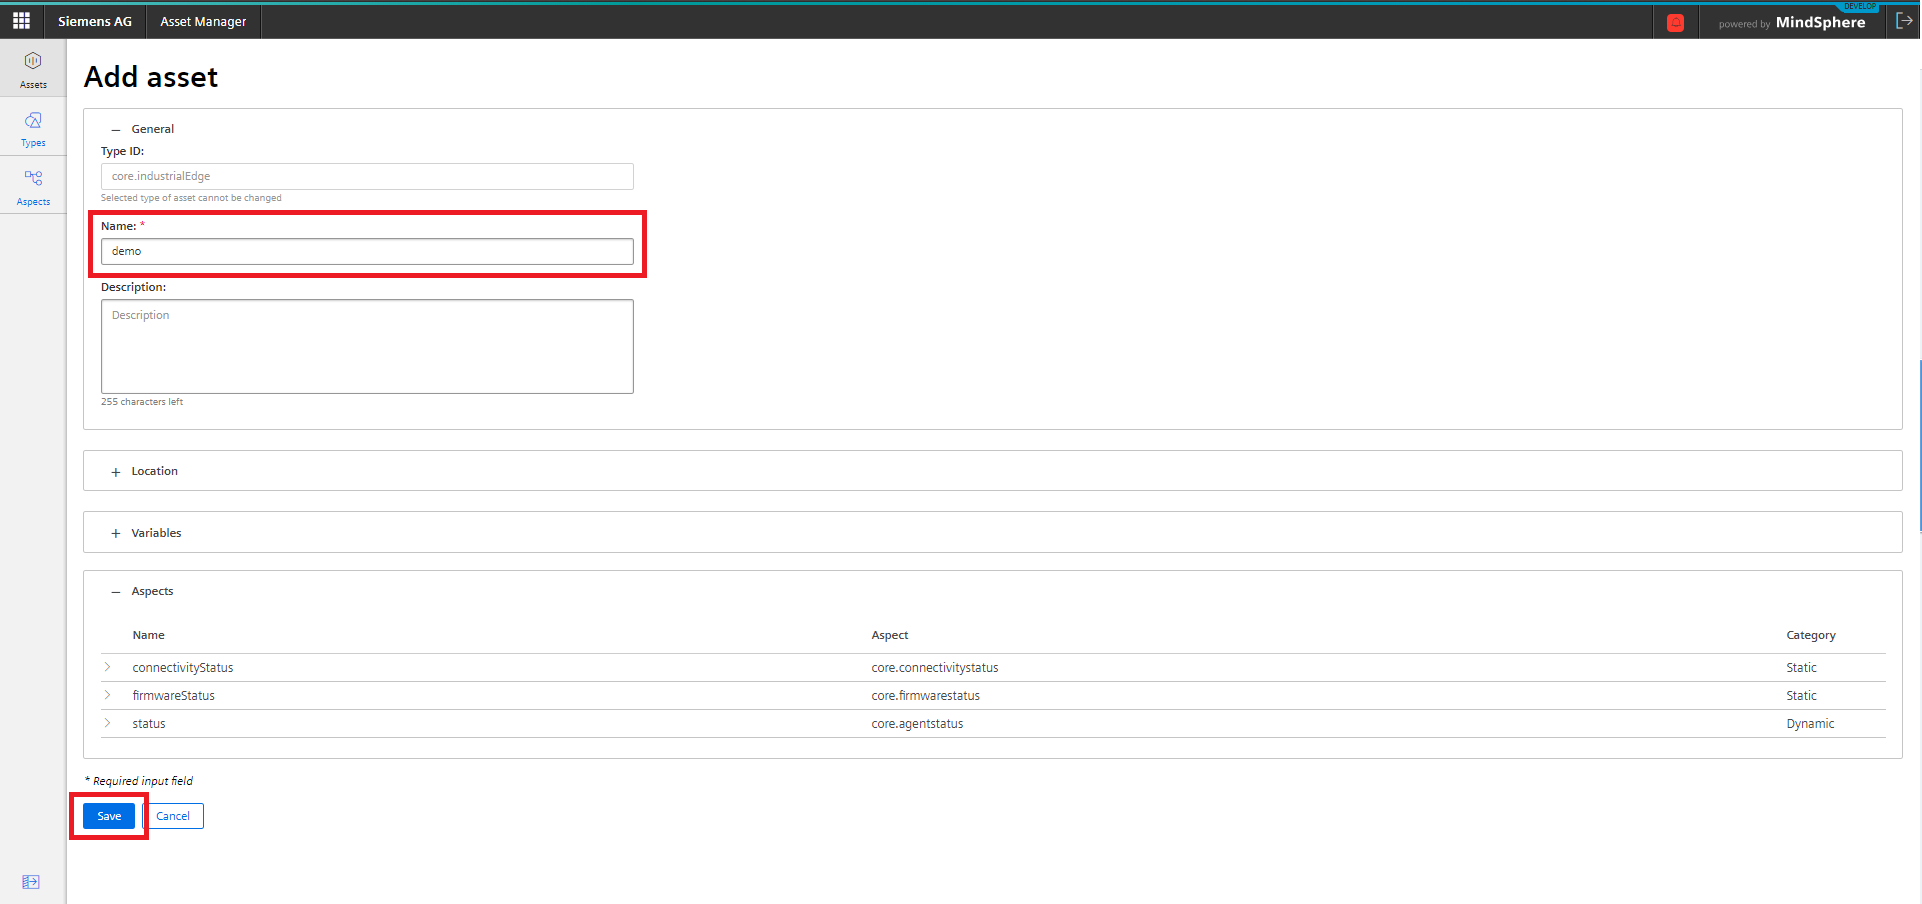
4) Input data to your new asset and click Save.
Hint: Adding the address and GPS coordinates is not mandatory but will help you in managing your fleet.
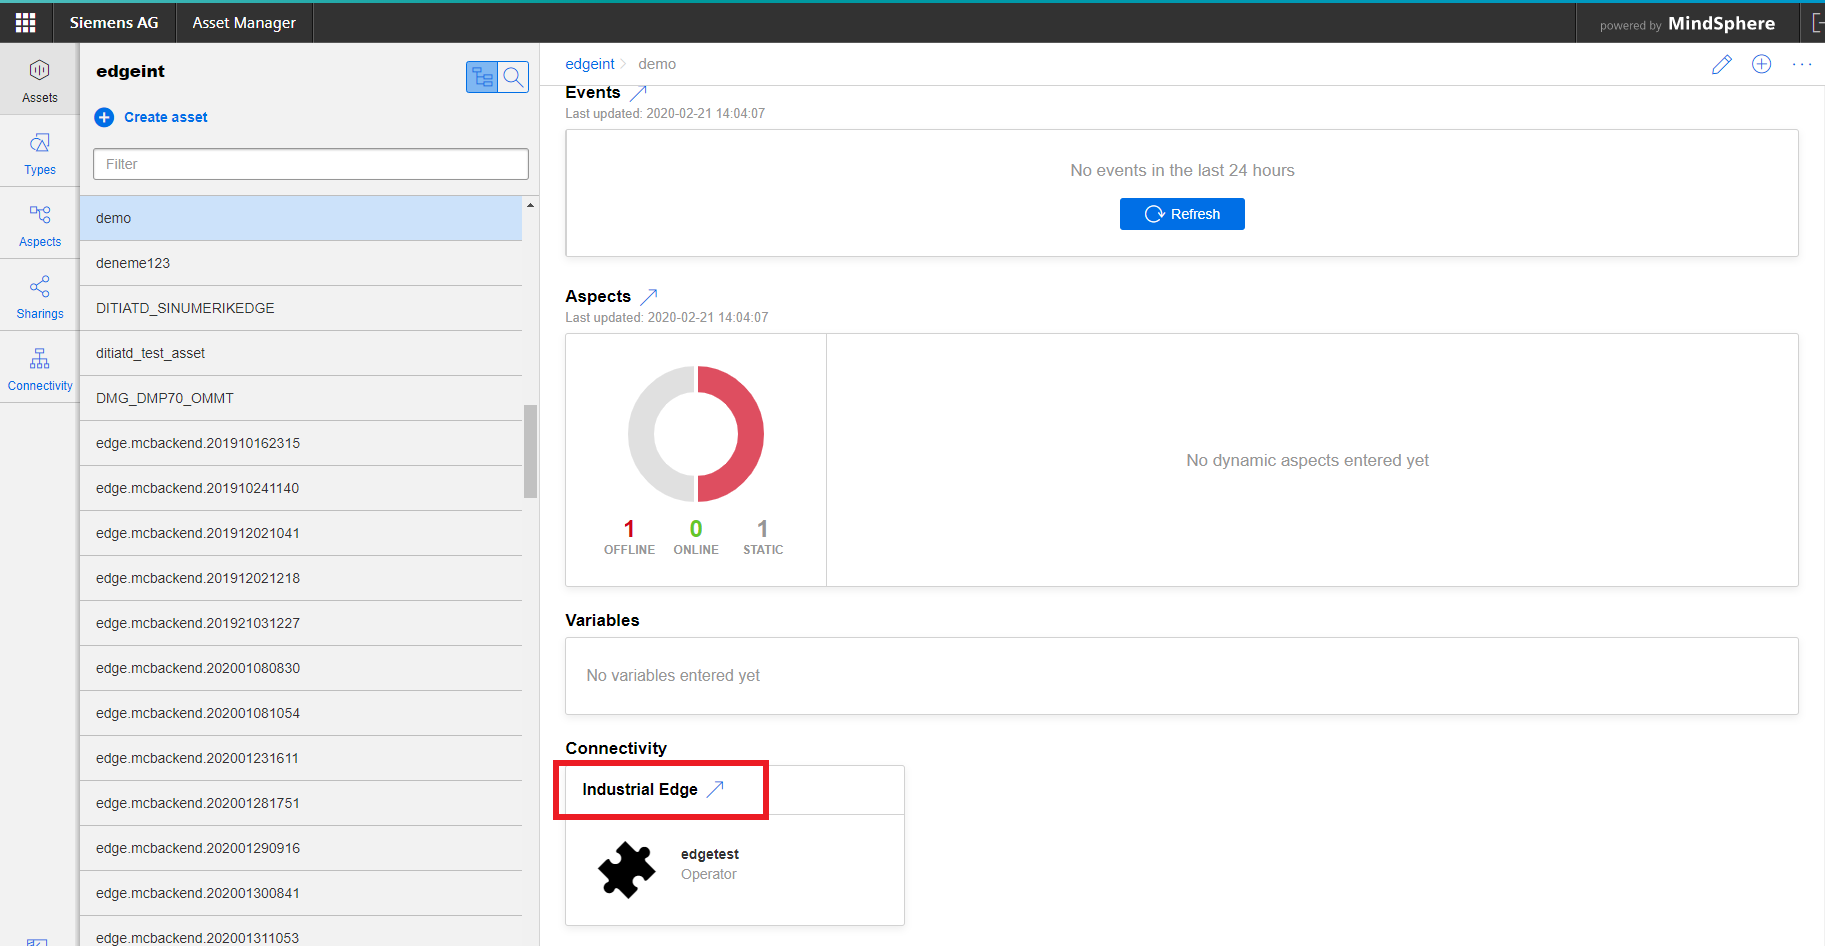
5) Select your asset from the asset list and click on right arrow icon to navigate to industrial edge plugin for your asset configuration.
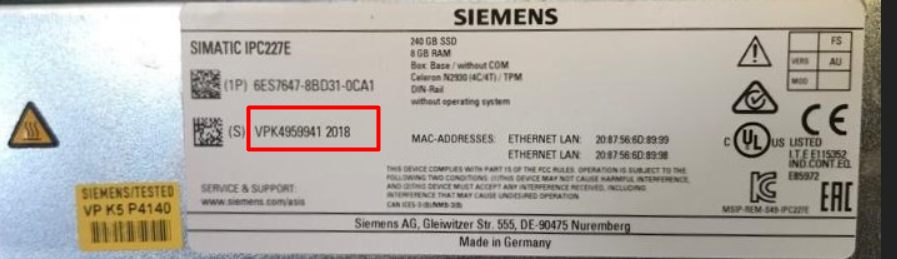
When an asset is created, serial number should be defined for one time according to box information that it is written on label under box. Please check the serial number format from info icon in the following figure. If the serial number is not valid, onboarding fails. Also a serial number can be used only in one asset, otherwise error message is shown while creating agent.
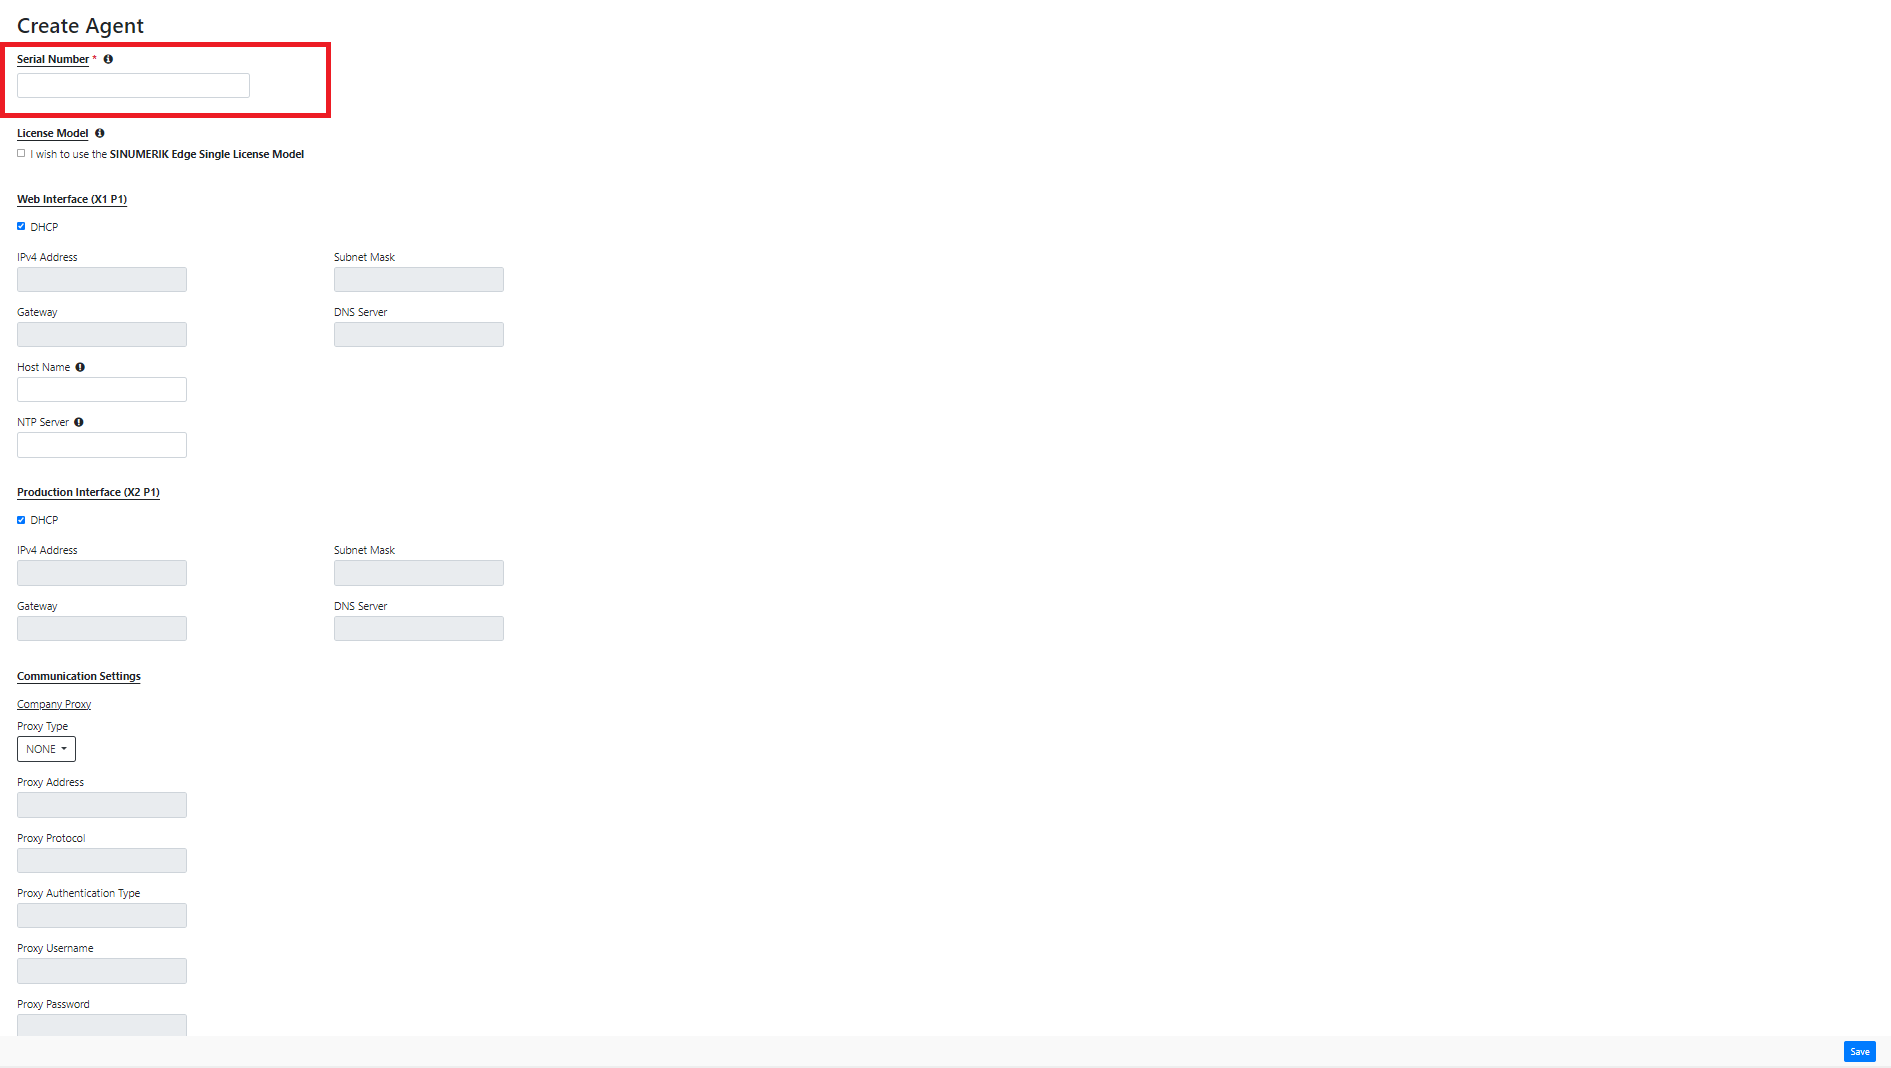
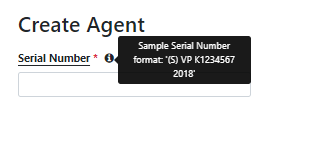
The red box in following figure shows a serial number field (VPK4959941 2018).
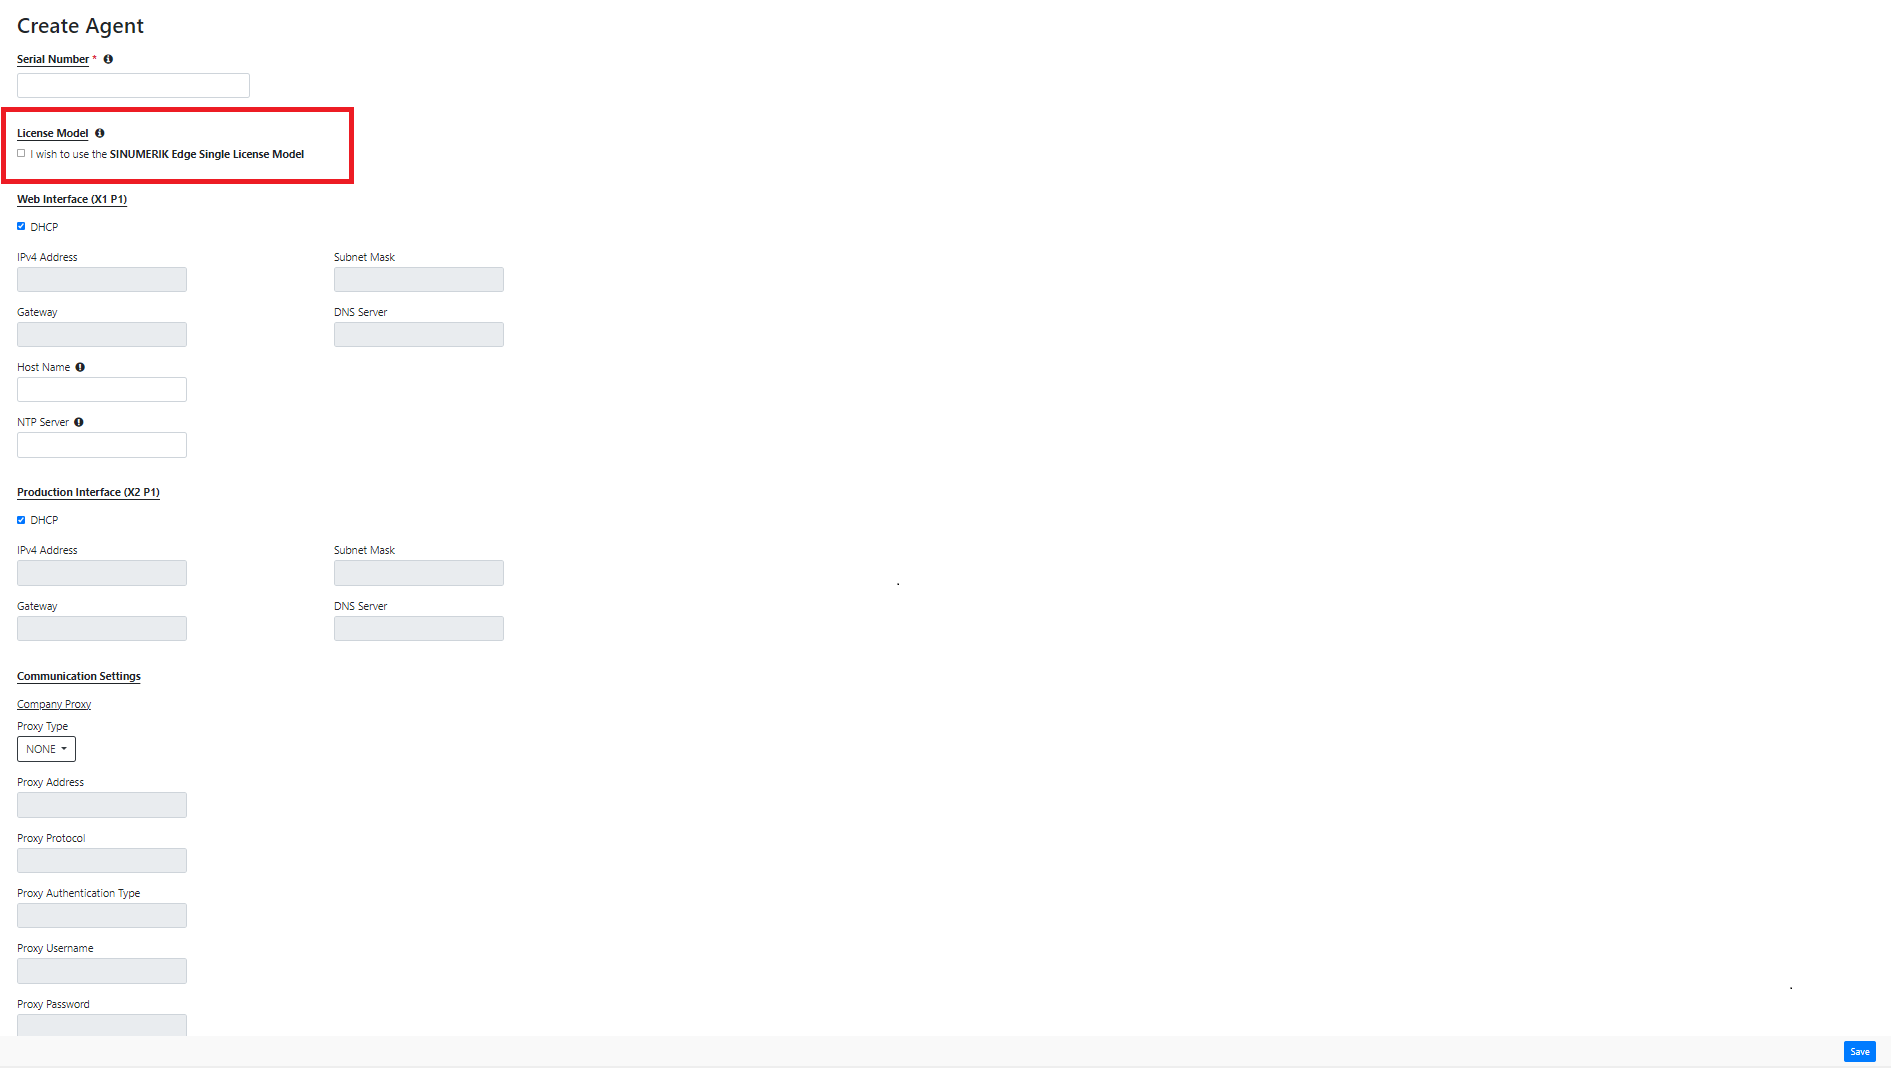
6) Machine Tool Framework Licensing Model is used by default for the onboarded assets. If you wish to onboard an asset with SINUMERIK Edge Single Licensing Model, please make your selection accordingly. Further details about the licensing models can be found in the "Machine Tool Framework Licensing Model" section.
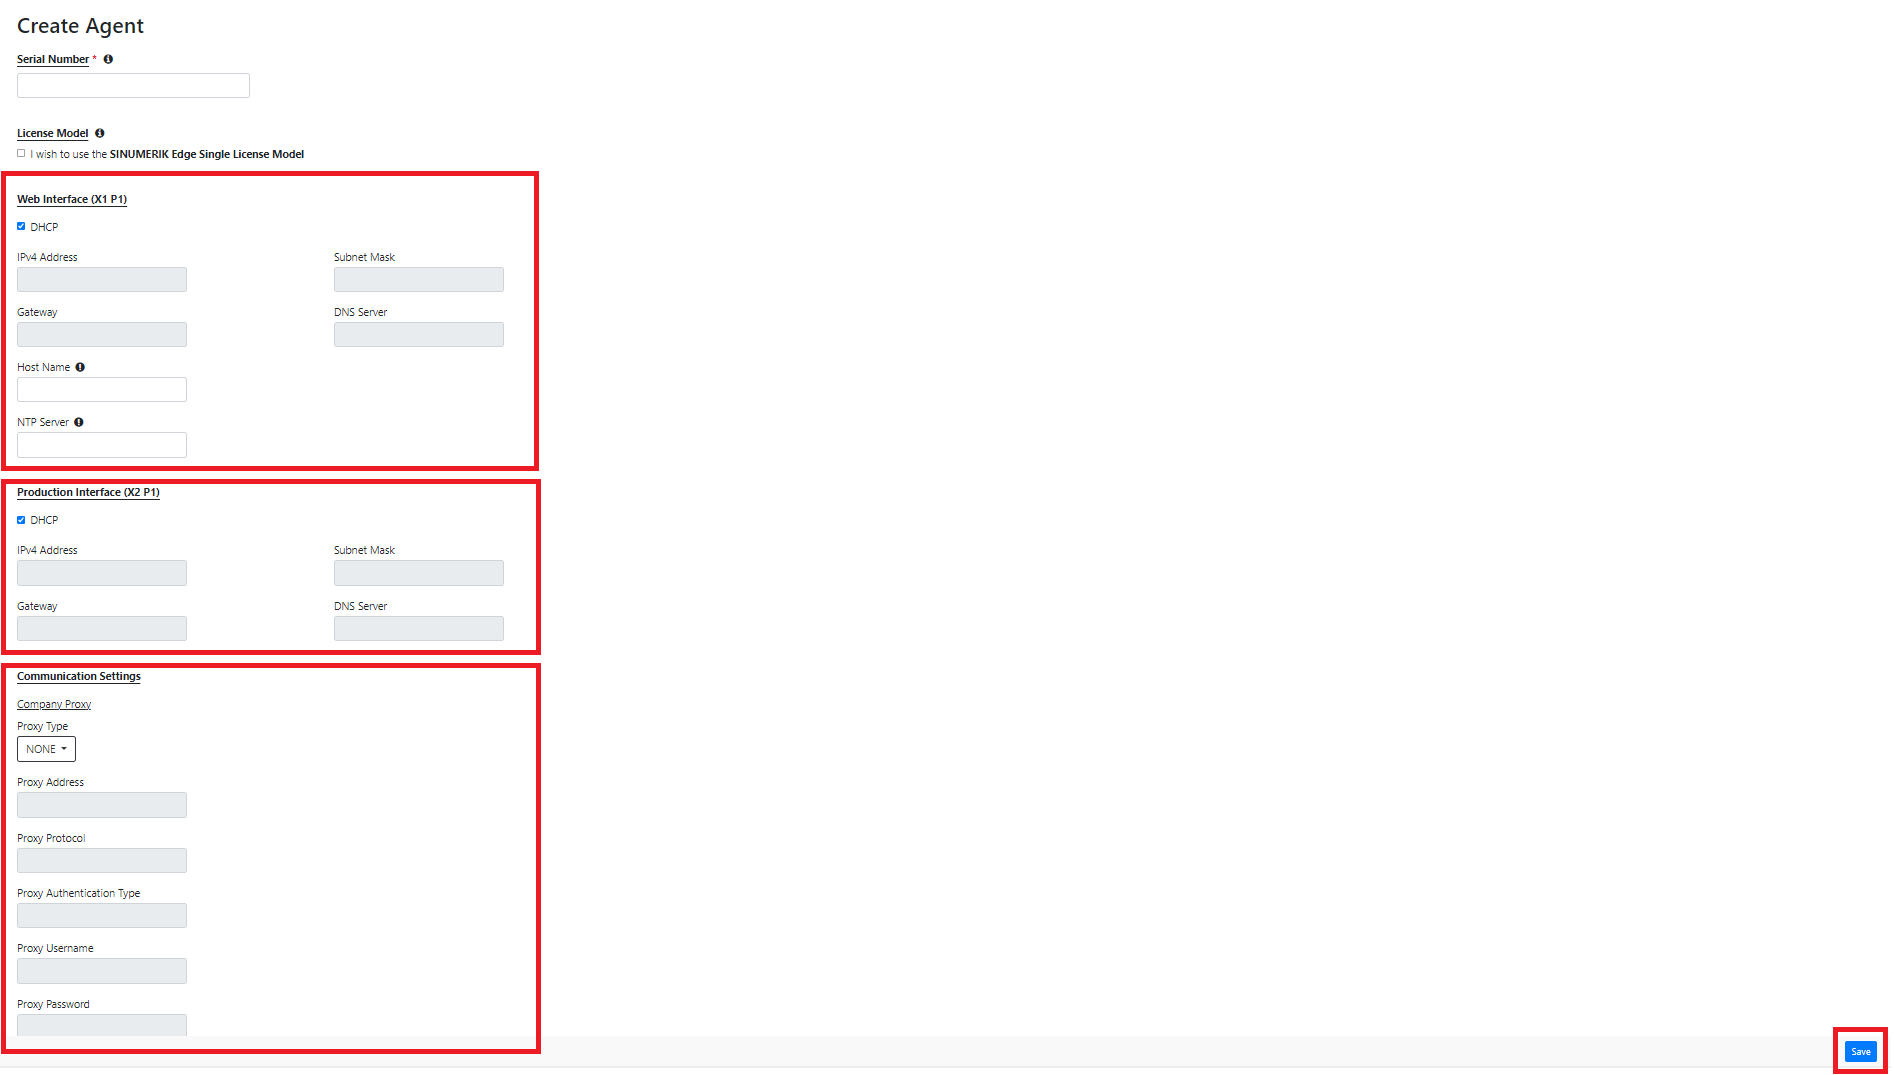
7) From the Hardware tab, identify your network configuration. This comprises DHCP settings as well as the proxy configuration.
If the box uses static IP to reach the Insights Hub, * from the Web interface (X1 P1) section, DHCP checkbox should be disabled, * the IPv4 Address, Subnet Mask, Gateway and DNS Server information should be filled.
If the box uses dynamic IP to reach the Insights Hub, * from the Web interface (X1 P1) section, the DHCP checkbox should be enabled. * other information sections should be disabled automatically.
If it's desired to connect the box by a hostname, the Host Name field can be set.
It should be noted that this option is only valid for in presence of local DNS.
After these configurations, the device can be accessed by hostname, eg local diagnostic dashboard application can be accessed by https://<hostname>:5443/diag on a web browser.
For the Production Interface (X2 P1), currently only static IP is supported, the DHCP checkbox should be disabled for SINUMERIK devices. Necessary IPv4 Address and Subnet Mask information should be filled.
If Proxy is used to reach the Insights Hub, the Proxy Type should be FIXED. The proxy input format is http://<proxy ip-address>:<port>.
If Proxy is not used to reach the Insights Hub, the Proxy Type should be NONE. (If you are not aware of your company proxy, please contact your local IT administration).
Note: There are certain global NTP servers preconfigured. If needed, you can configure local NTP Server from NTP Server section. Please refer to Time Behavior chapter for further details of system time settings.
When the configurations are completed, click Save.
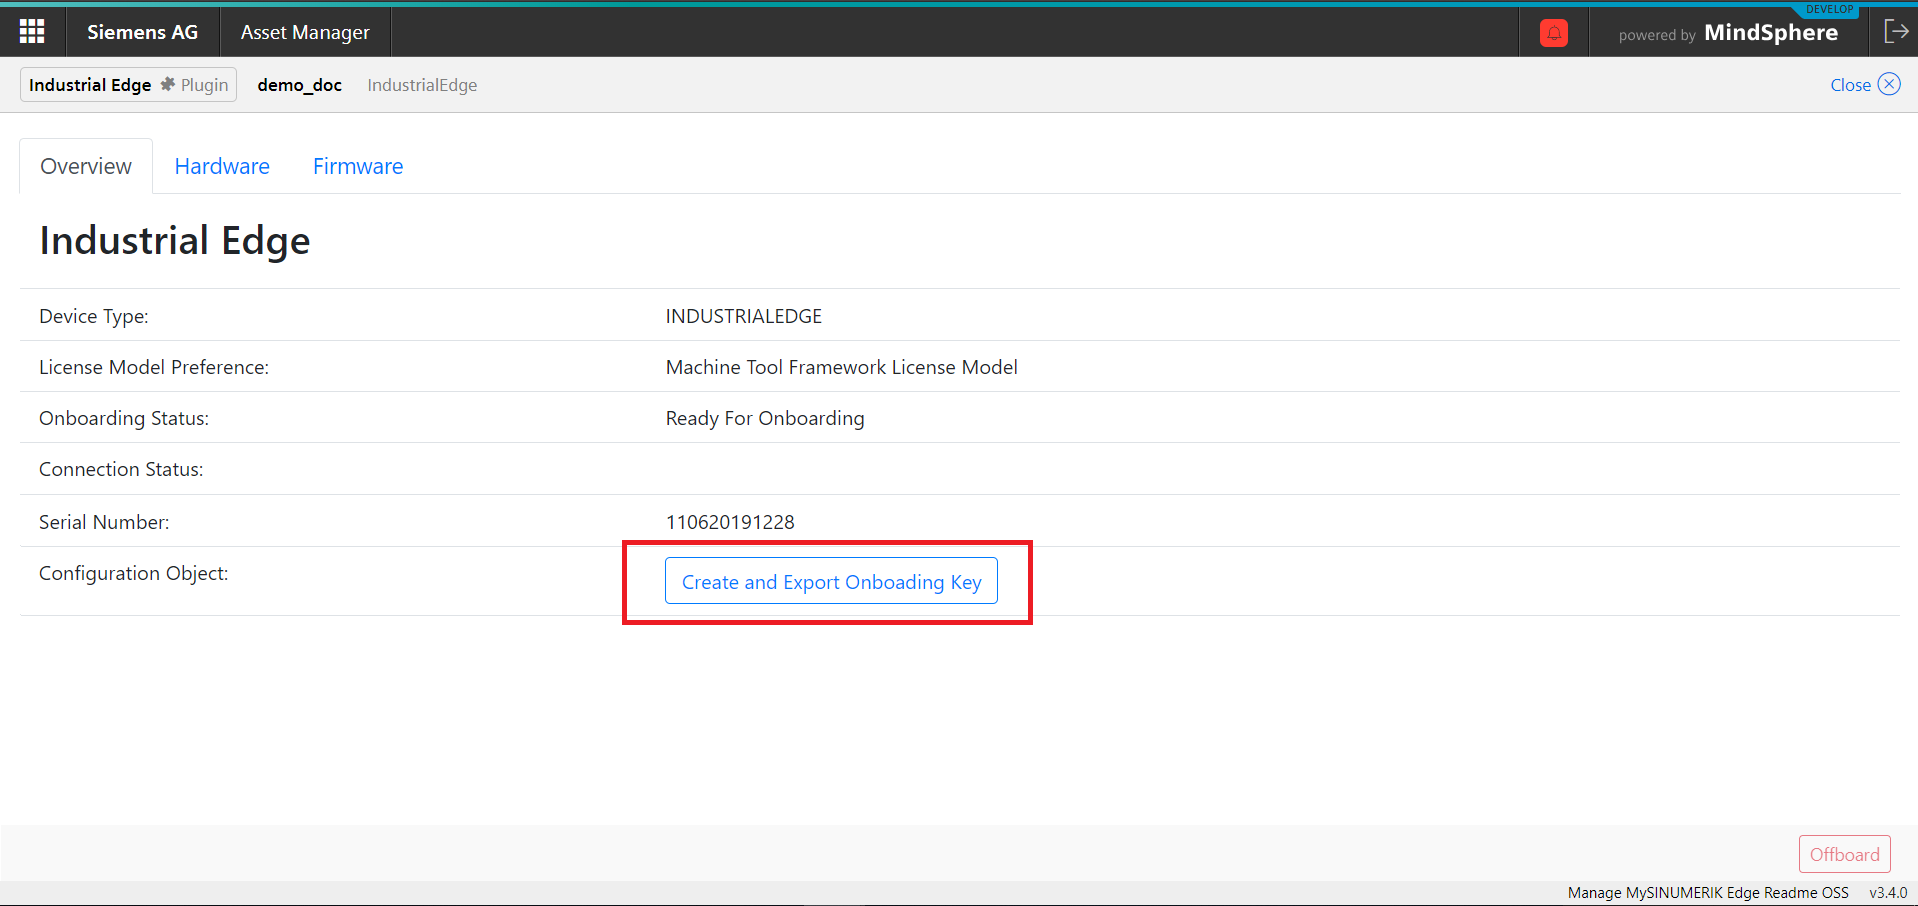
7) Download the Onboarding Key by clicking "Create and Export Onboarding Key" button.
Note: Since this is a common config format the browser may ask you if you want to keep this file dependent on the local security settings.
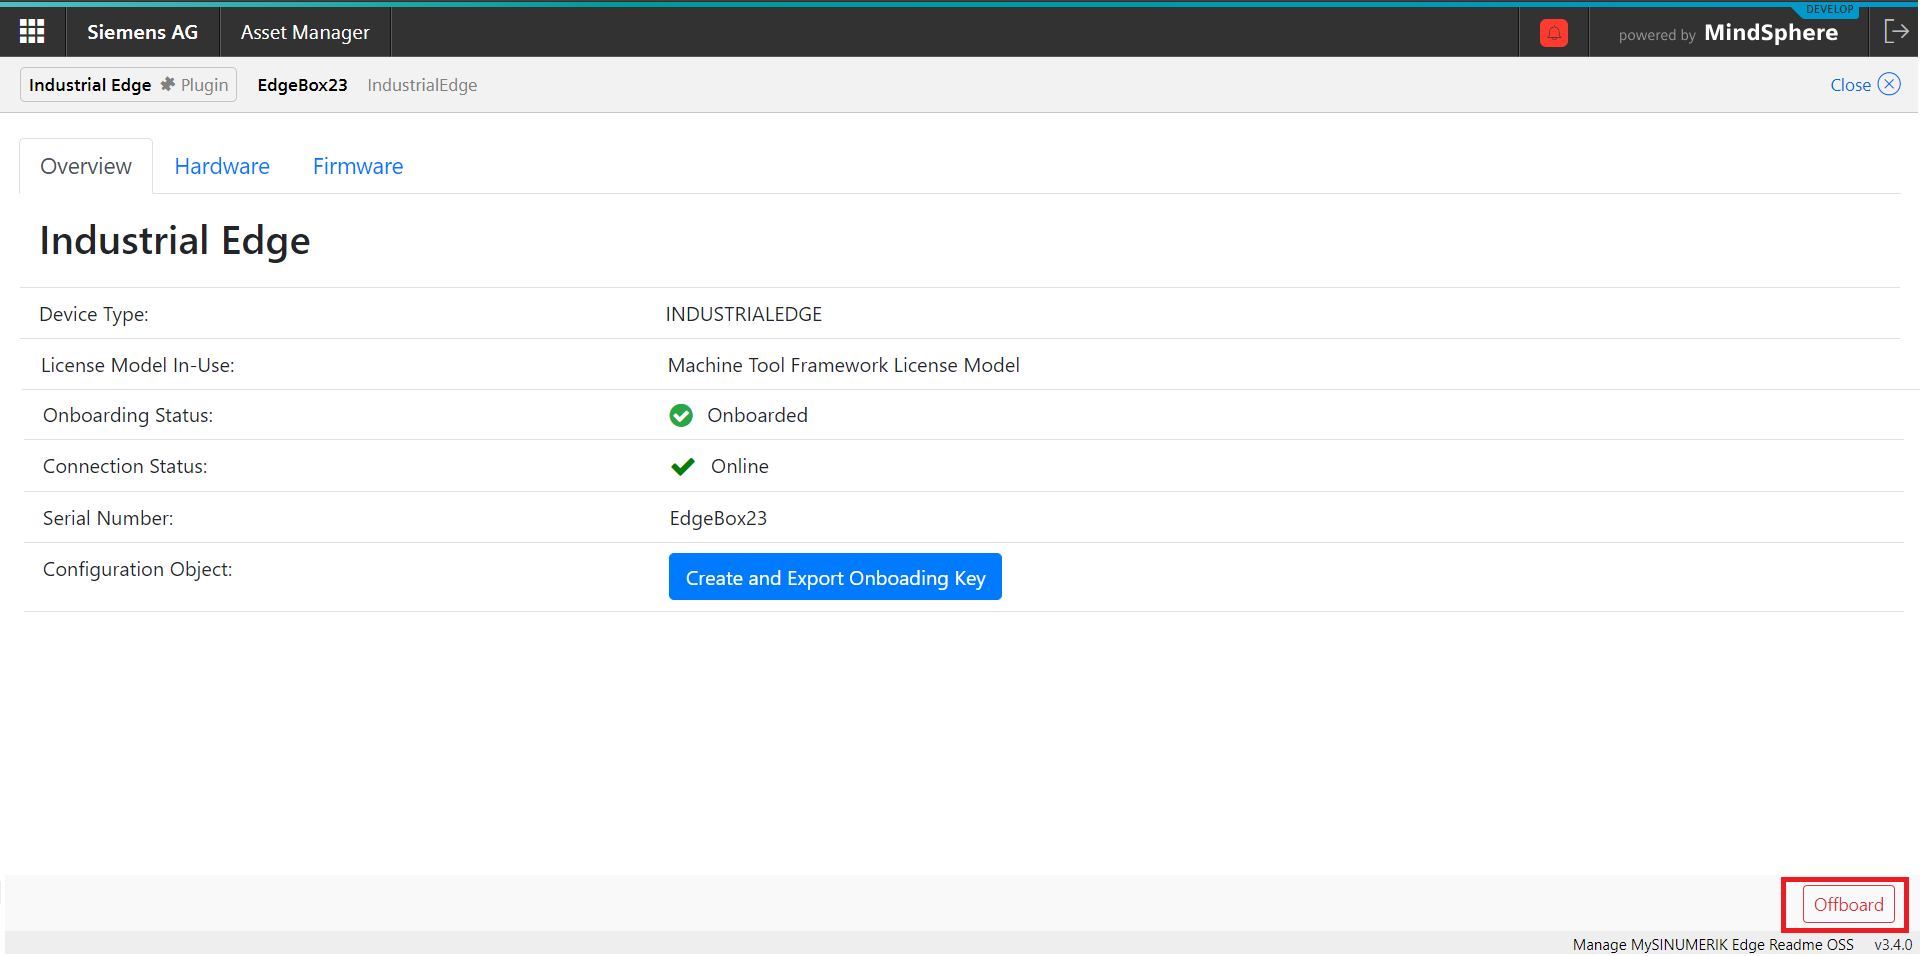
8) Copy the downloaded configuration file to a USB-Stick(which should be fat32 formatted). Then plug the stick to your SINUMERIK Edge, the Onboarding process will be started automatically. Refresh the page to inspect the state change from Onboarding to Onboarded on the Overview Tab.
Note If the state does not change in 5 minutes, you can download the onboarding related logs from Diagnostic Application and check the cause of the problem.
Note Do not turn off or reboot SINUMERIK Edge device and do not unplug onboarding USB device until Insights Hub reports online/onboarded status on Manage MySINUMERIK Edge /App Management UI.
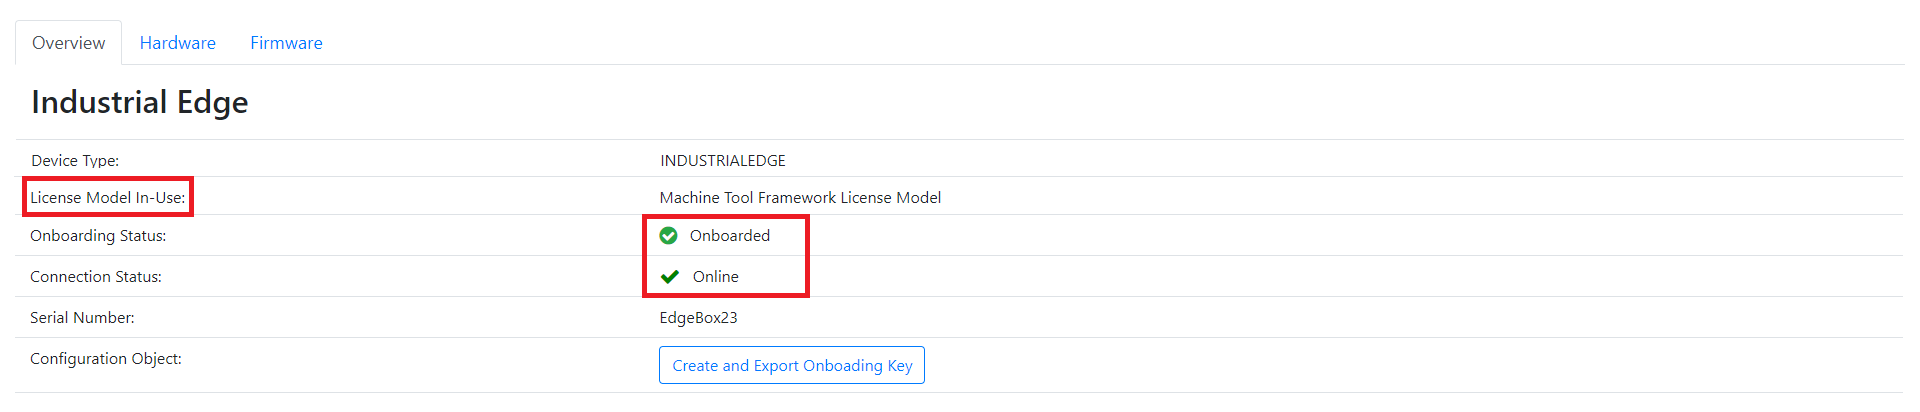
After the asset is onboarded, License Model In-Use section will be appeared instead of License Model Preference section. The actual license model will be displayed in this area.
9) An Onboarded Asset is displayed with the appropriate status on Manage MySINUMERIK Edge /App Management UI.

Offboard Asset
1) To offboard an onboarded asset, click the Offboard button in the Overview section.
2) After this operation the status will be changed to Onboarding which means that the asset is offboarded.
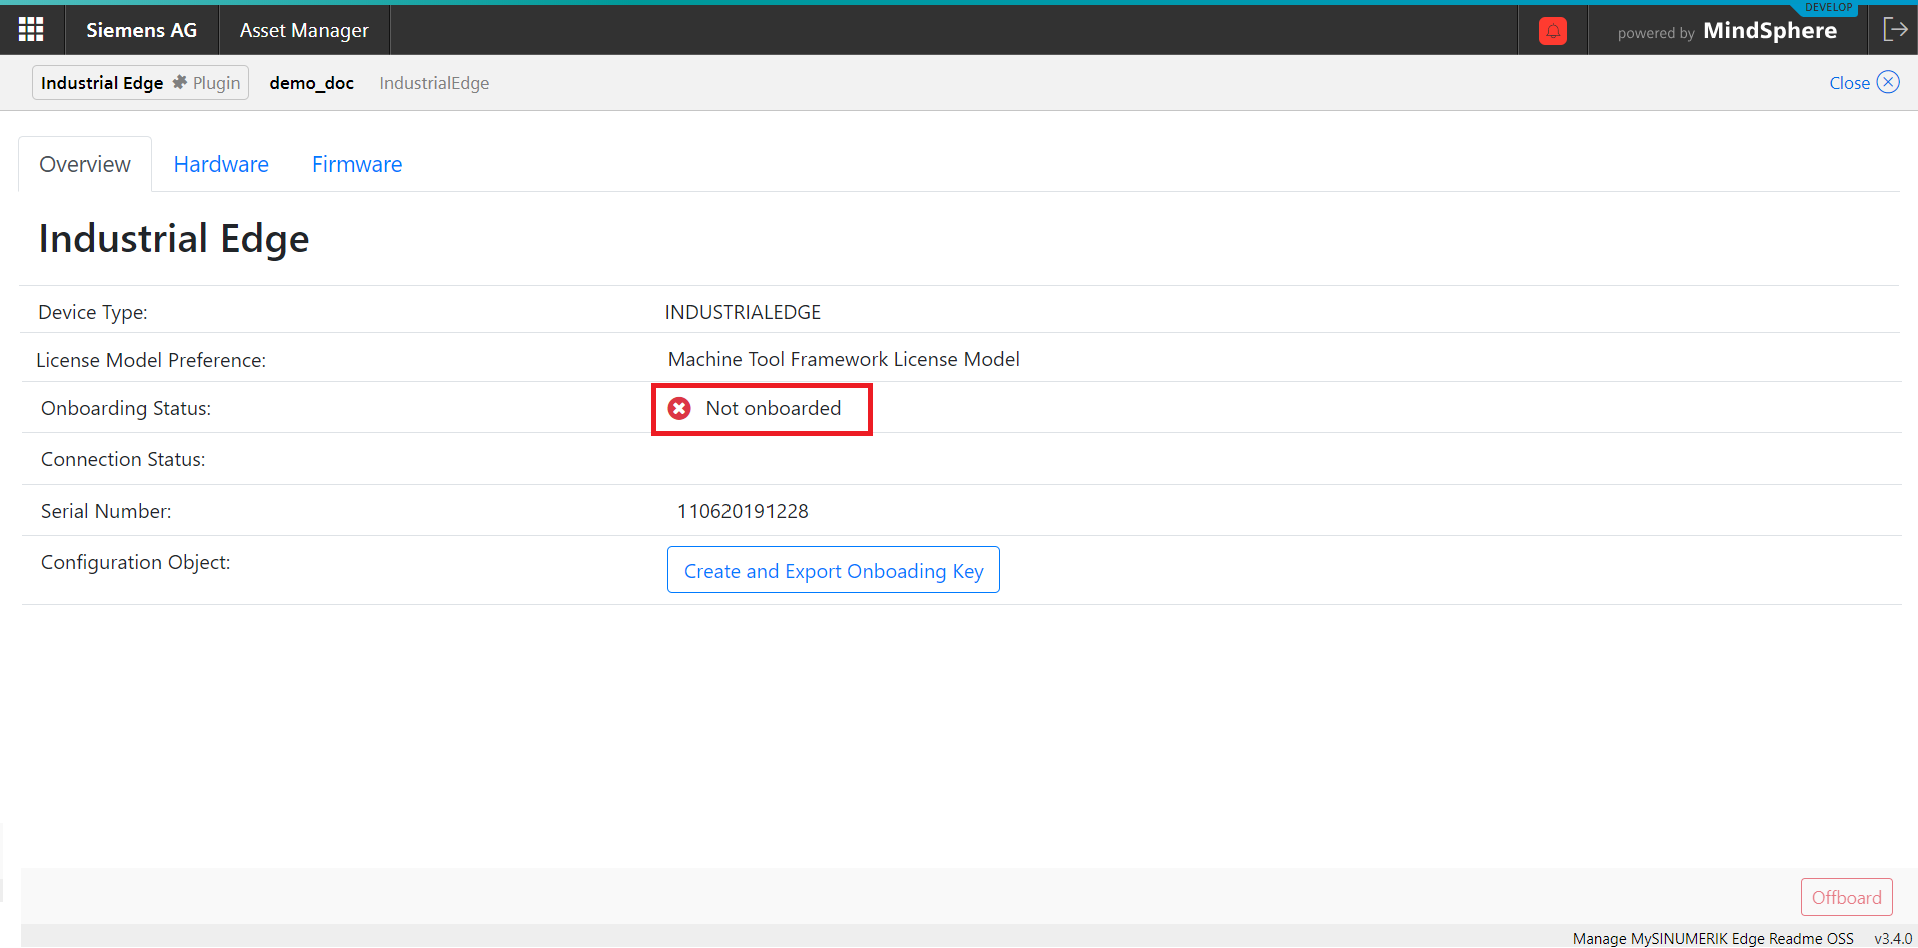
3) An Offboarded Asset is displayed with the appropriate status on Manage MySINUMERIK Edge /App Management UI.

Editing Asset Name
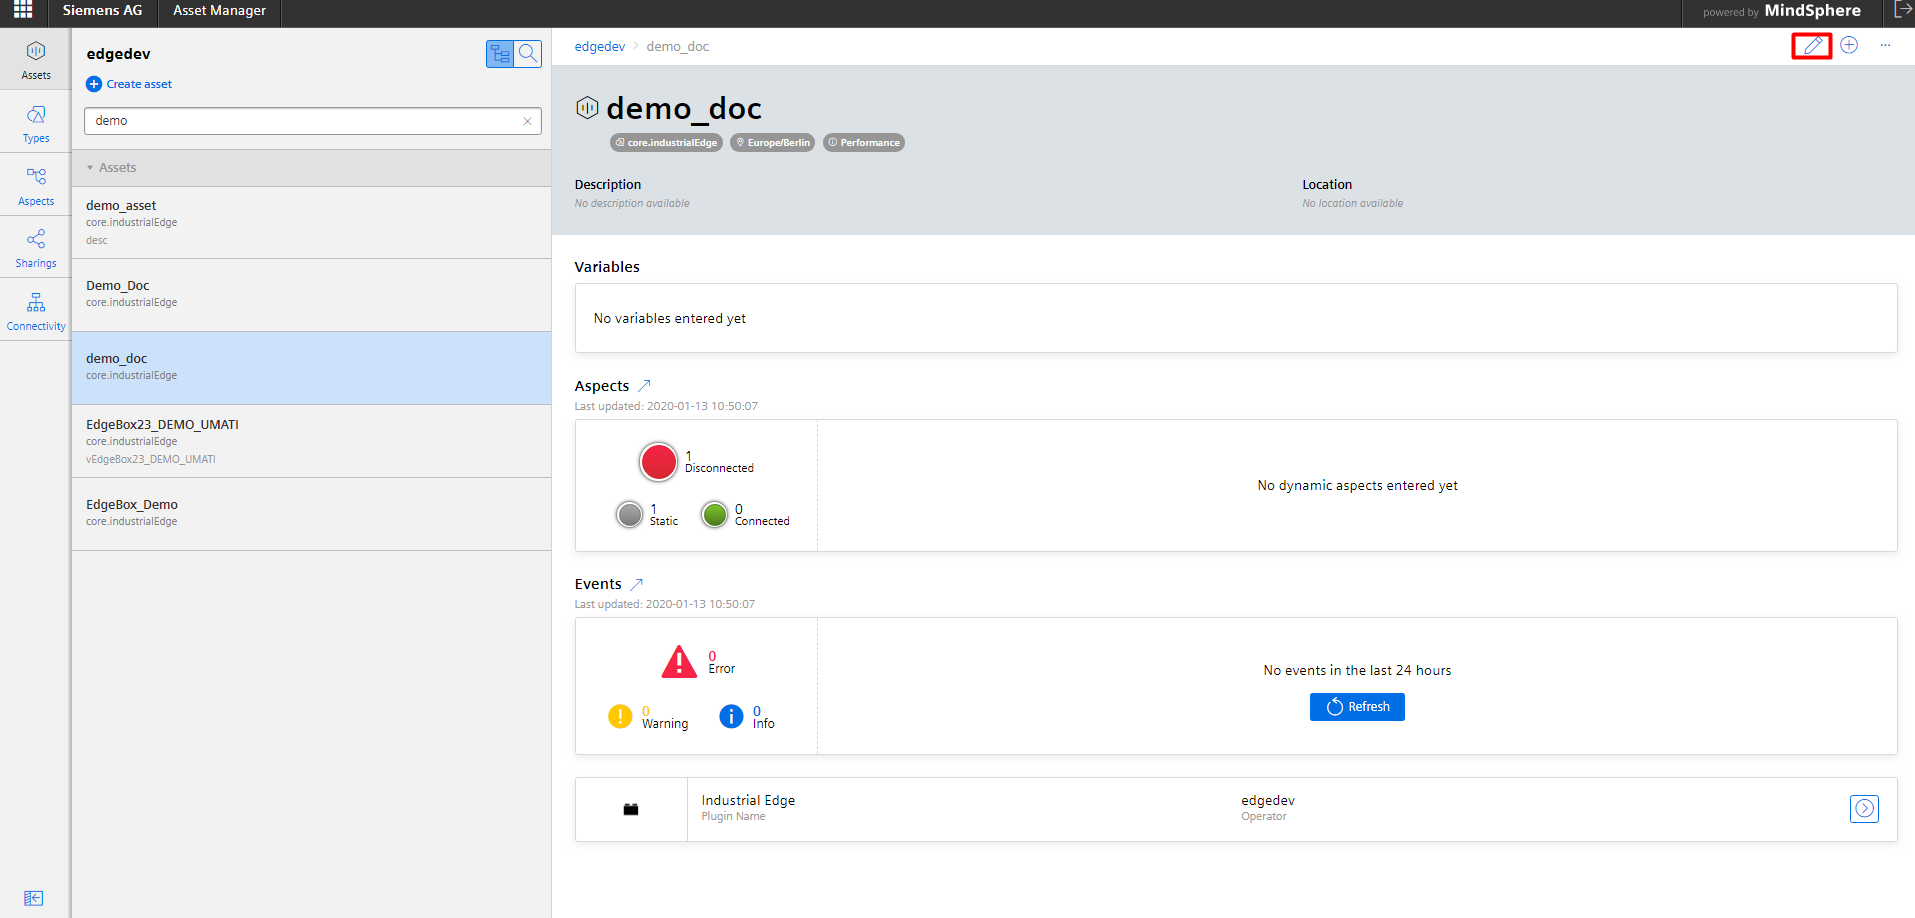
1) To edit asset name, click the pencil icon on Insights Hub / Asset Manager application.
2) After this operation, click the Save button.
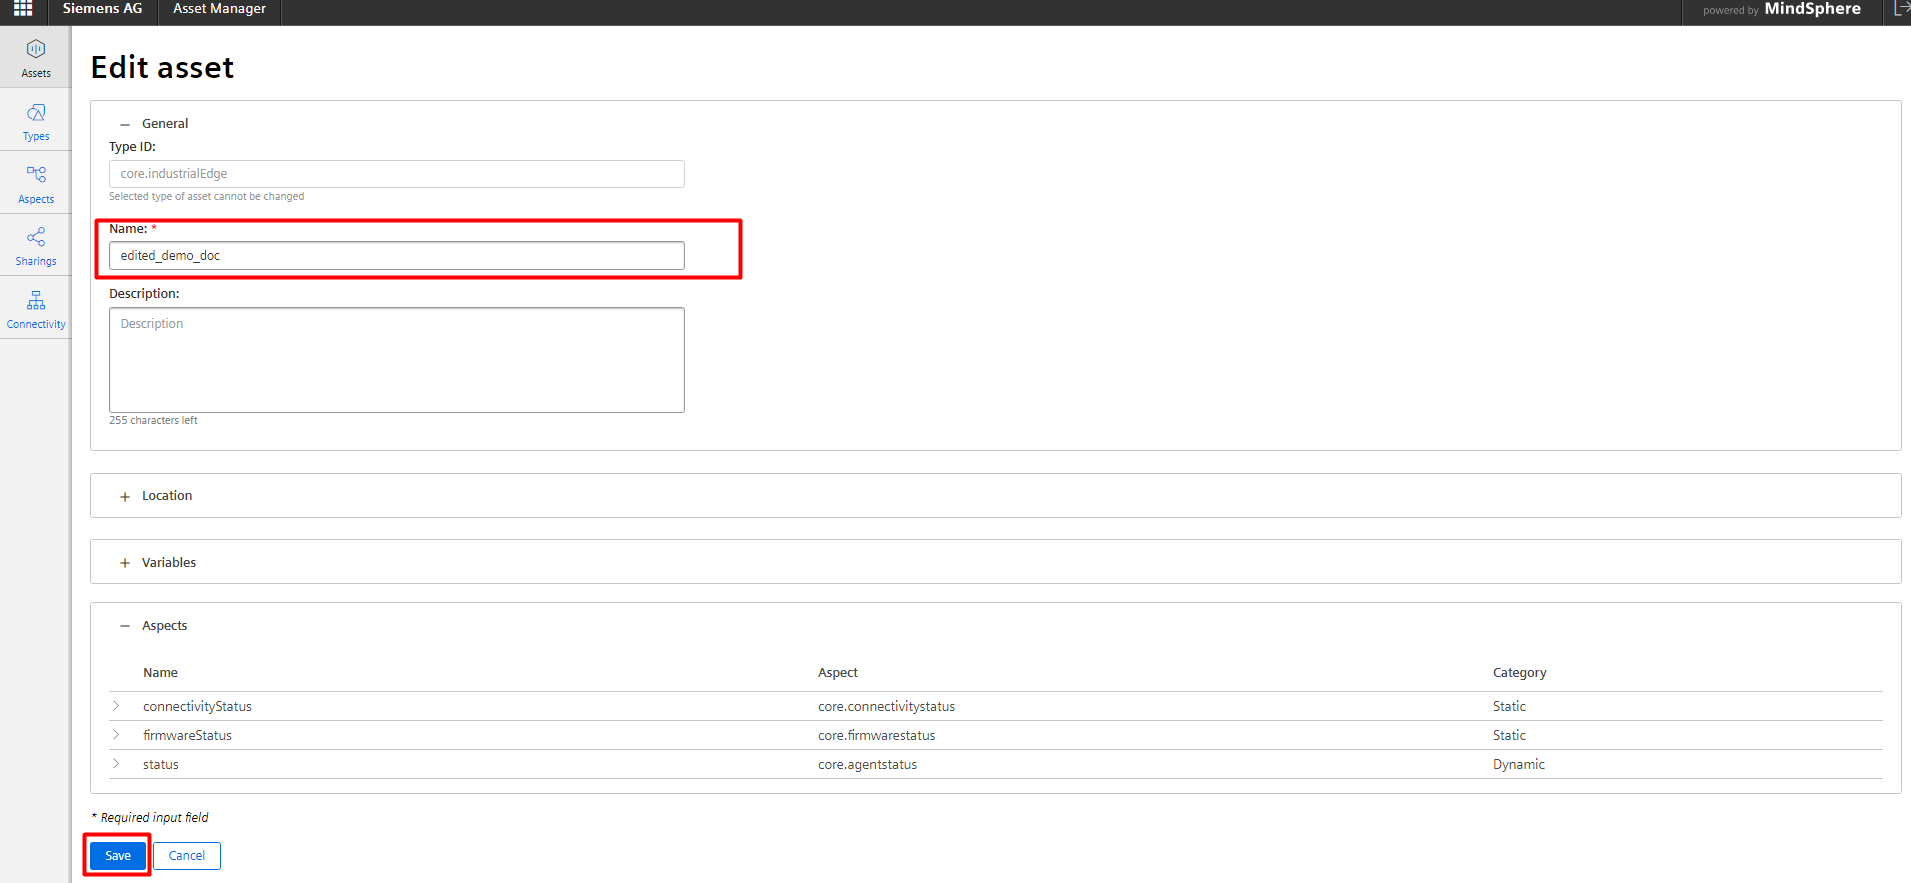
Note After changing asset name, reonboarding operation is not required.
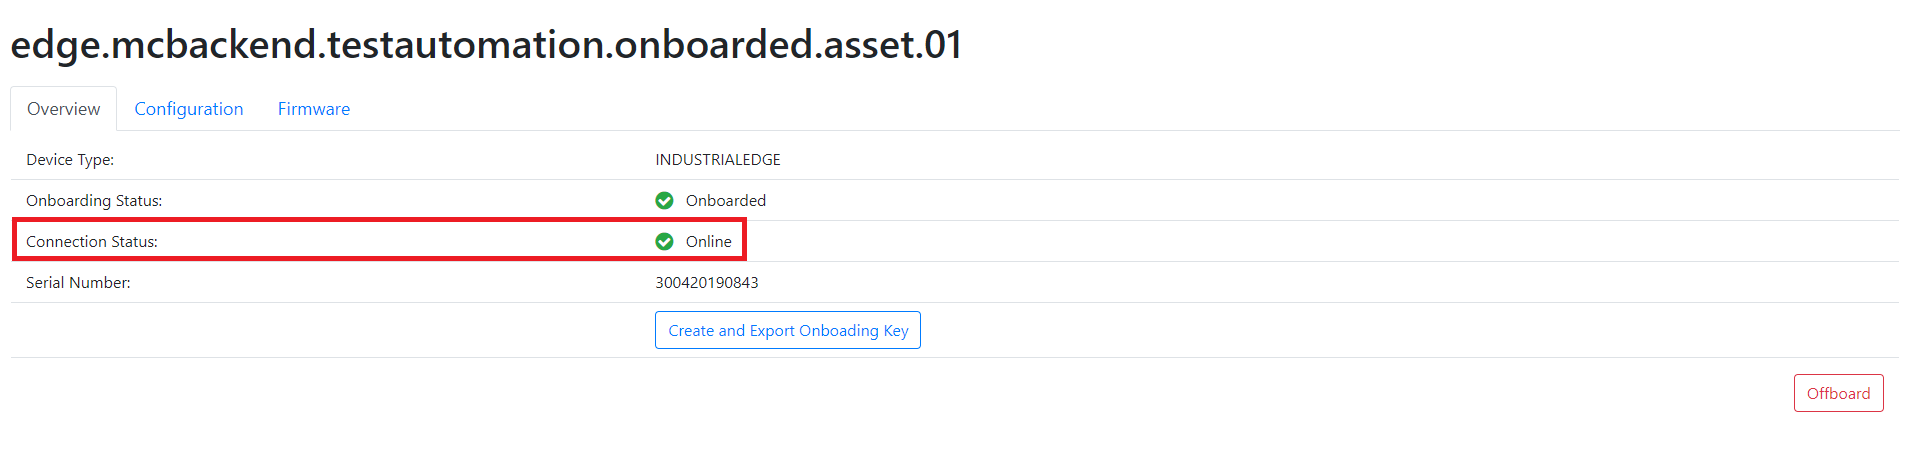
Online Status of an Asset
Once the asset is onboarded, a periodic health status message is broadcast from the asset to Insights Hub. This ensures the network availability between the asset and the backend services. An onboarded asset, therefore, can be either online or offline according to its health status. Online Status of an Asset can be monitored from the Manage MySINUMERIK Edge /App Management application and Insights Hub / Asset Manager application.
Online State
An Onboarded asset will be online as long as the network connection between the asset and Insights Hub is established.
Operations, such as application installation, firmware installation and configurations are permitted only if the asset is Online.
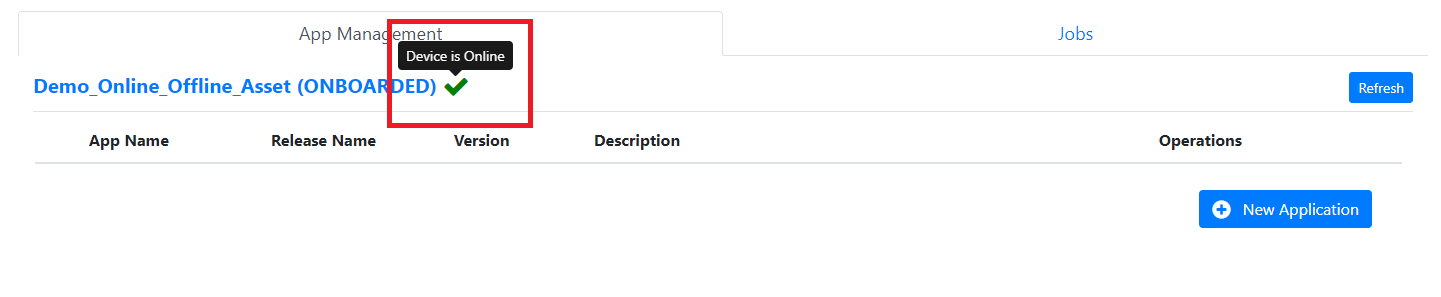
1) Manage MySINUMERIK Edge /App Management
An Online asset is displayed with a green tick, as demonstrated below:
2) Insights Hub / Asset Manager
An Online asset is displayed in new label with a check mark, as demonstrated below:
Offline State
An Onboarded asset will be offline when network connection between the asset and Insights Hub is terminated.
All operations are disabled for an Offline asset.
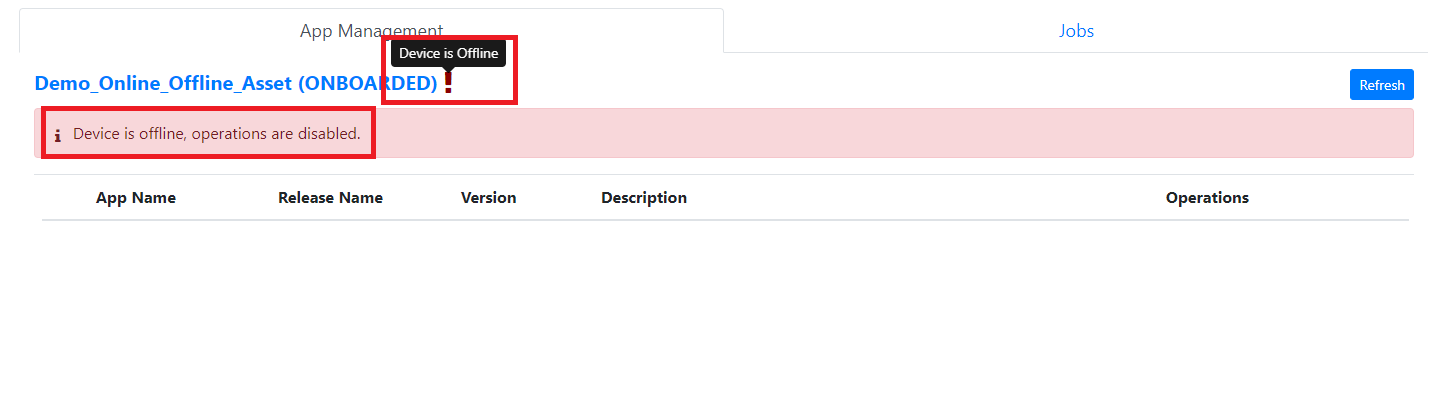
1) Manage MySINUMERIK Edge /App Management
An Offline asset is displayed with an exclamation mark and a message, as demonstrated below:
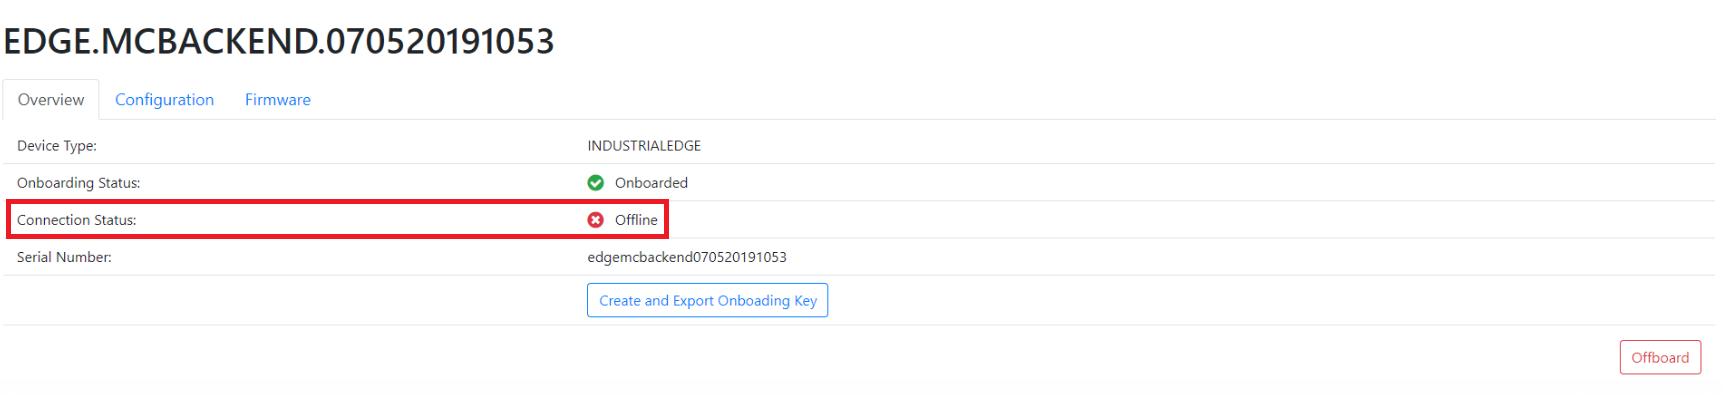
2) Insights Hub / Asset Manager
An Offline asset is displayed in new label with a cross mark, as demonstrated below:
Unknown State
An Onboarded asset will be in unknown state when there is no available information about connection status.
All operations are disabled for an asset in Unknown state.
An asset in Unknown state is displayed with a question mark and a message, as demonstrated below:

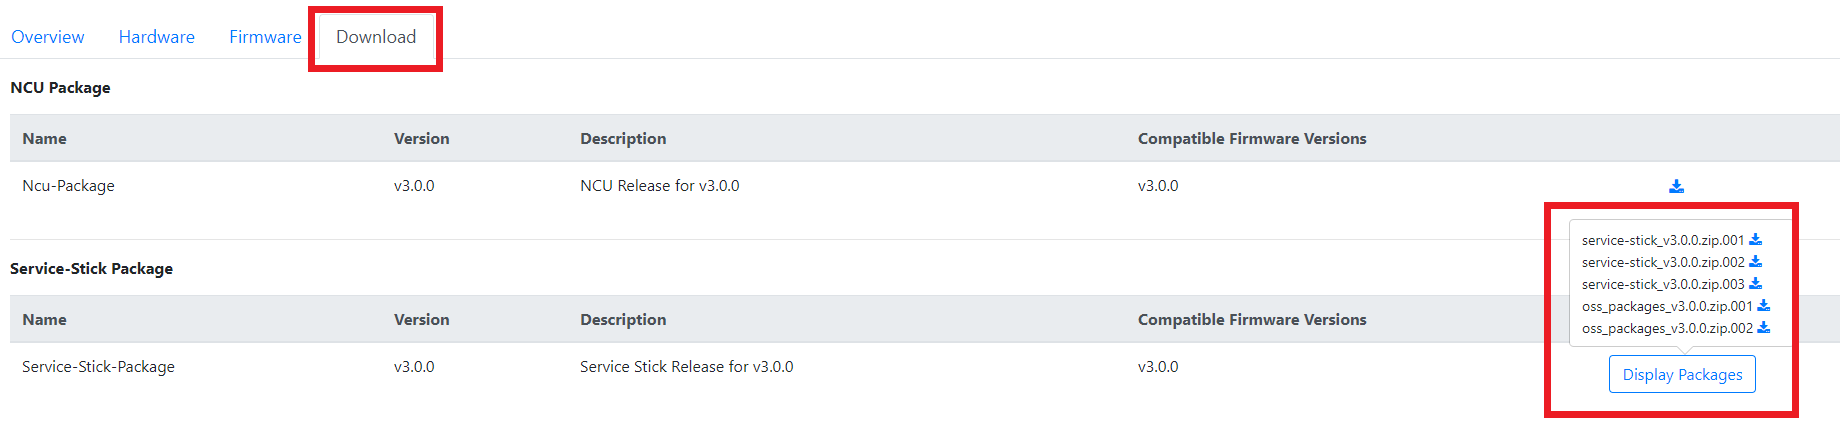
Download NCU Package
Click Download tab to see NCU package detail information.
Click Download Icon to download NCU package.
Note: Only NCU packages which are compatible with the firmware version of the asset are listed.
Note: Please follow the security guidelines for "Data transfer and storage", see platform security.

Download Service Stick Package
Click Download tab to see Service Stick package detail information.
Click Download Button to see multiple Service Stick packages.
Click Download Icon to download Service Stick package.
Note: Please download all partitions of the related compressed package then extract to get to the whole package.
Note: Only Service Stick package which is compatible with the firmware version of the asset is listed.
Note: Please follow the security guidelines for "Data transfer and storage", see platform security.
Application Management with Manage MySINUMERIK Edge /App Management
From the Insights Hub Launchpad choose the Manage MySINUMERIK Edge /App Management application which provides comprehensive dialogues comprising:
-
App and instance handling (Installation/Removal)
-
App lifecycle management (Start/Stop)
-
App configuration management (Configure/Reconfigure)
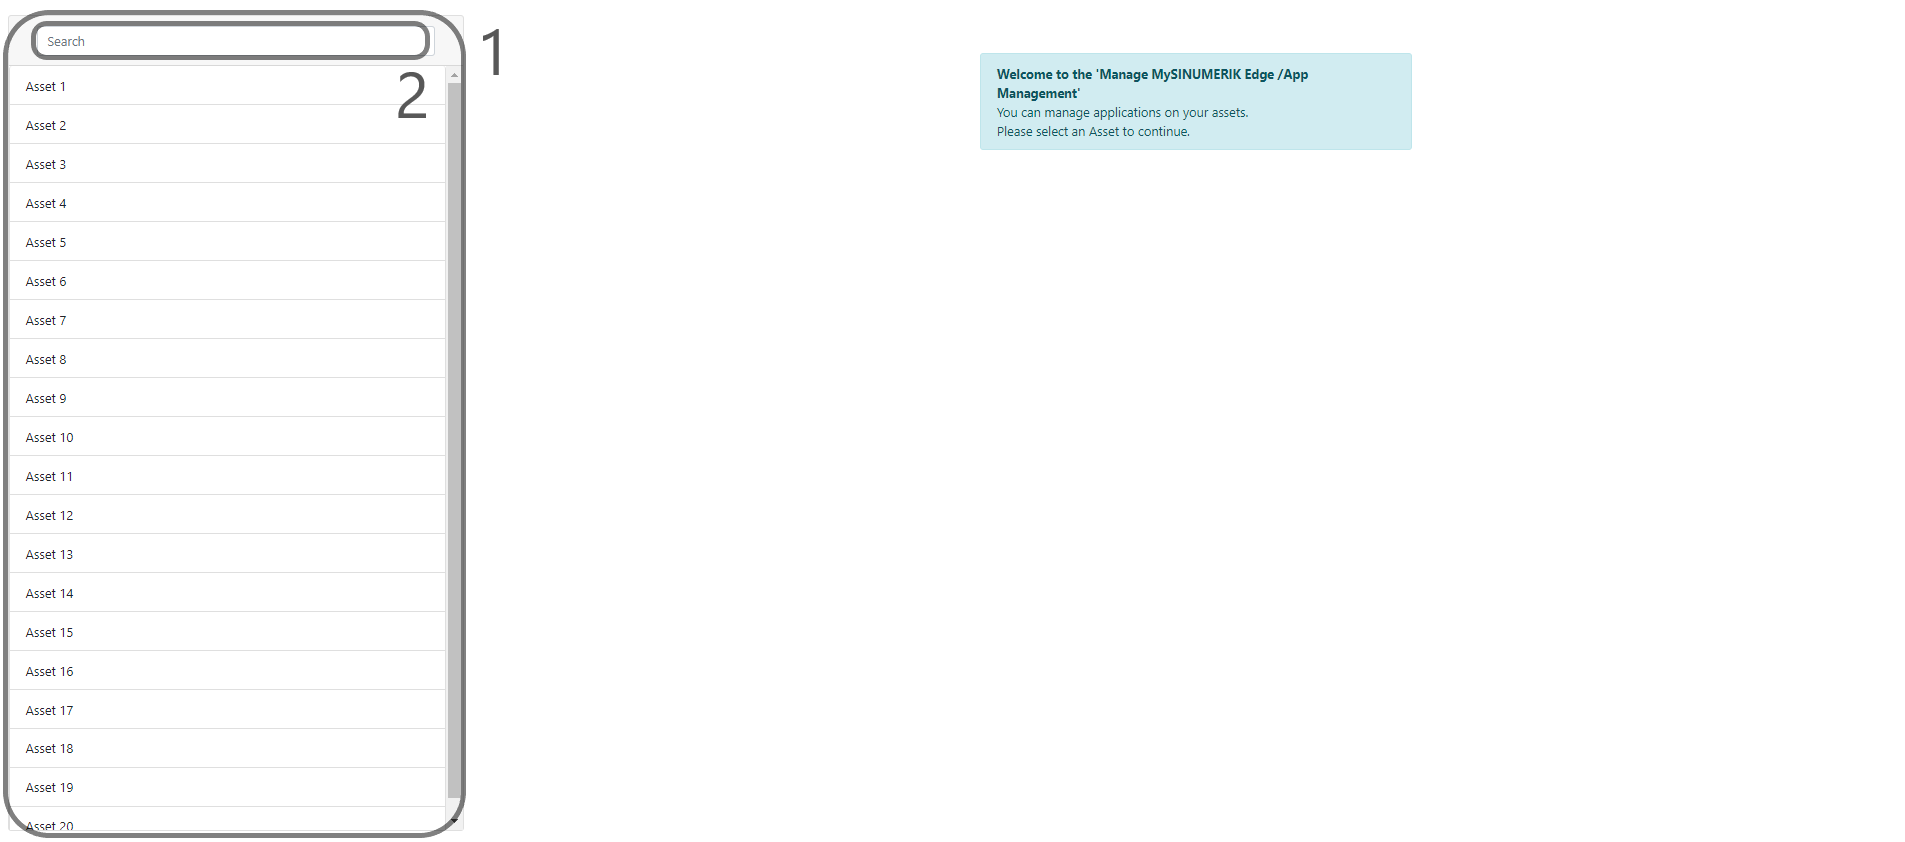
Listing Assets
This feature is used to display the assets that belong to your tenant.
1) When the user opens the page, assets are automatically displayed in the asset pane
2) The user can search assets by typing keywords in the Search text box. Asset names containing the supplied keyword are filtered.
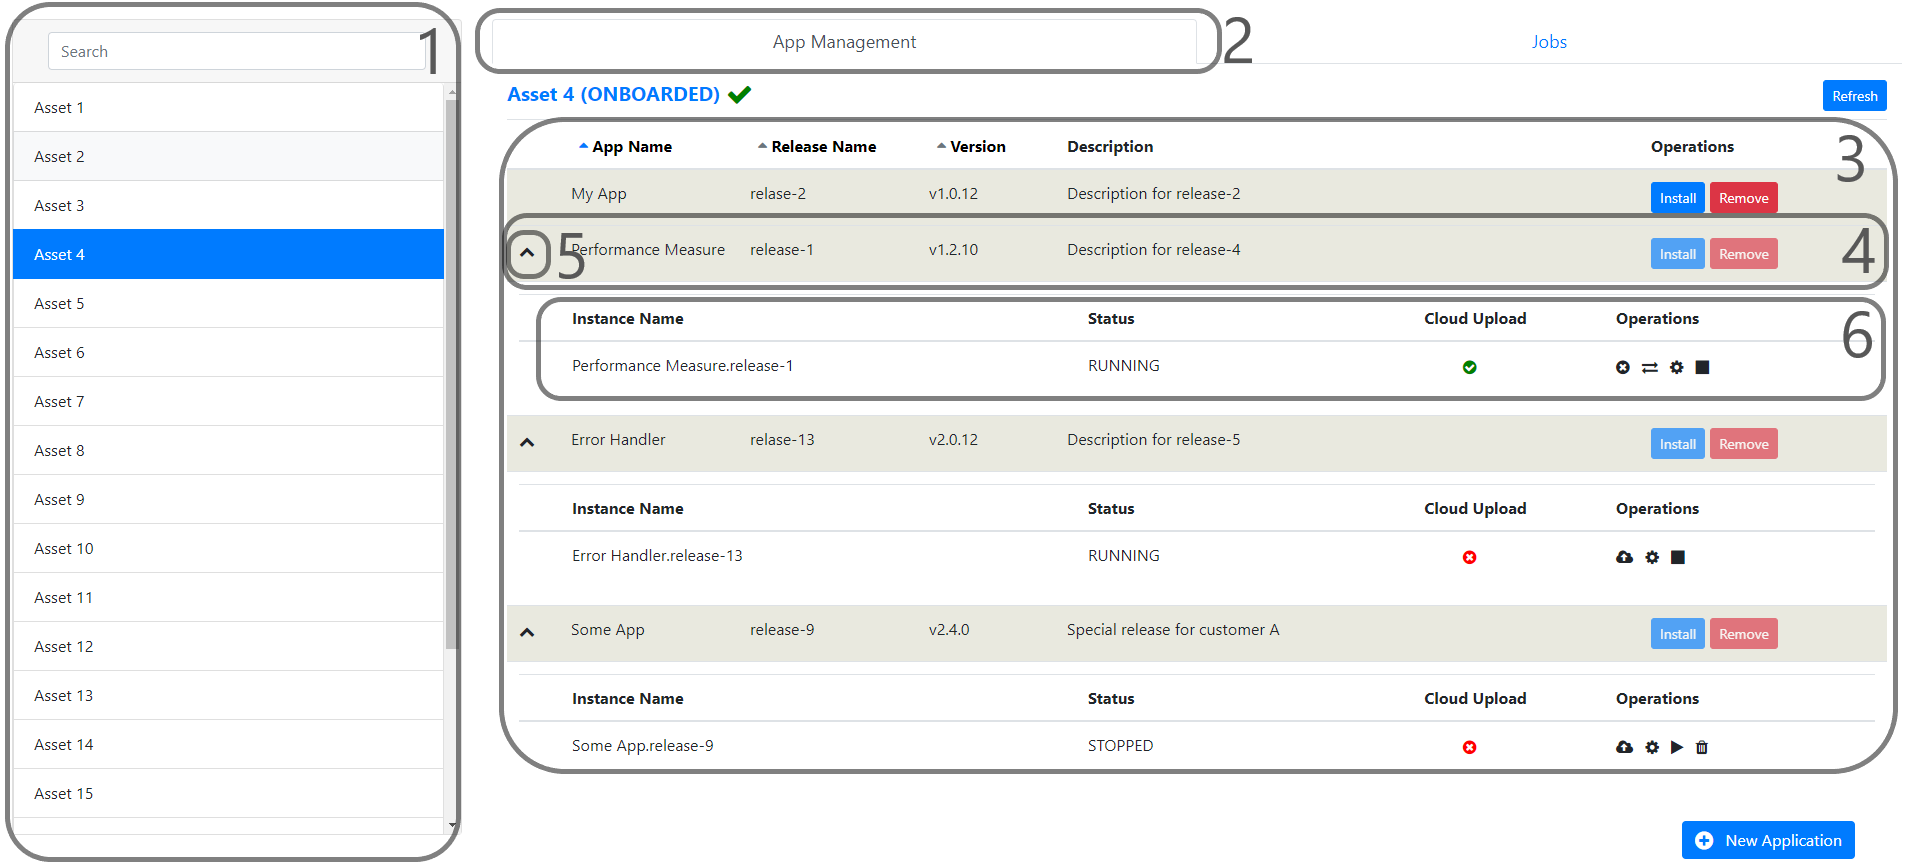
Listing Applications Releases and Application Instances
This feature is used to list the application releases and the application instances.
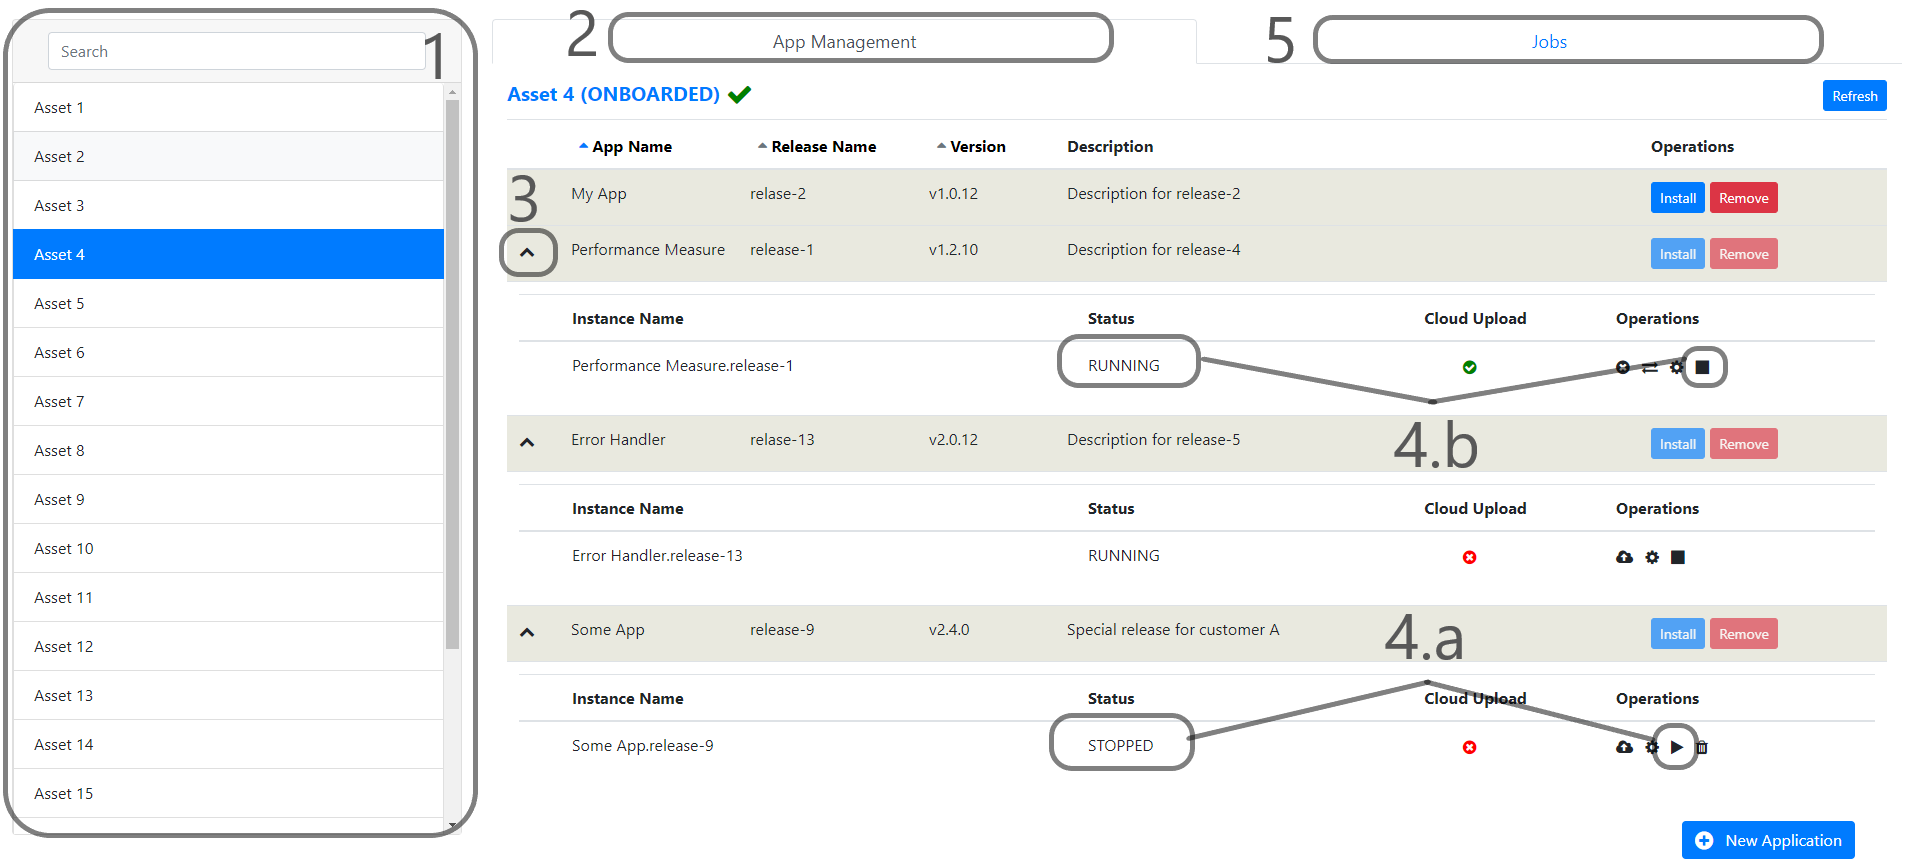
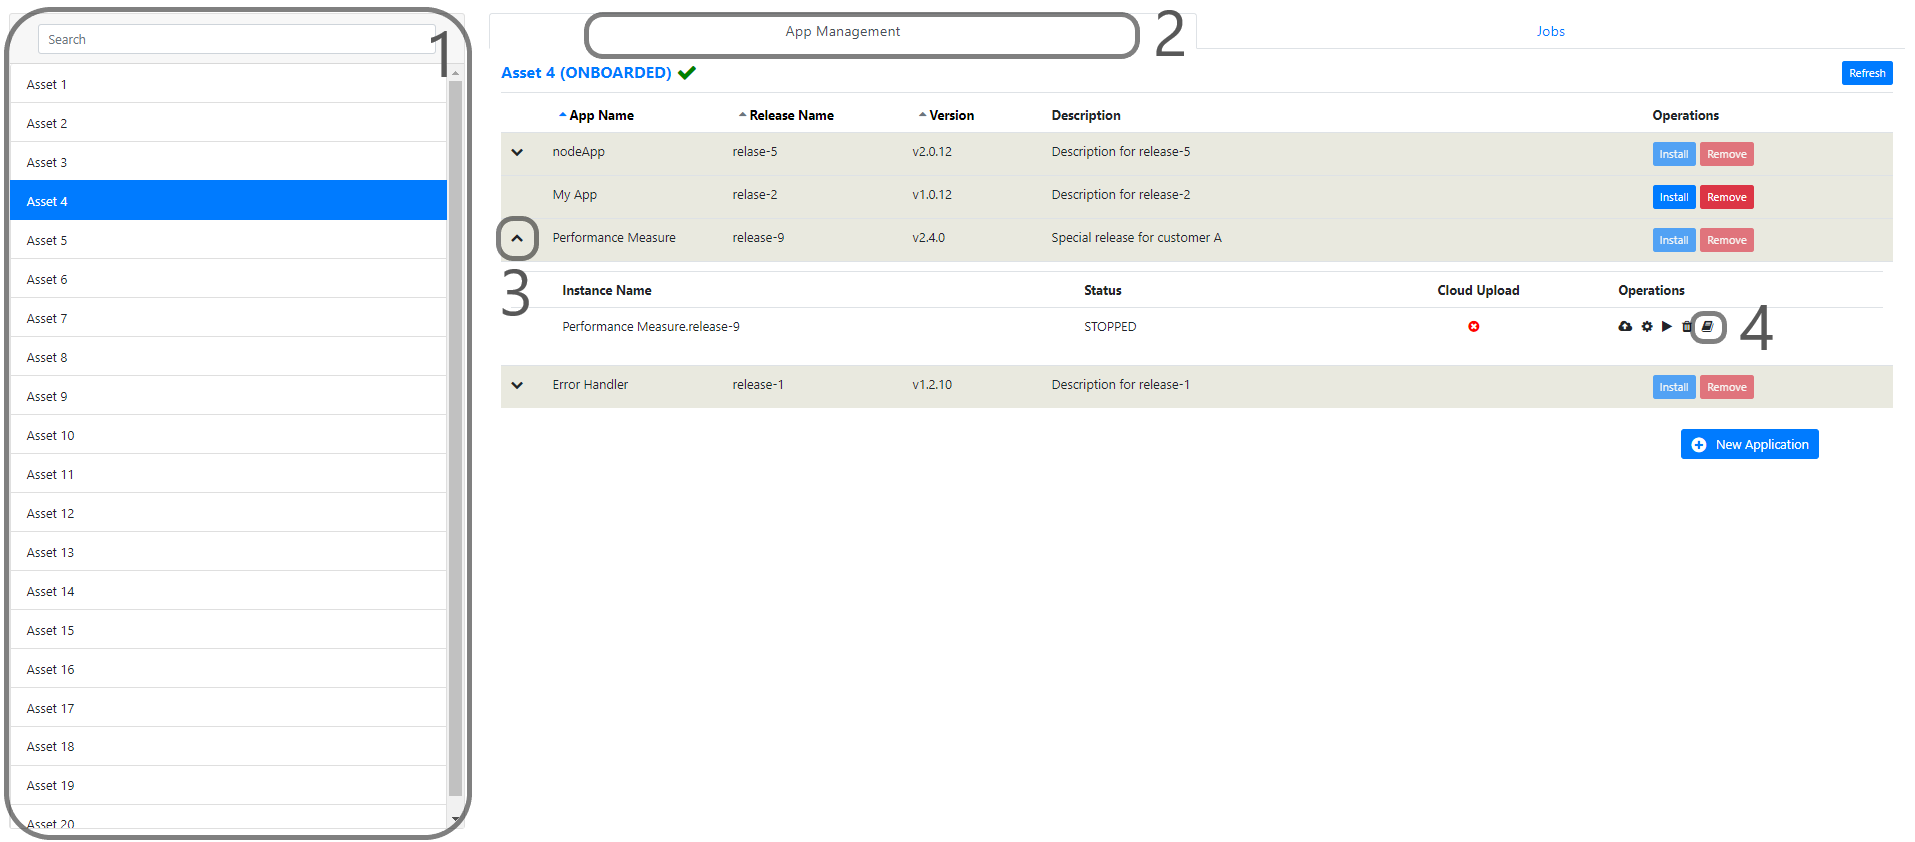
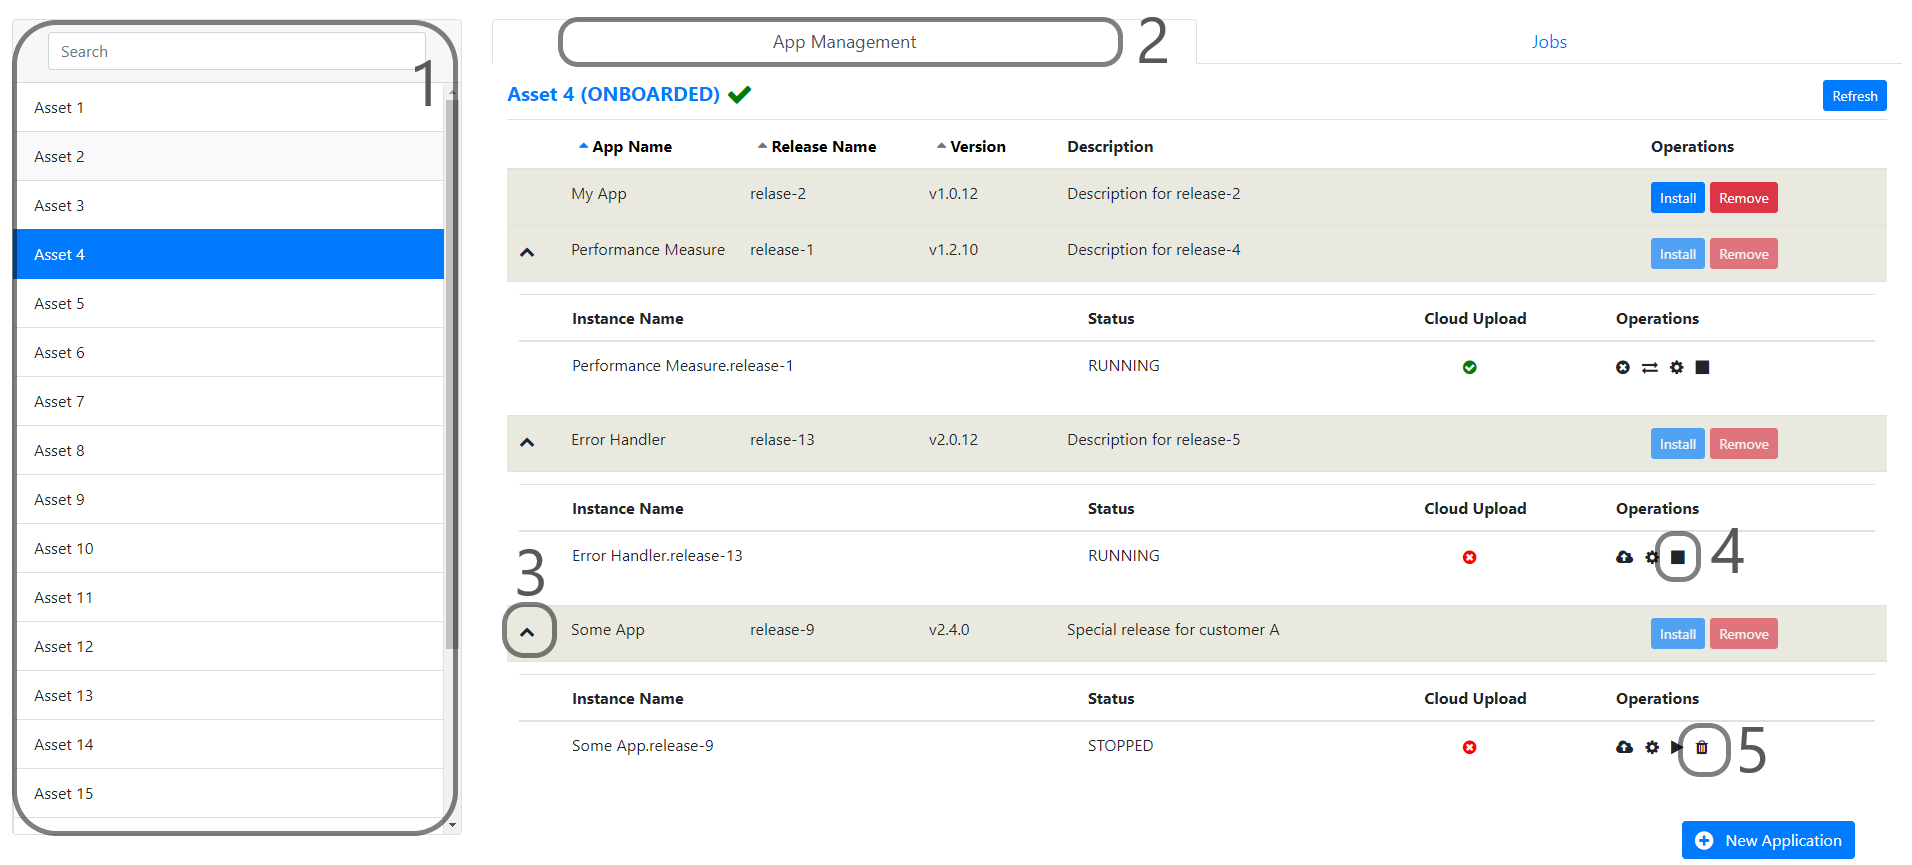
1) Select an Asset
2) Select the “App Management” tab
3) This section shows the "Application Release and Application Instance Management" table
4) This section shows the "Application Release" entry
5) Click the Expand/Collapse Icon to display/hide the "Application Instances" that are installed from the "Application Release"
6) This section shows the "Application Instance" entries
Deploying Application to Asset
This feature is used to deploy a release of an application to asset.
1) Choose your Industrial Edge asset
2) Select the "App Management" tab
3) Click the New Application button
4) A new window will be opened where you can select the application and release you want to deploy. Select the application. You can use the search area to find the application.
5) When you select the application, release table displays releases of that application with details. Select the "Release Version" you like to deploy to your asset. * Click the Additional Documents icon to display the "Additional Documents" list and download the relevant documents, e.g. "Release Notes" etc., from that list
6) Click the check-box to accept "Terms and Conditions". The "Terms and Conditions" document should be read before proceeding to the next step. Click the Accept Terms and Conditions link to download the document. You can select any of the available languages the for document from the language drop down menu.
7) Click the Save button to start the deployment job.
8) Click the "Jobs" tab and the "Installation" sub tab.
9) Here you can find the installation job you have started in the previous step.


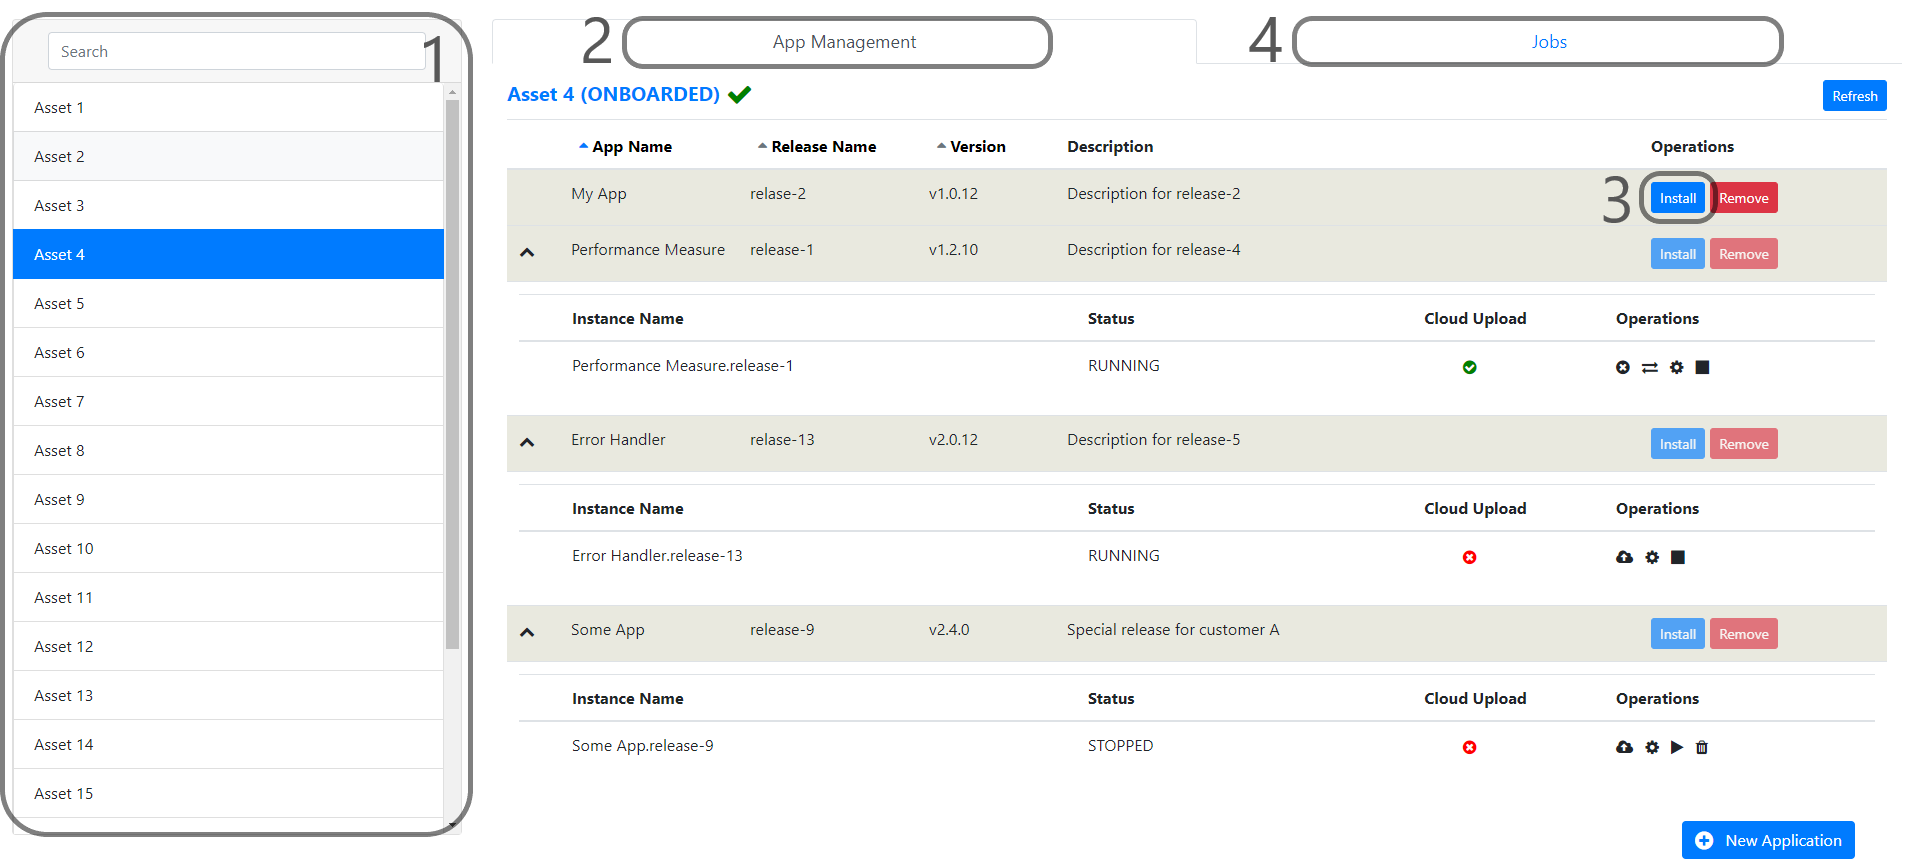
Installing Application Instance
This feature is used to install the previously deployed application release. Currently, only one application instance can be created from one application release.
1) Select an Asset
2) Select the “App Management” tab
3) Click the Install button of a deployed "Application Release" from the list
4) Observe the status from the “Jobs” tab and the “Configure” sub tab.
Known Issues: Currently, there is a synchronization issue between assets and cloud. When an installation is initialized, the Application is instantly created in the cloud but it may take some time to complete the actual installation in the asset. The status of the installation can be monitored from the “Configuration Jobs” section as mentioned.
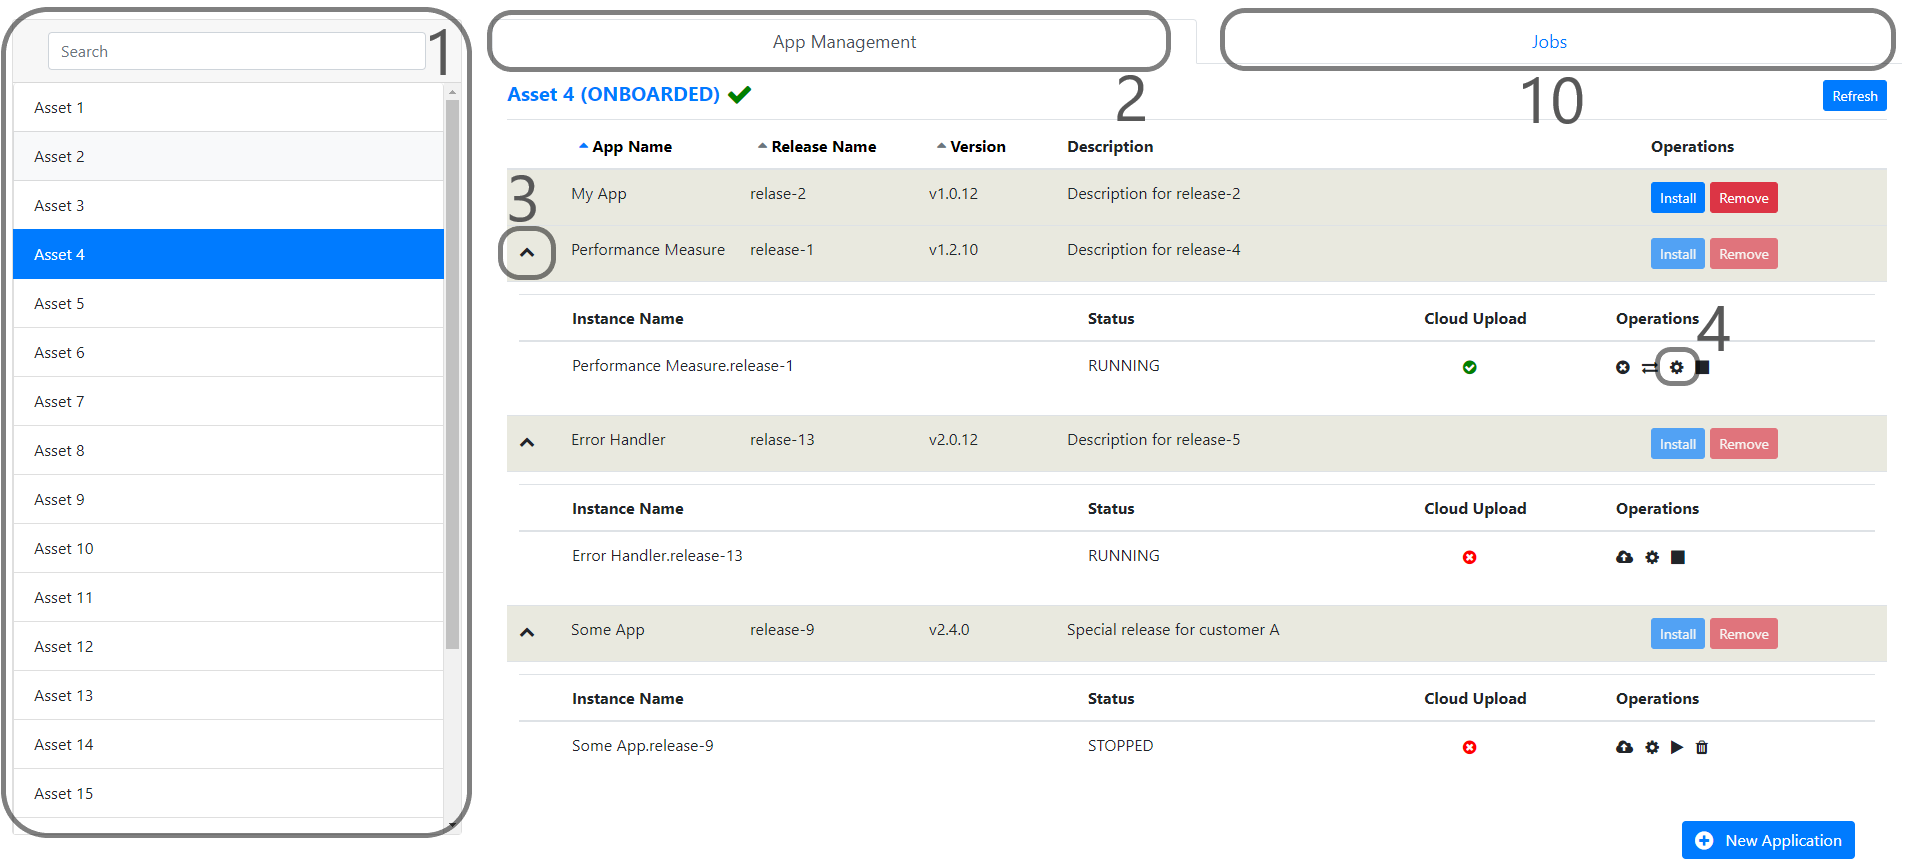
Configuring Application Instance
This feature is used to update the configuration of an application instance.
1) Select an Asset
2) Select “App Management” tab
3) Click “Expand” icon of a deployed "Application Release" from list
4) Click the “Edit App Instance Configuration” icon of the "Application Instance", for which you want to edit configuration
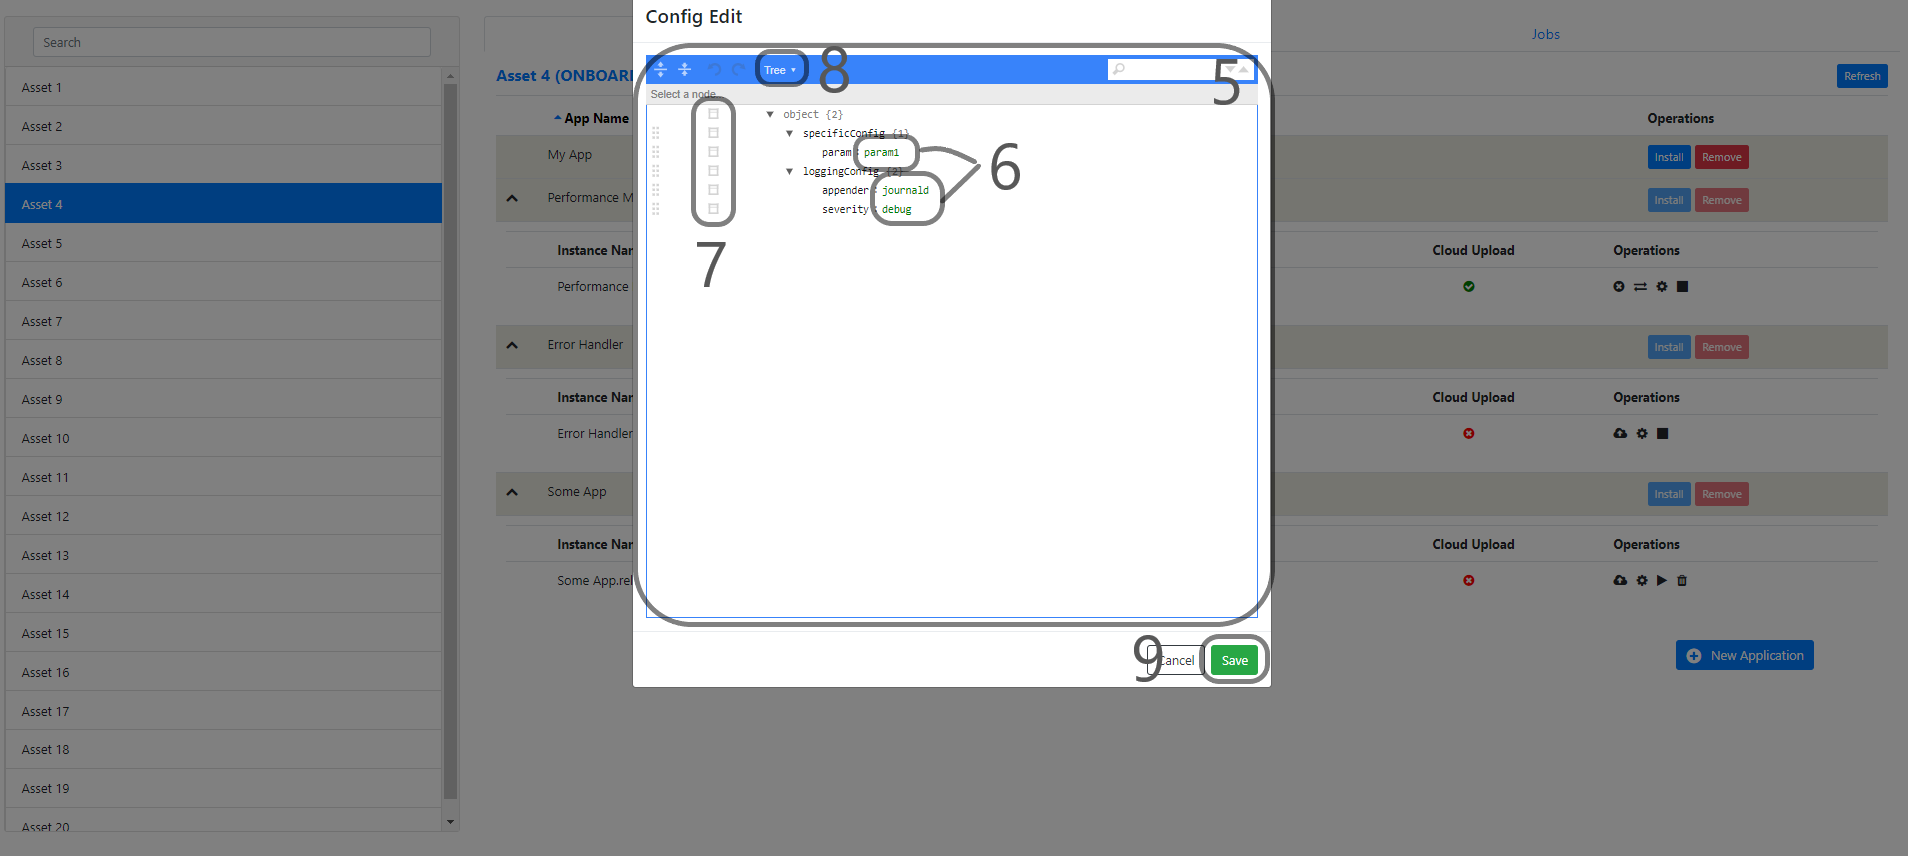
5) This action opens "Configuration Edit" window
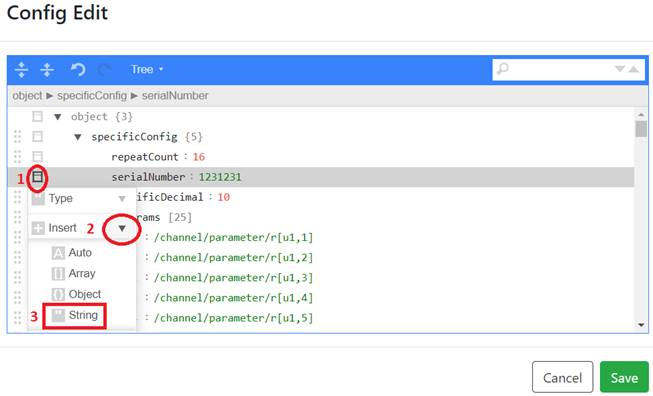
6) Click on parameter values to update
7) Use icons to add new configuration parameter or remove existing one.
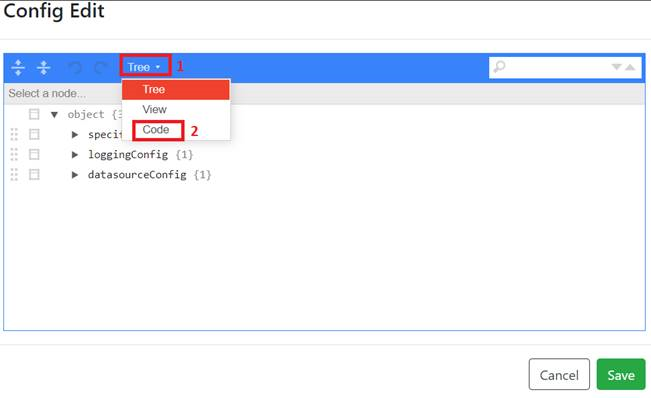
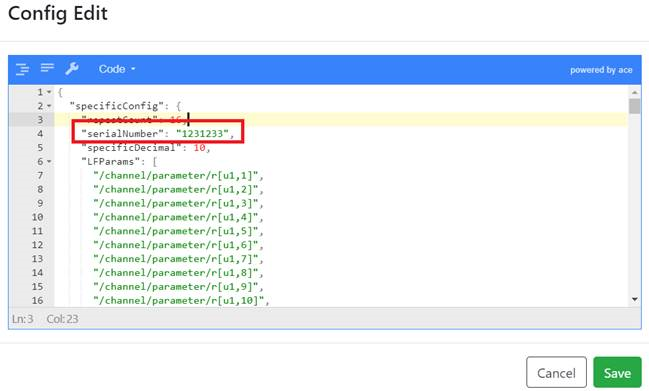
8) Alternatively, click on drop down and select “code” option to edit the configuration in json/text format.
9) Click Save to save the configuration update and deploy the changes to the asset.
10) Observe the status from “Jobs” tab and “Configure” sub tab.
Known Issues: Currently, there is a synchronization issue between assets and cloud. When configuration of an application instance is updated, the update instantly shows effect in Cloud and UIs. Therefore, the updated configuration will be displayed when the “Edit App Instance Configuration” is clicked a second time. However, it takes some time for the configuration to show effect, even the application in the asset may need to be restarted. The real status of the configuration operation in the asset can be monitored from the jobs section as mentioned.
Warning
If the value which is edited is in string format, different steps need to be applied in "Configuration Edit" window not to encounter parsing problems on SINUMERIK Edge side
- Option-1: using Tree view
- Option-2: using Code view
Start/Stop Application Instance
This feature is used to start/stop application instances.
1) Select an Asset
2) Select the “App Management” tab
3) Click the “Expand” icon of a deployed "Application Release" from the list
4) Start or Stop the selected "Application Instance": * To start an "Application Instance", click the Start icon for an application which has “STOPPED” status * To stop an "Application Instance", click the Stop icon for an application which has “RUNNING” status
5) Observe the status from the “Jobs” tab and the “Configure” sub tab.
Known Issues: Currently, there is a synchronization issue between assets and cloud. When an application instance is started or stopped, the cloud and UI’s are instantly updated and display the new status of the "Application Instance". However, it takes some time for the asset to actually start or stop applications. The real status of this operation in the asset can be monitored from the jobs section as mentioned.
Download Additional Documents
This feature is used to view/download additional documents, e.g. "Release Notes" etc.
1) Select an Asset
2) Select the “App Management” tab
3) Click the “Expand” icon of a deployed "Application Release" from the list
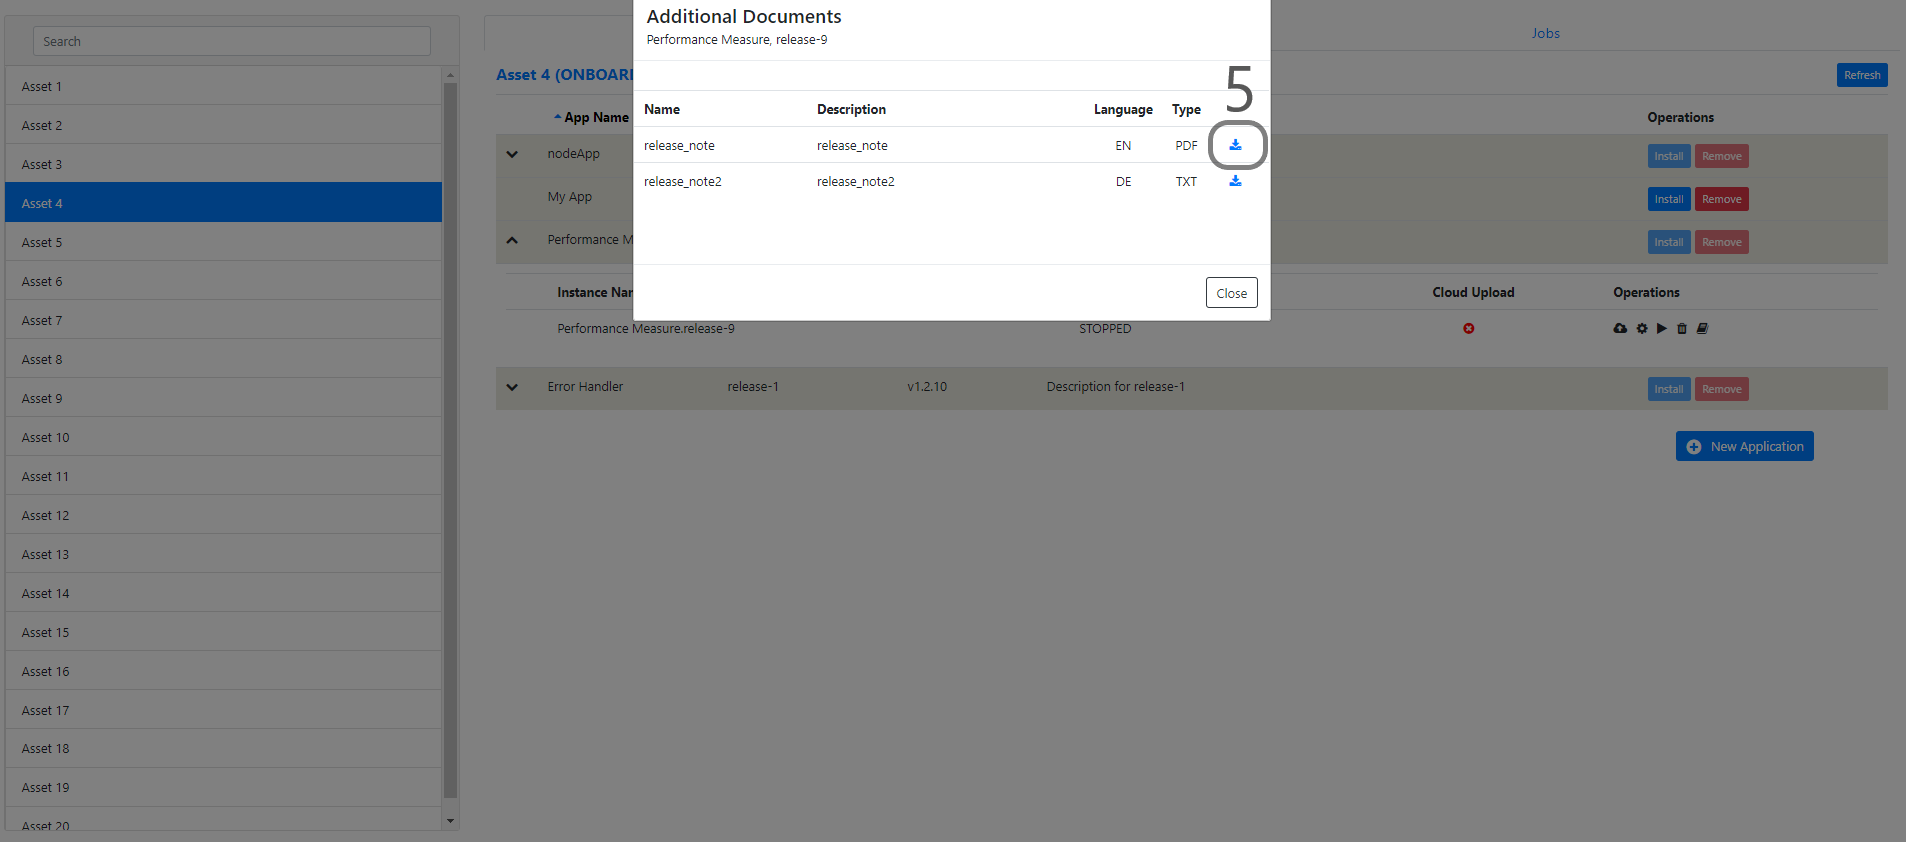
4) Click the Additional Documents icon to display the "Additional Documents" window
5) Click the Download icon to download the available documents.
Enabling/Disabling Cloud Upload
1) Select an Asset
2) Select the “App Management” tab
3) Click the “Expand” icon of a deployed "Application Release" from the list
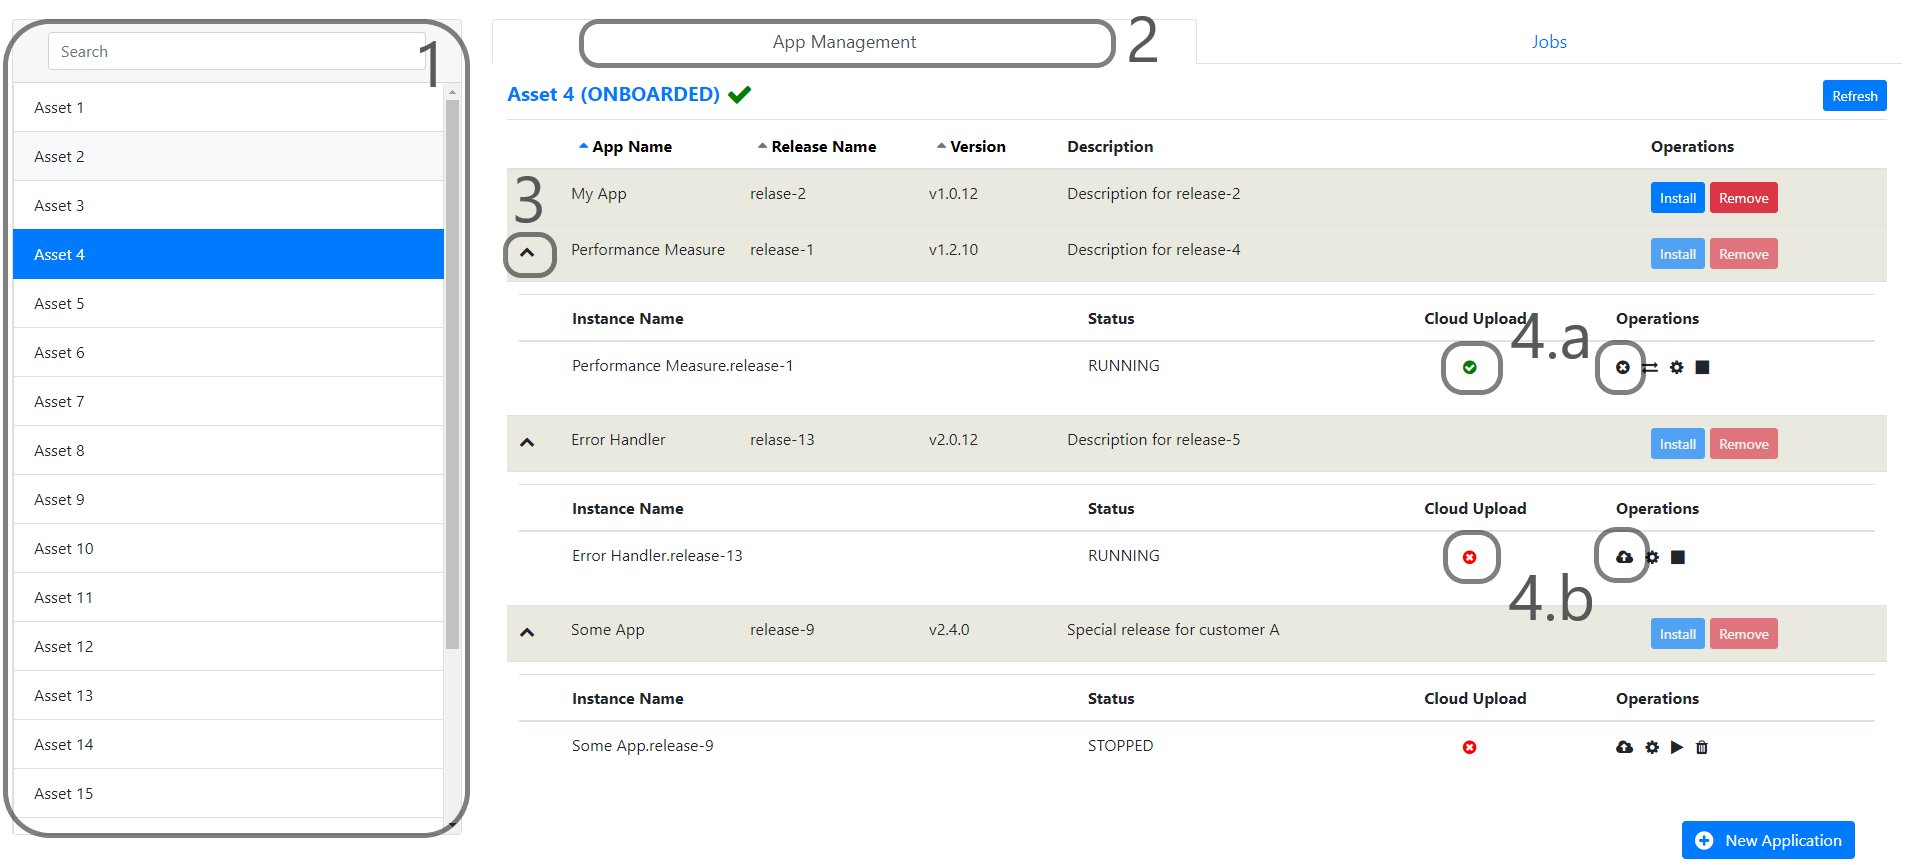
4) Enable or Disable the Cloud Upload feature of the "Application Instances": * To disable the cloud upload feature, click the Disable Upload Cloud icon for an application which has “Cloud Upload: Enabled” status * To enable cloud upload feature, click the Enable Upload Cloud icon for an application which has “Cloud Upload: Disabled” status
5) Observe the status from the “Jobs” tab and the “Configure” sub tab.
Data Mapping
1) Select an Asset
2) Select the “App Management” tab
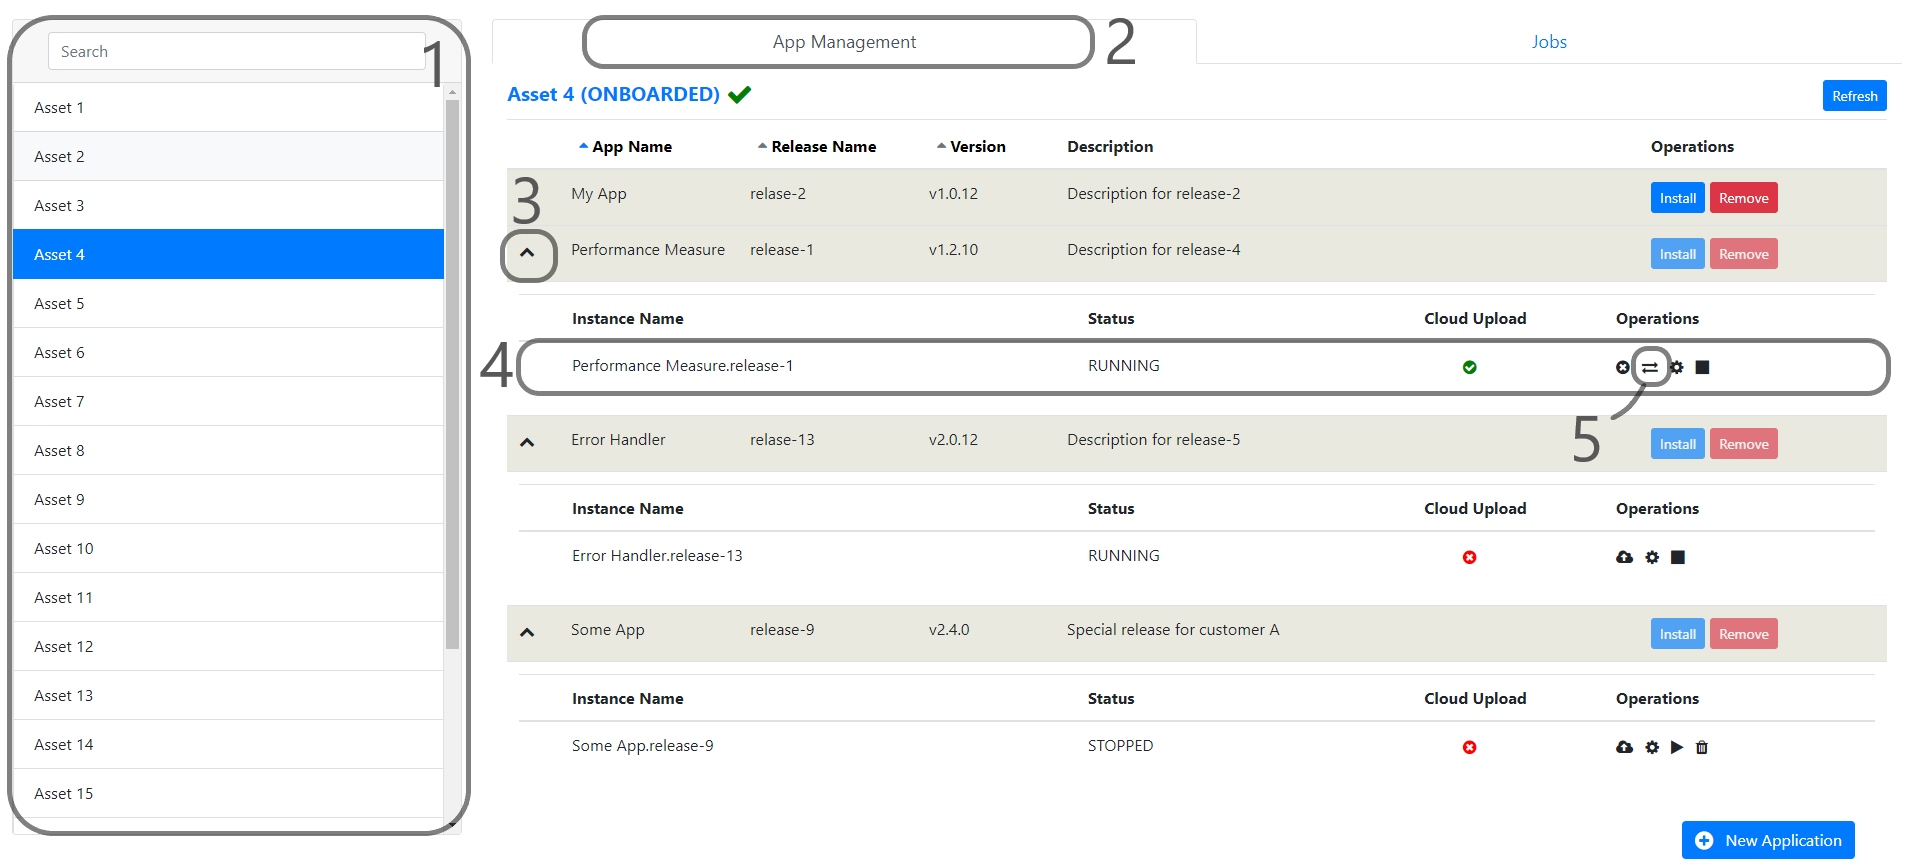
3) Click the “Expand” icon of a deployed "Application Release" from the list
4) This section displays the "Application Instance" list
5) Click the Data Mapping icon to display the "Data Mapping" List
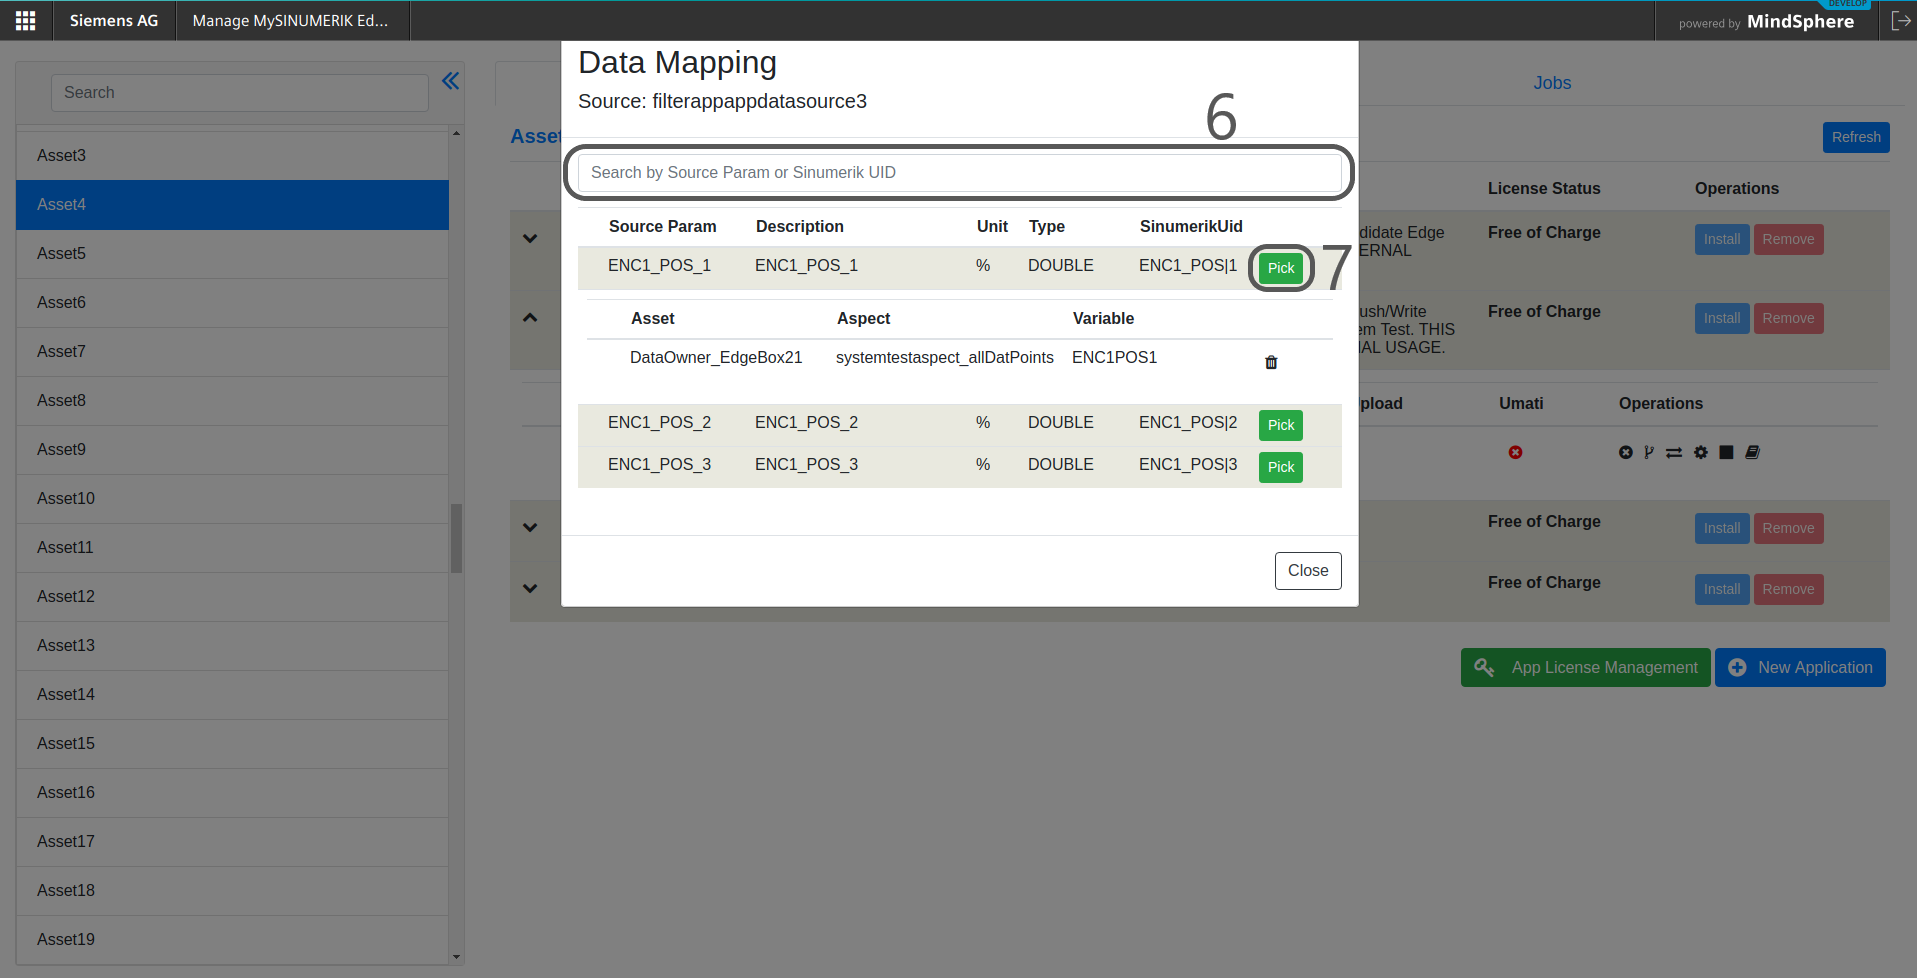
In order to add a new Mapping:
6) Search source param and SINUMERIK UID by typing keywords in the Search box
7) Click the Pick button of the (source) parameter for which you want to define a new mapping
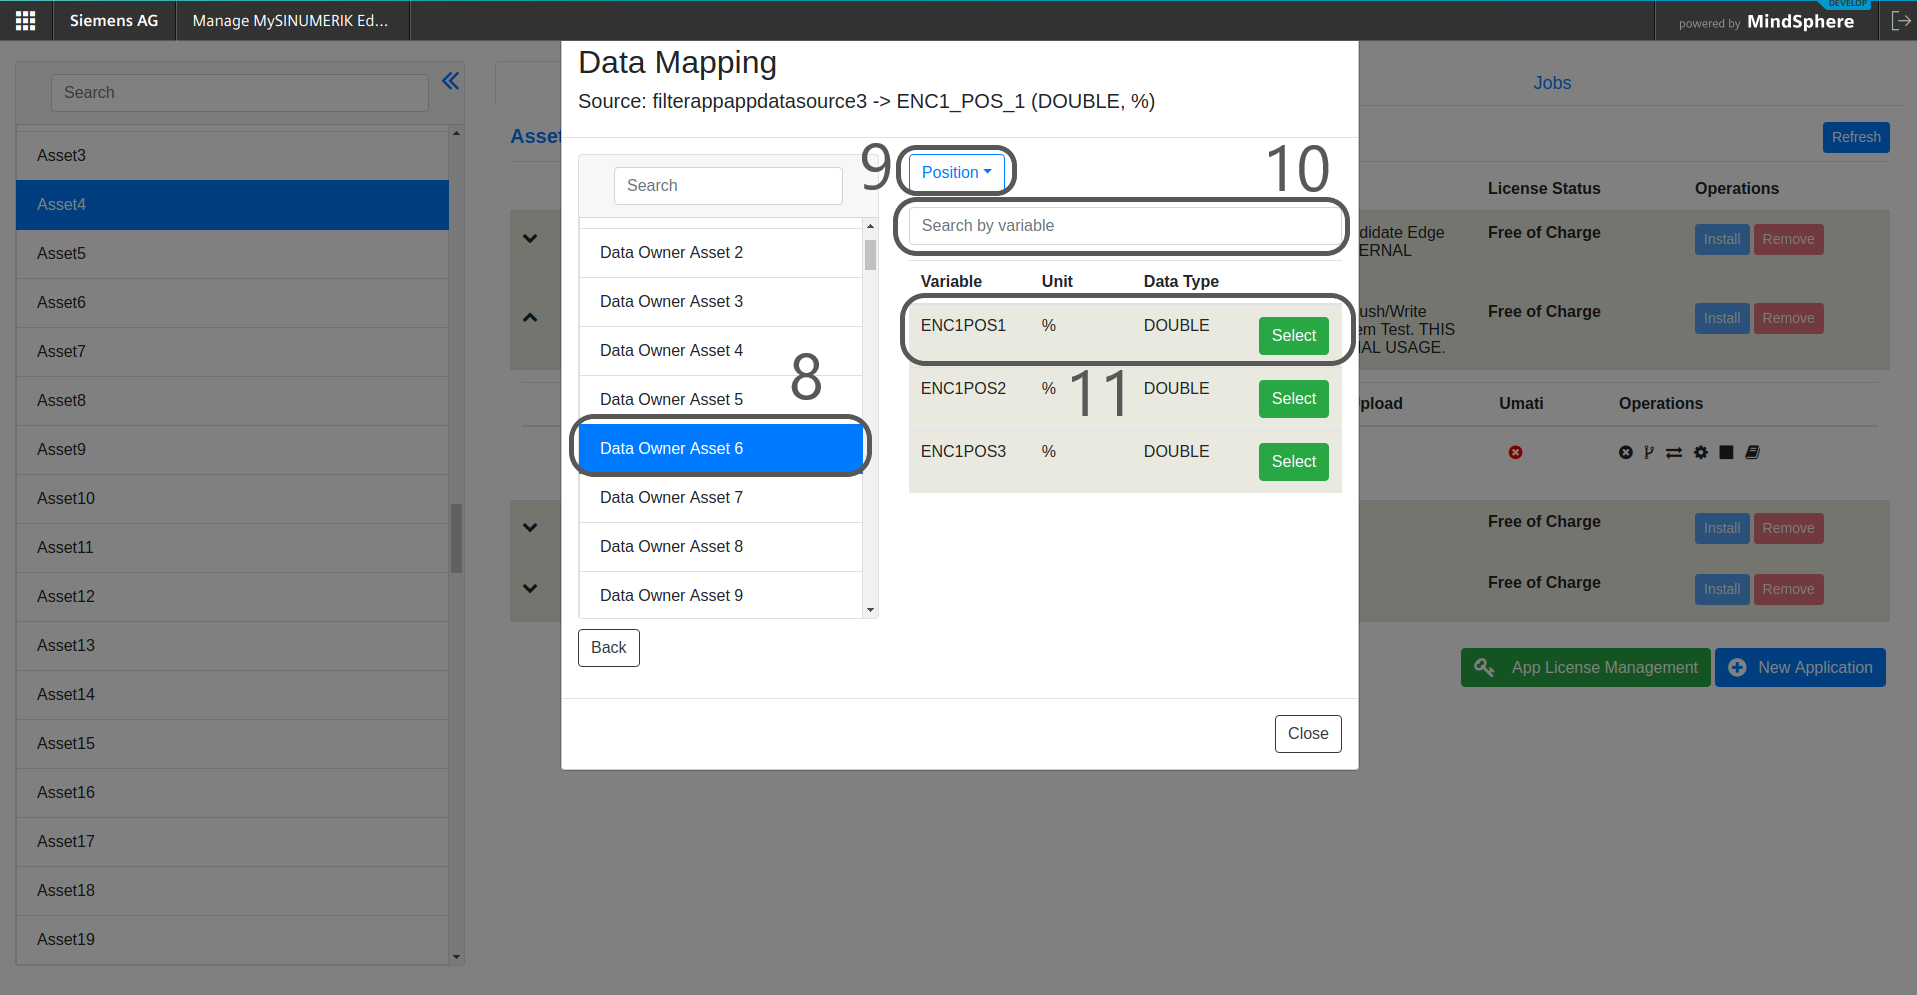
8) From the "Data Owner" asset list, select a data owner asset. The source parameter value will be sent to that asset
9) Select one of the aspect types from the the Aspect Type drop down. The source parameter's value will be sent to that aspect type of the previously selected asset.
10) Search variable by typing keywords in the Search box
11) Select one of the parameters (as destination) by clicking the Select button.
12) The source parameter value is now mapped to the selected destination parameter.
Removing Application Instance
1) Select an Asset
2) Select the “App Management” tab
3) Click the “Expand” icon of a deployed "Application Release" from the list
4) If the Application Instance’s status is not "Stopped", first click the Stop button to stop it and make the Remove App Instance icon visible.
5) Click the Remove App Instance icon to remove the application.
6) Click the “Jobs” tab and the “Configure” sub tab.
7) Observe the status from the list
Warning
Please disable cloud upload feature of an application before uninstalling.

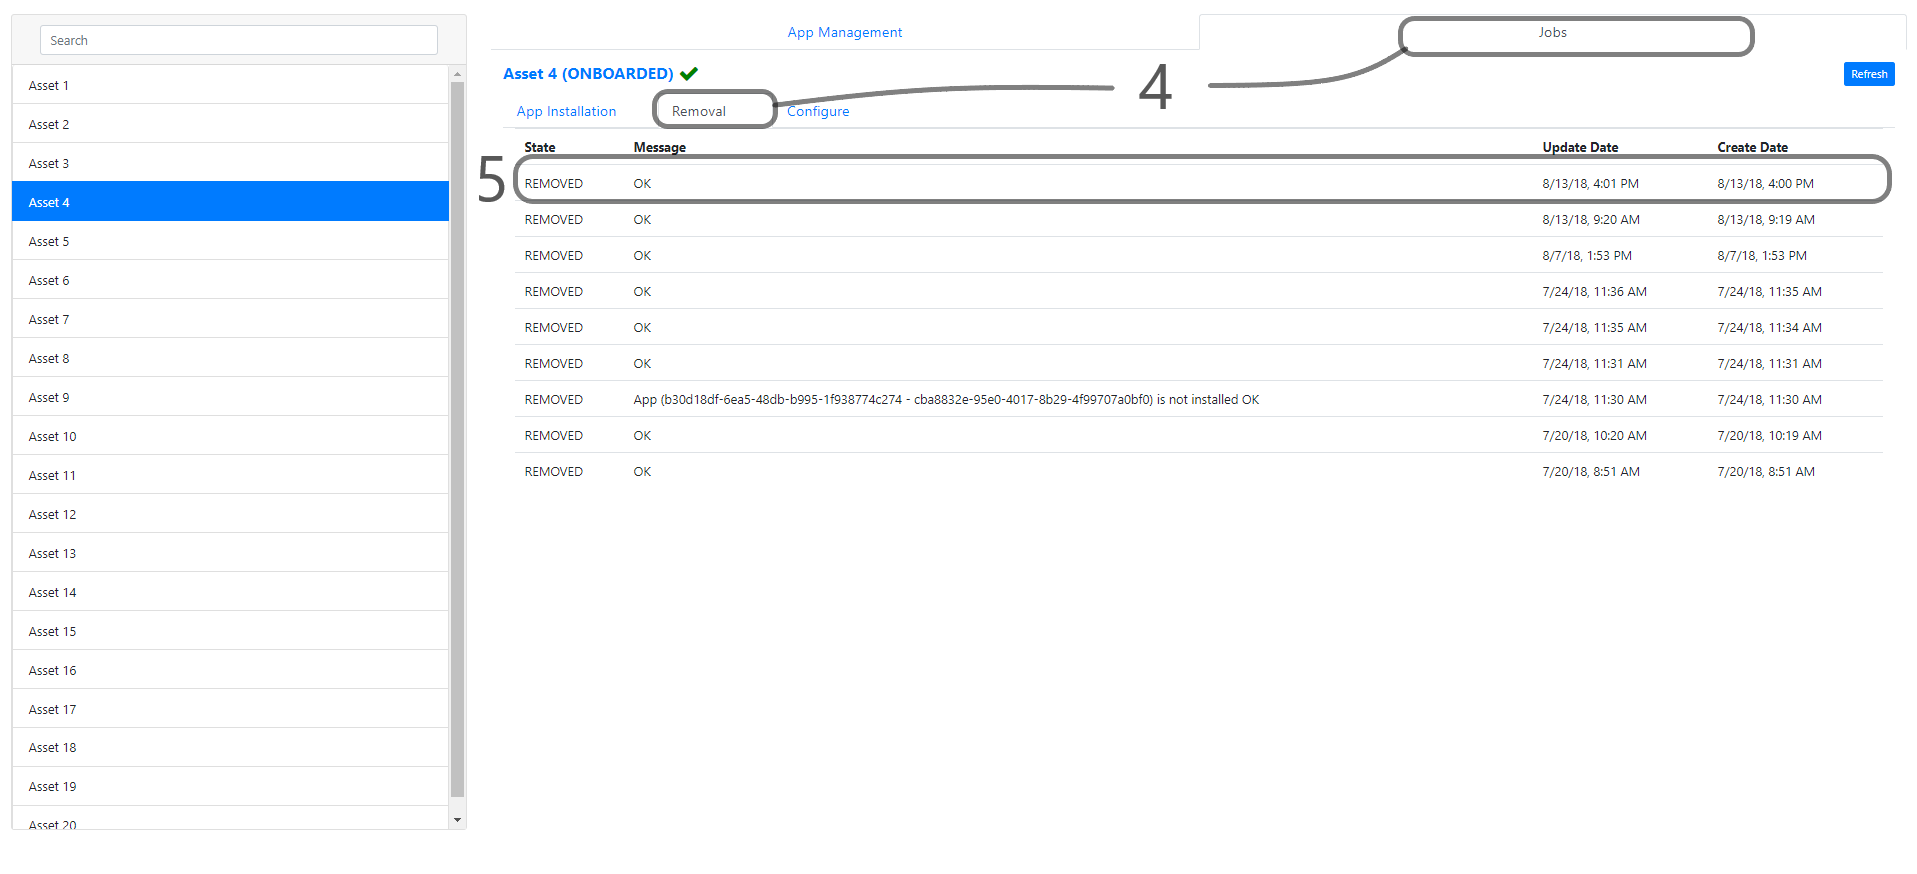
Removing Application Release
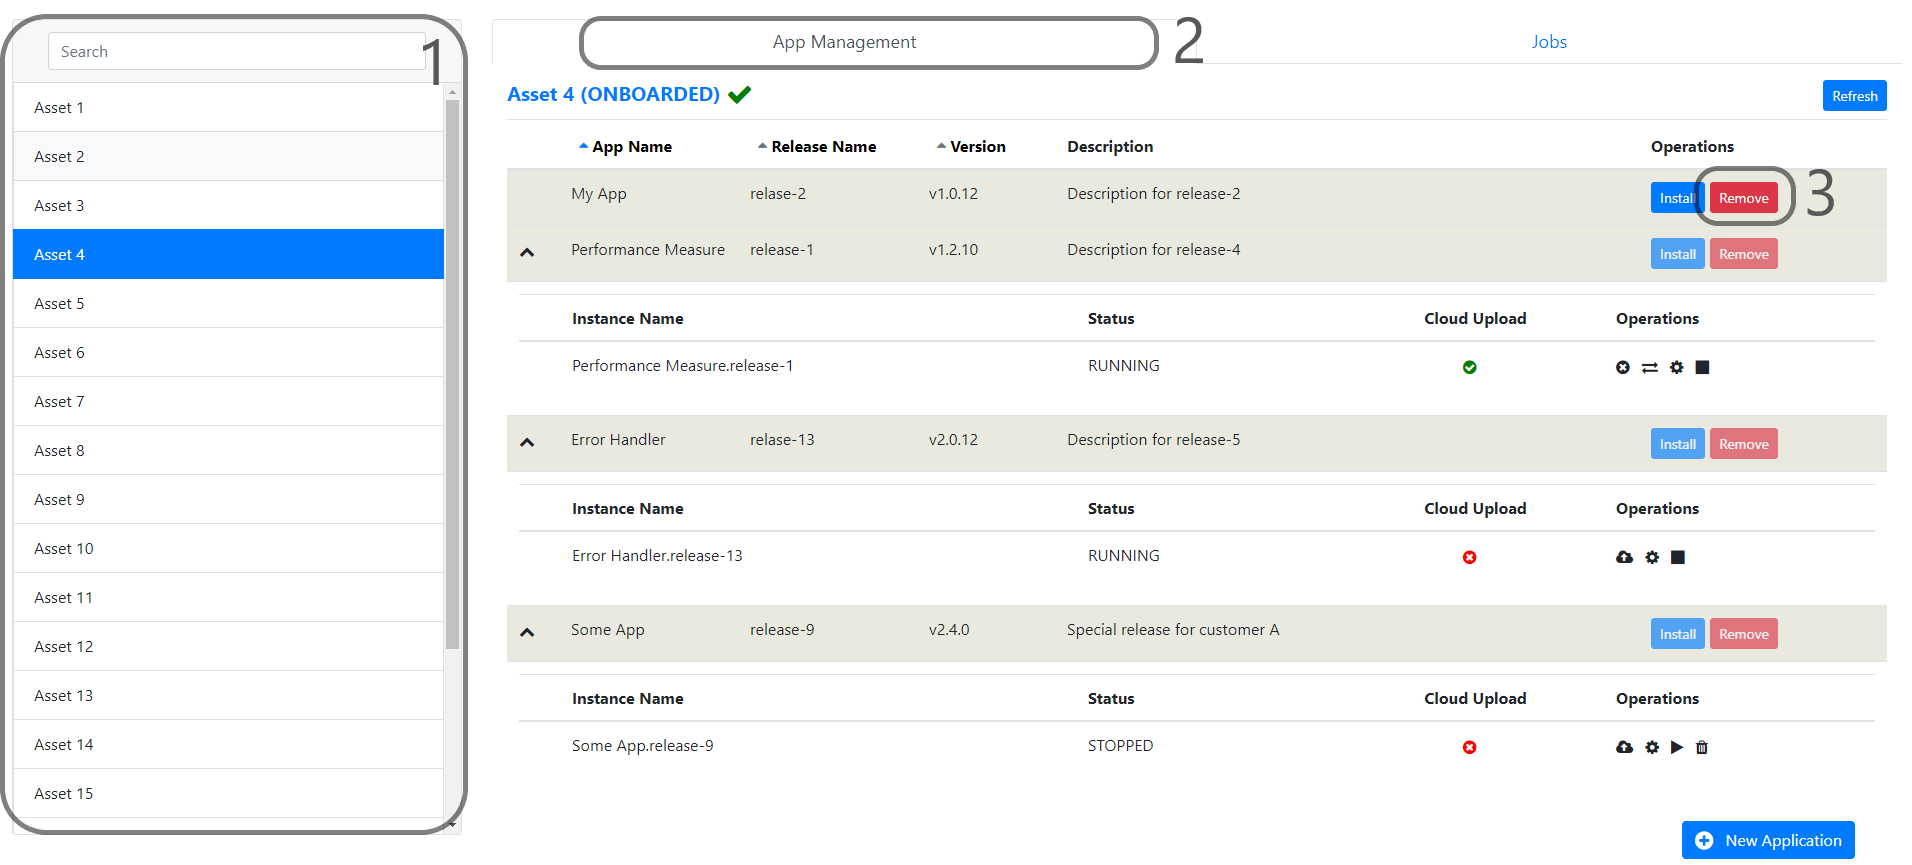
1) Select an Asset
2) Select the “App Management” tab
3) Click the Remove button of an "Application Release" which you want to remove. Note that there must be no application instance created to remove applications. If so, just follow the Removing Application Instance section first.
4) Click the “Jobs” tab and the “Removal” sub tab.
5) Observe the status from the list
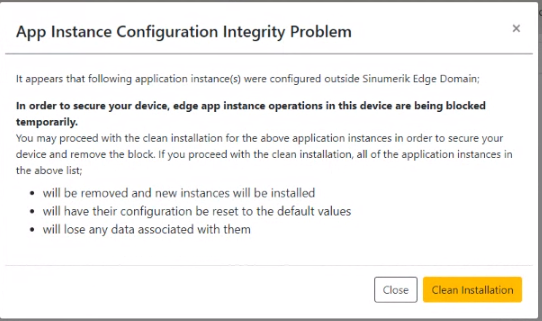
Application Instance Configuration Integrity
Manage MySINUMERIK Edge /App Management is the only autorized way of managing application instances in your device. Other use cases, such as using Insights Hub API's, will by-pass some major validations in the SINUMERIK Edge back-end services which may eventually lead to security vulnerabilities or integrity issues caused by misconfigurations.
If any of the application instances in a device are configured without using Manage MySINUMERIK Edge /App Management, SINUMERIK Edge backend services will not reflect those changes to your device and blocks your device for further configurations temporarily; you will be notified via an Integrity Problem pop-up. The application instance(s), whose configuration(s) are not accepted, are also listed in the pop-up.
In order to remove the block of your device, you may either;
- Click the "Clean Installation" button in the warning pop-up, which will remove and re-install the application instance(s) listed in the pop-up.
- Manually delete and re-install the application instance(s) listed in the pop-up
Please be aware that both of those operations will remove the app instance(s) and create new one(s); which will cause loss of any data/configuration that is associated with the removed app instance(s).
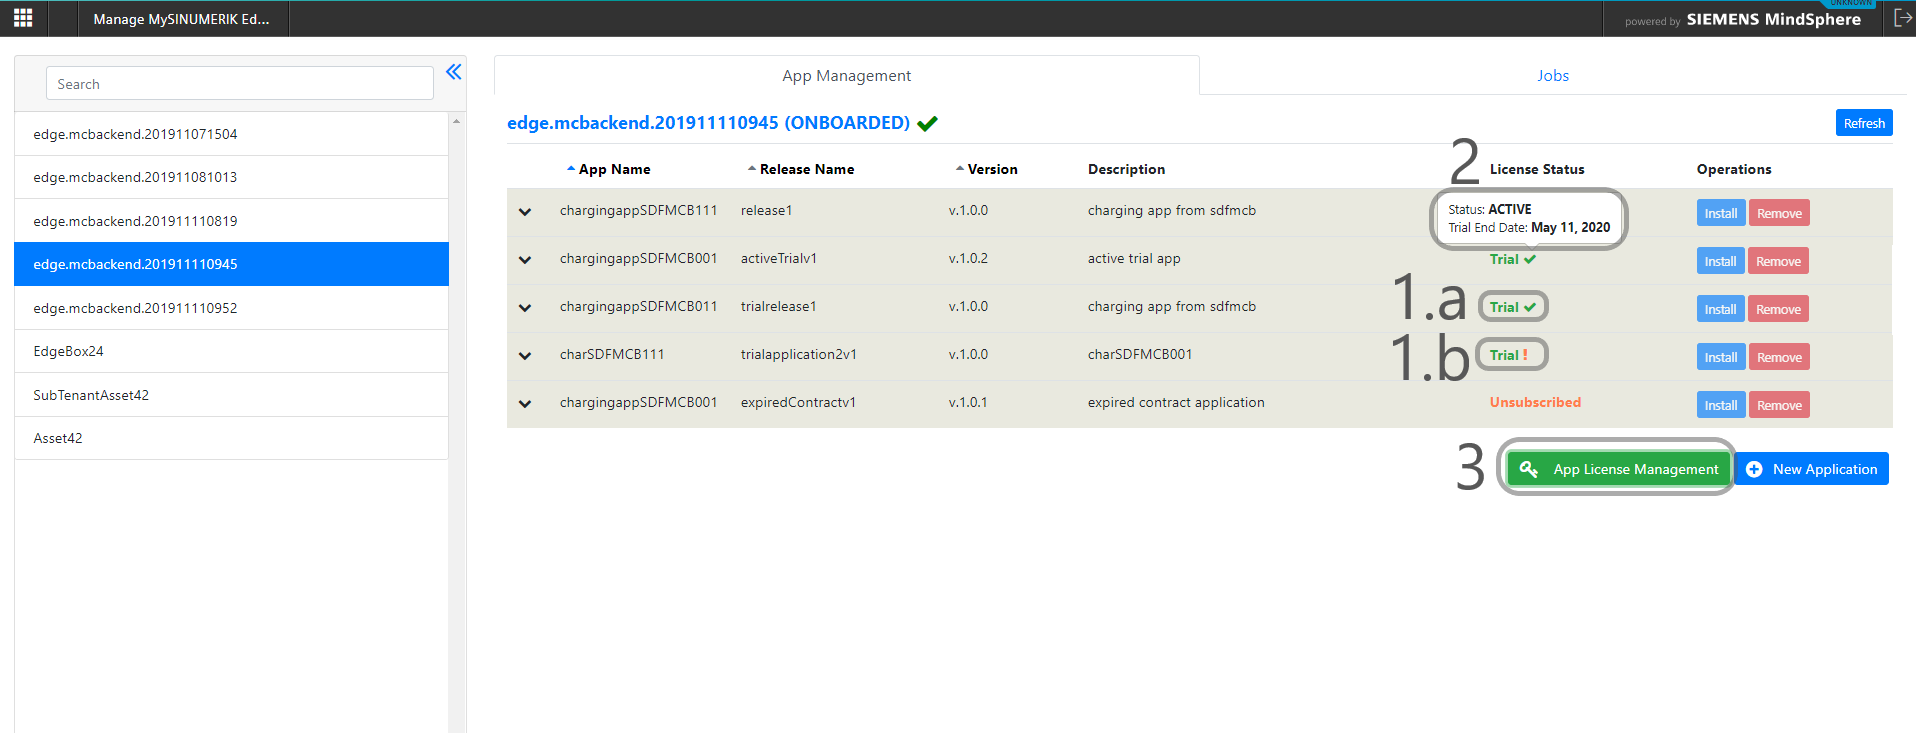
Trial Application Management
This feature provides managing applications with trial license.
Note: Trial license must be given to your tenant by operator. For detail information, you should communicate with your local sales representative.
1) After deploying trial application listing App Management list and license status shown like:
- display active trial status with tick mark.
- display expired trial status with exclamation mark.
2) Display a tooltip which given status and expiration date information when hovering mouse tick or exclamation marks.
3) Click 'App License Management' button to open license management pop up to manage trial application.
4) Select 'App Trial License Management' tab to list the applications with trial license.
5) Display trial application status * display 'ACTIVE' status, trial application can be used as a normal application end of the expiration date. * display 'EXPIRED' status, trial application cannot be used.
6) Click 'Purchase' button to purchase trial application which does not have any contract, confirmation pop up is shown.
7) Click 'Subscribe' button to subscribe trial application which has expired contract, confirmation pop up is shown.
8) Click 'Extend' button, trial license period can be extended if available license is given by the operator, if not contact your local sales representative.

Machine Tool Framework License Management
Using Machine Tool Framework Licenses
You can use the pro license, if you need, you can also use an additional license. Please refer to New Asset License Model: Machine Tool Framework chapter for further details of pro and additional licenses.
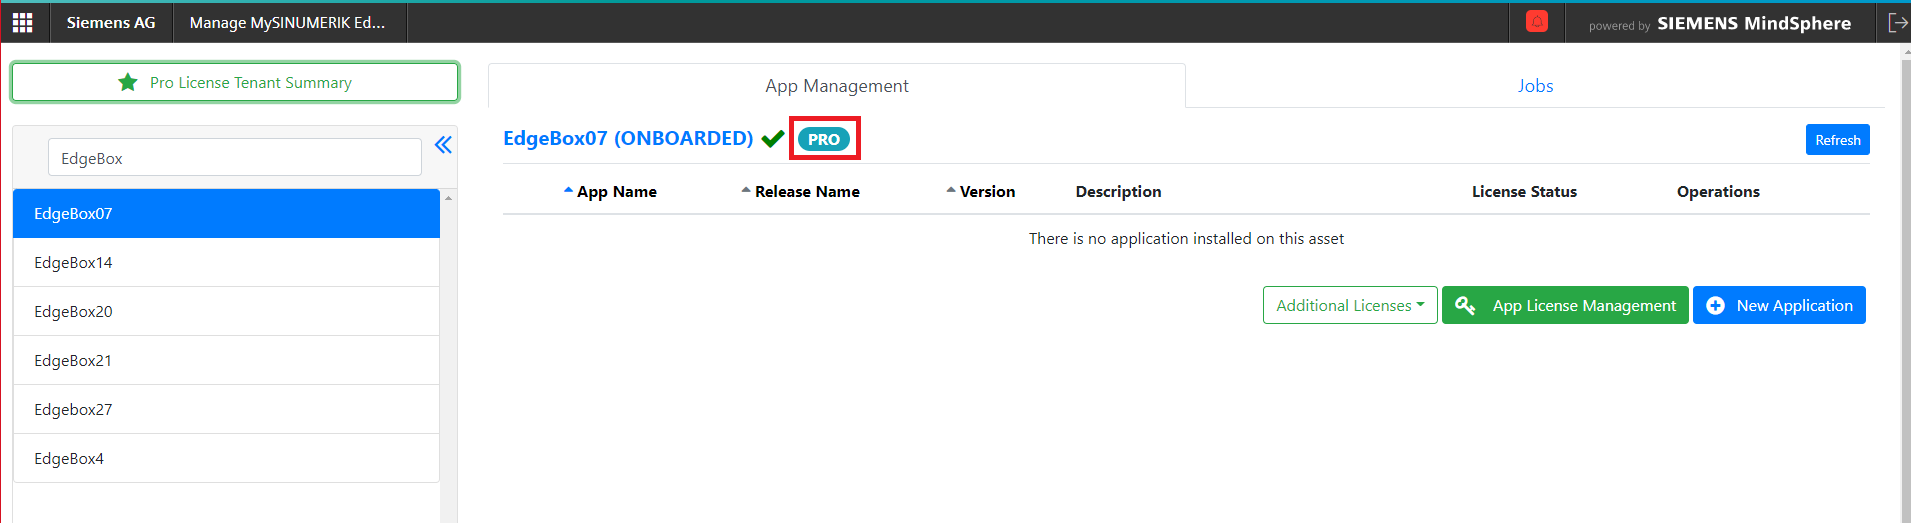
In order to assign Machine Tool Framework License to an asset, select an asset and then click Machine Tool Framework (pro) License button.
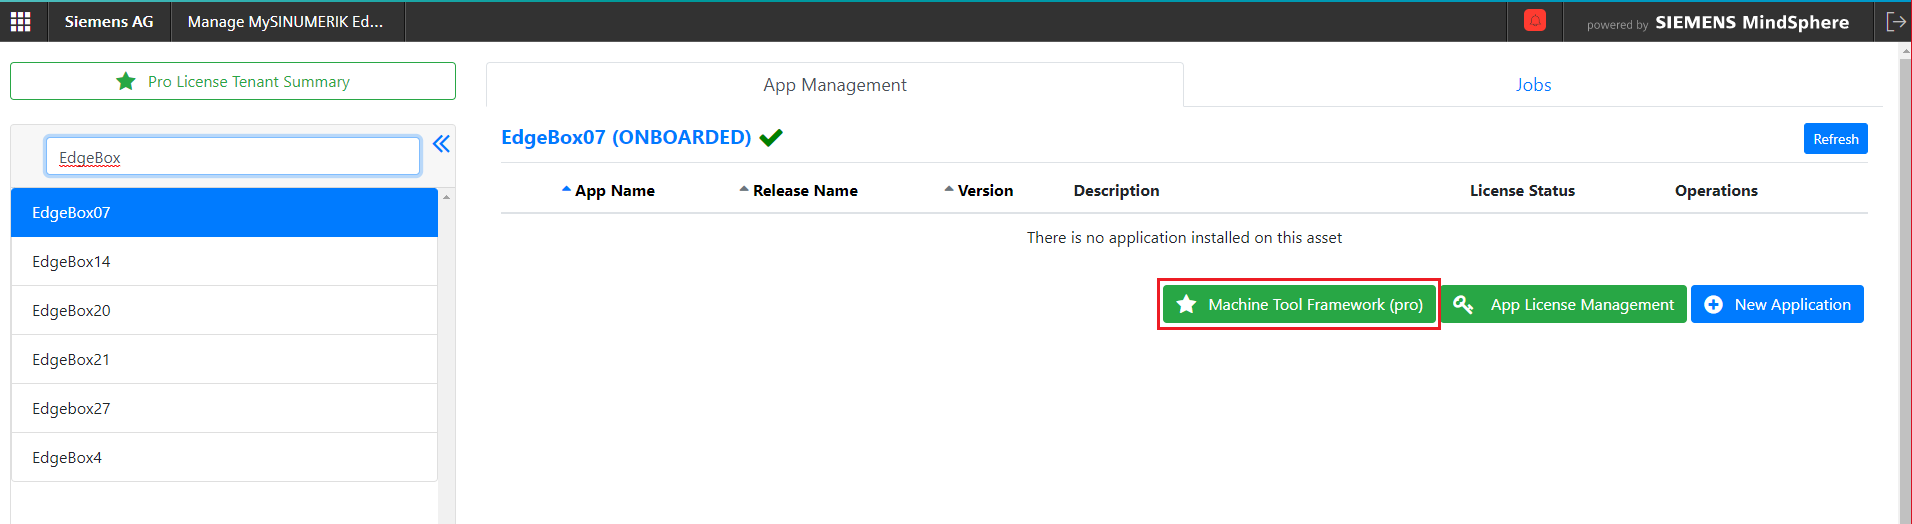
Once the license is assigned, the "Pro" badge will appear near the asset name.
If you wish to assign additional licences to your asset, you may click Additional Licenses button and select Machine Tool Framework (pro) +25.

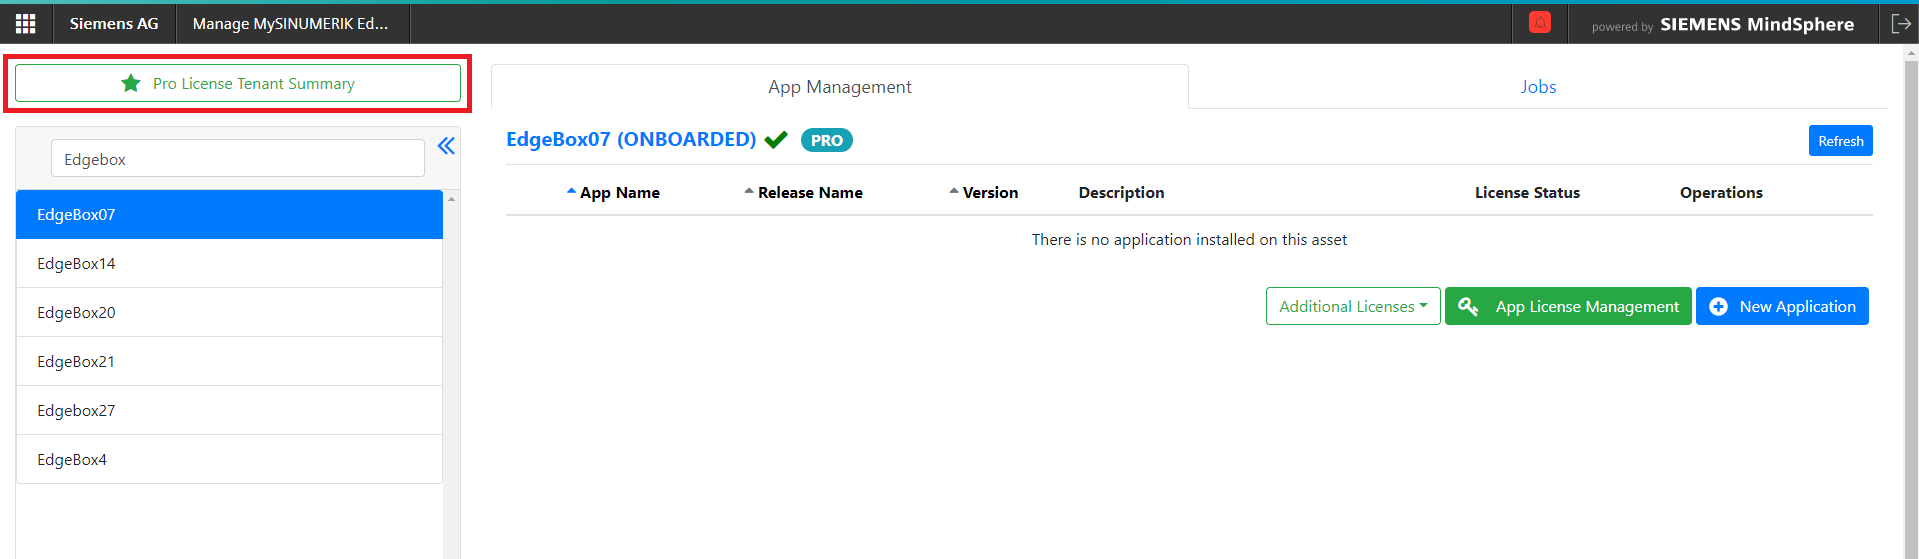
Machine Tool Framework License Tenant Summary
By clicking Pro License Tenant Summary button, you can track
- Total number of licenses you have in your tenant
- Total number of licenses assigned to assets
- Assets having license(s)
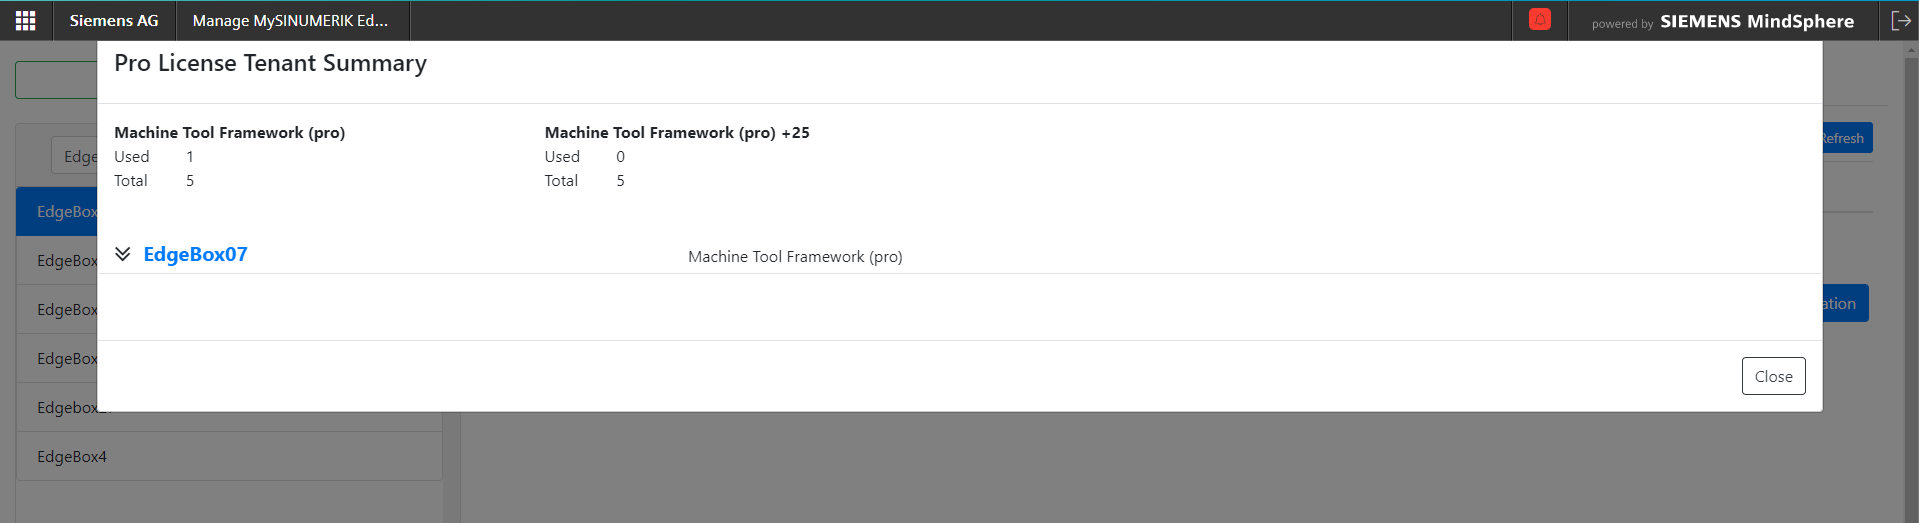
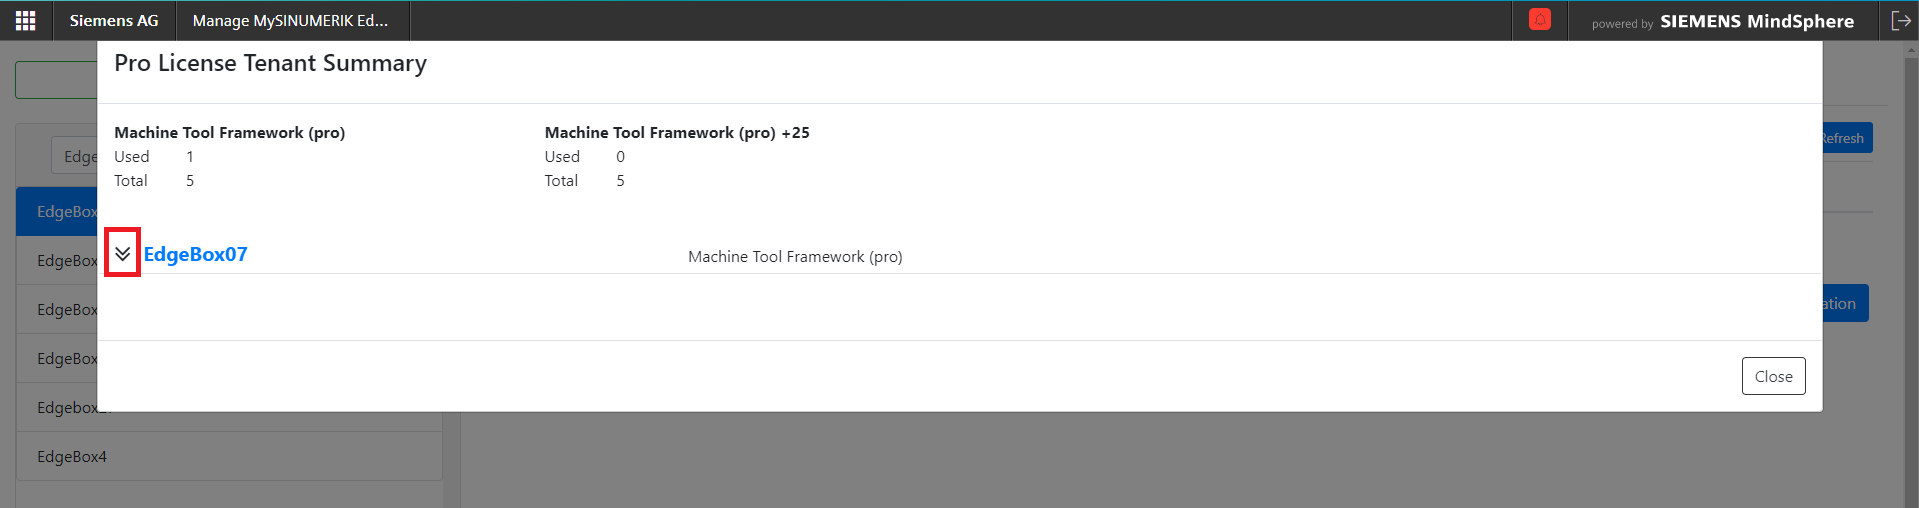
You may display further details about assets' assigned licenses by clicking the expand button
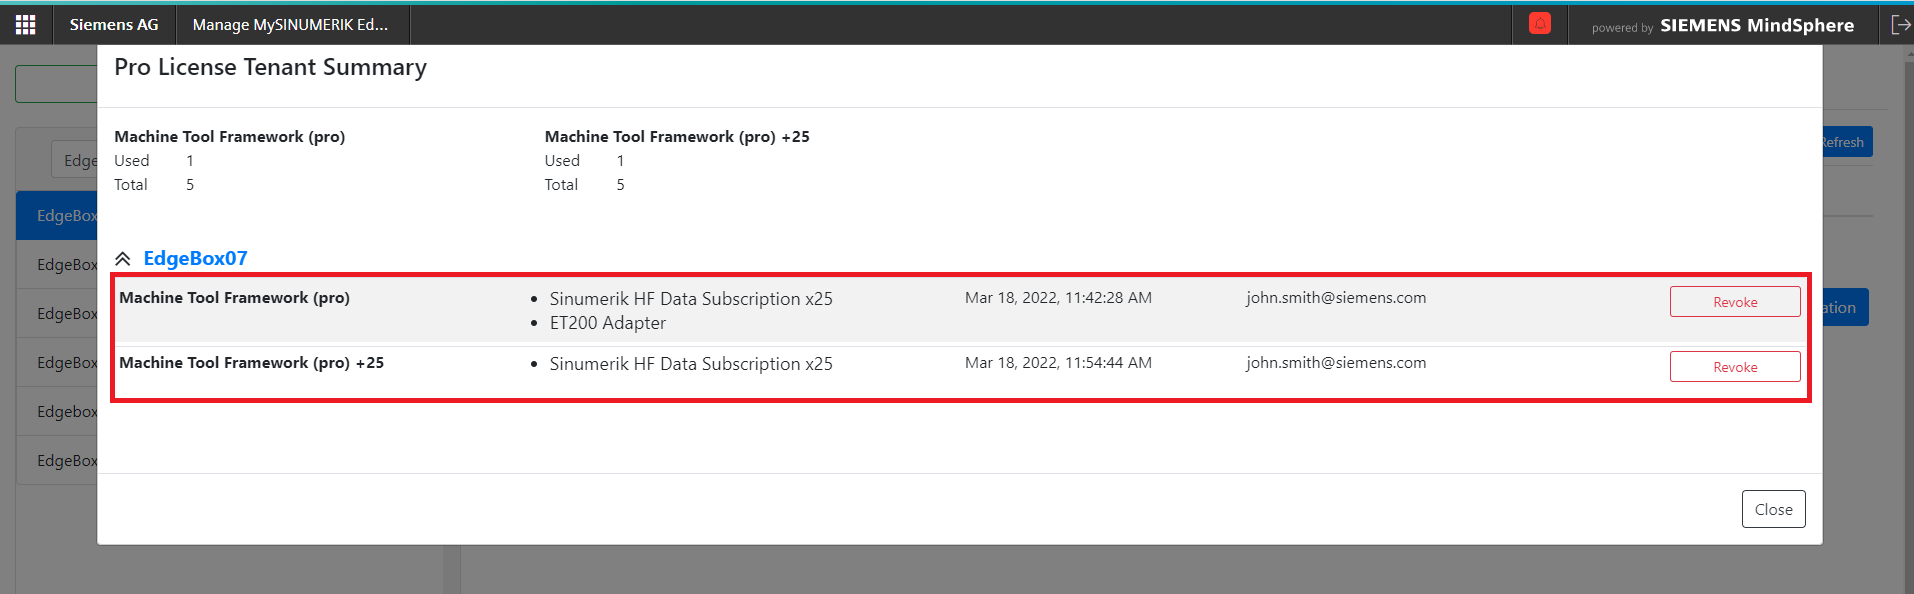
Revoking Machine Tool Framework Licenses
If you want to revoke a license from an asset, you can do so from Pro License Tenant Summary. Click Revoke button to revoke Machine Tool Framework (pro) or additional licences.
Important Note: 'Machine Tool Framework (pro) +25' needs to be revoked first in order to revoke 'Machine Tool Framework (pro)' License.
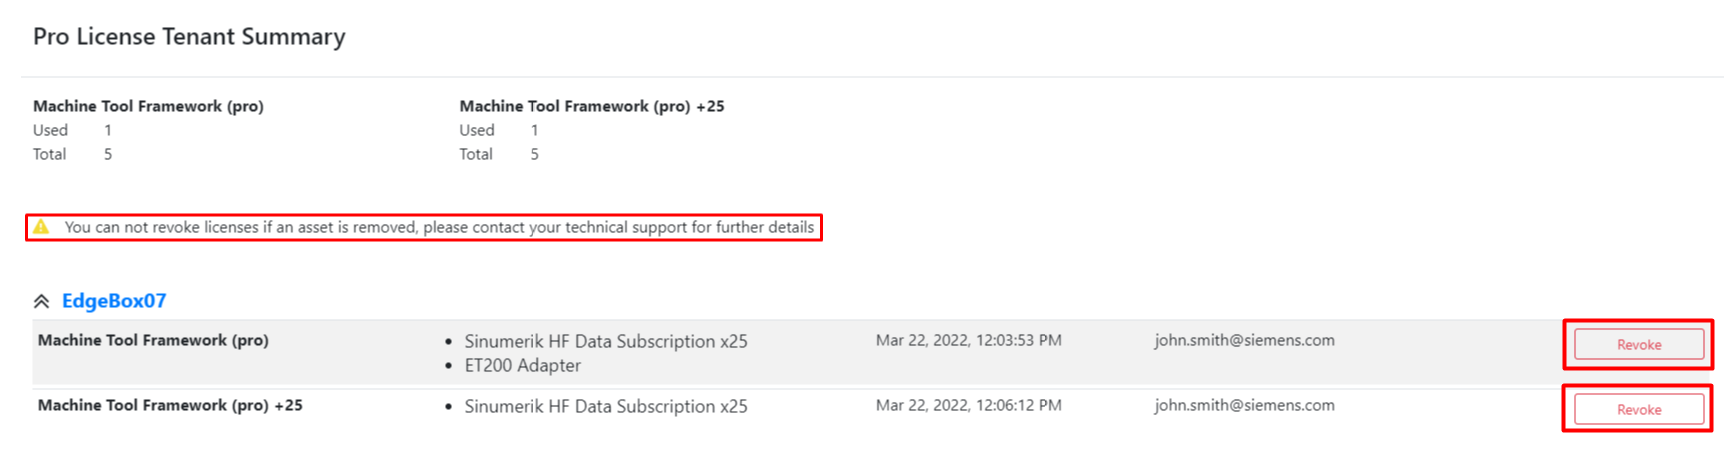
Warning
You can not revoke licenses if an asset is removed, please contact your technical support for further details
Firmware Management with Asset Manager Industrial Edge Plugin
The Industrial Edge provides a power fail-safe update over the air mechanism for the management of the overall firmware.
Note: The firmware update forces a reboot of the Industrial Edge to activate it. The download may take some time depending on the bandwidth. During this time the Industrial Edge still operates as usual.
Note: Firmware version updates may cause compatibility issues between firmware and previously installed edge applications. You should uninstall/remove every edge application (also system applications like adapterframework) from the box before proceeding with a firmware update in order to avoid compatibility issues. Once the firmware update is completed, you can install the latest edge applications that are compatible with your firmware by using Manage MySINUMERIK Edge /App Management.
Choose the Asset Manager from the Insights Hub Launchpad and click on "Industrial Edge"
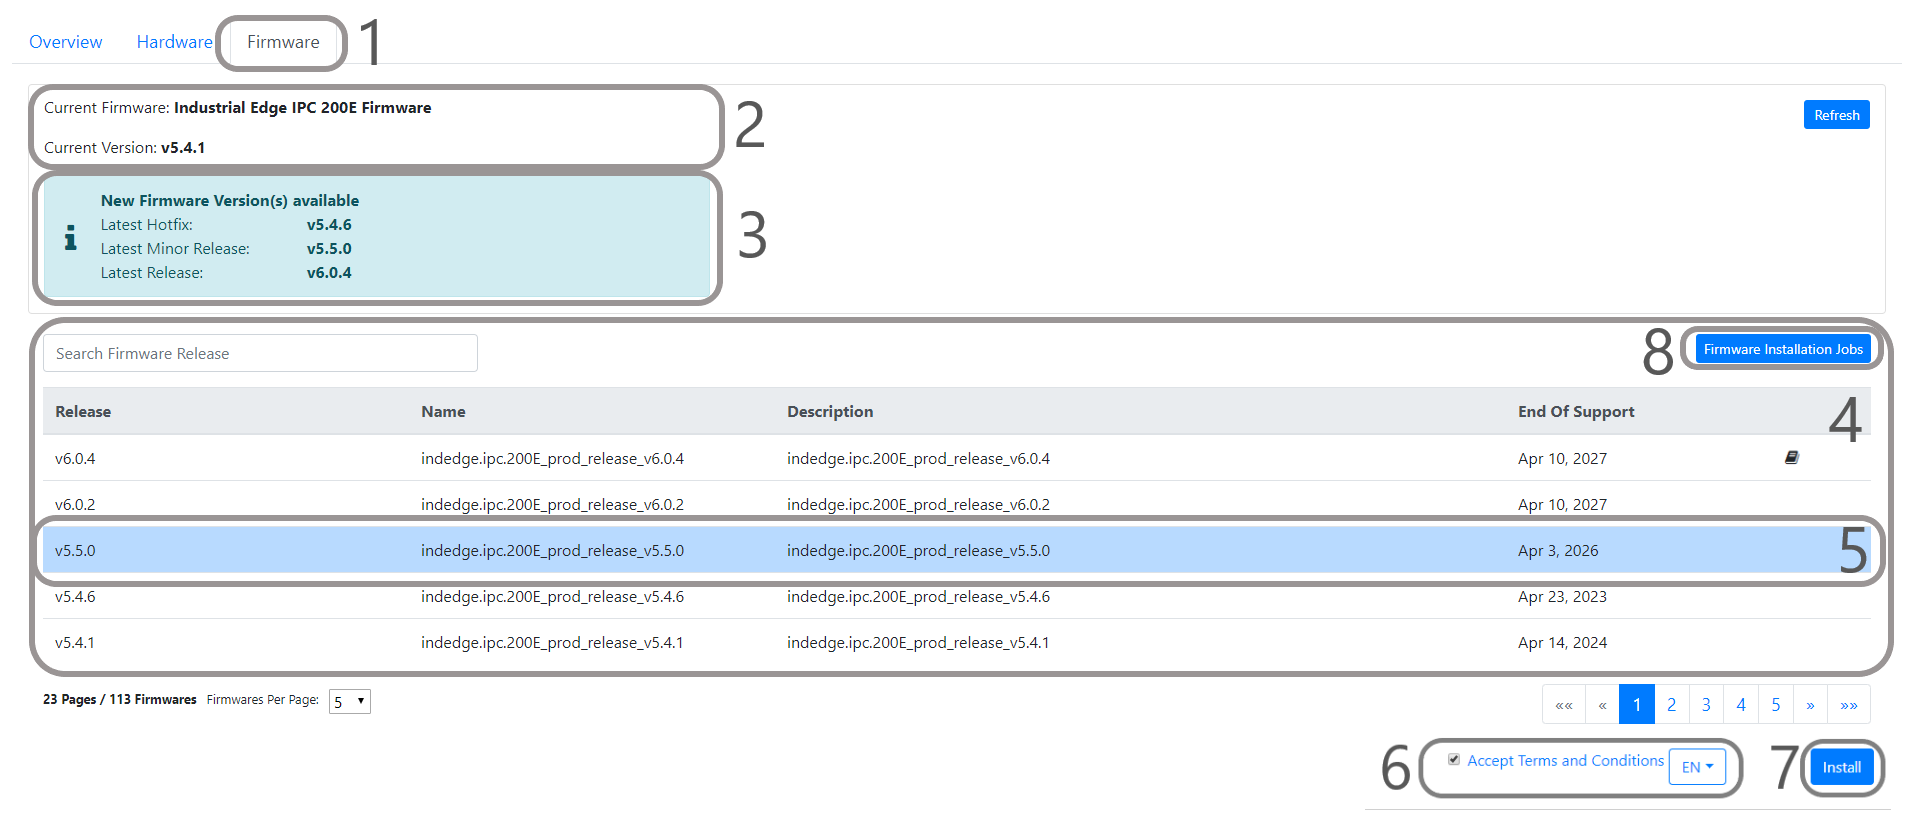
1) Select the “Firmware” tab
2) Display the device’s current firmware information. The Current Firmware and Current Version are displayed.
3) A message box is shown displaying the available firmware version(s) for Latest Hotfix, Latest Minor Release and Latest Release based on the device's current firmware information.
4) When the page is loaded, firmware releases are listed with the release version, name, description, additional documents and the end of support date. Search firmware releases by typing keywords in the Search Firmware box. You can search the release version, name and description.
In order to install a new firmware release:
5) Click a release which will be installed on the device from the firmware release list.
6) Select the "Terms and Conditions" language from dropdown list. Click the Accept Terms and Conditions link to read terms and conditions in the selected language. Click the checkbox to accept terms and conditions.
7) After accepting terms and conditions, the Install button will be enabled. Click the Install button to install the firmware release on SINUMERIK Edge.
8) You can follow the installation status from the “Firmware Installation Jobs” button.

Download Log Files From Monitor
Log Files include journal logs of components and applications in the SINUMERIK Edge. To show components and applications logs to users, these files are sent to Insights Hub. So that the app developer can use these application or system logs for further analyzes.
1) Login to the Insights Hub with your credentials. Then from the Insights Hub Launchpad choose Monitor.
Note: As a prerequisite, an agent asset (Industrial Edge) should be created from the Asset Manager and the asset status should be onboarded.
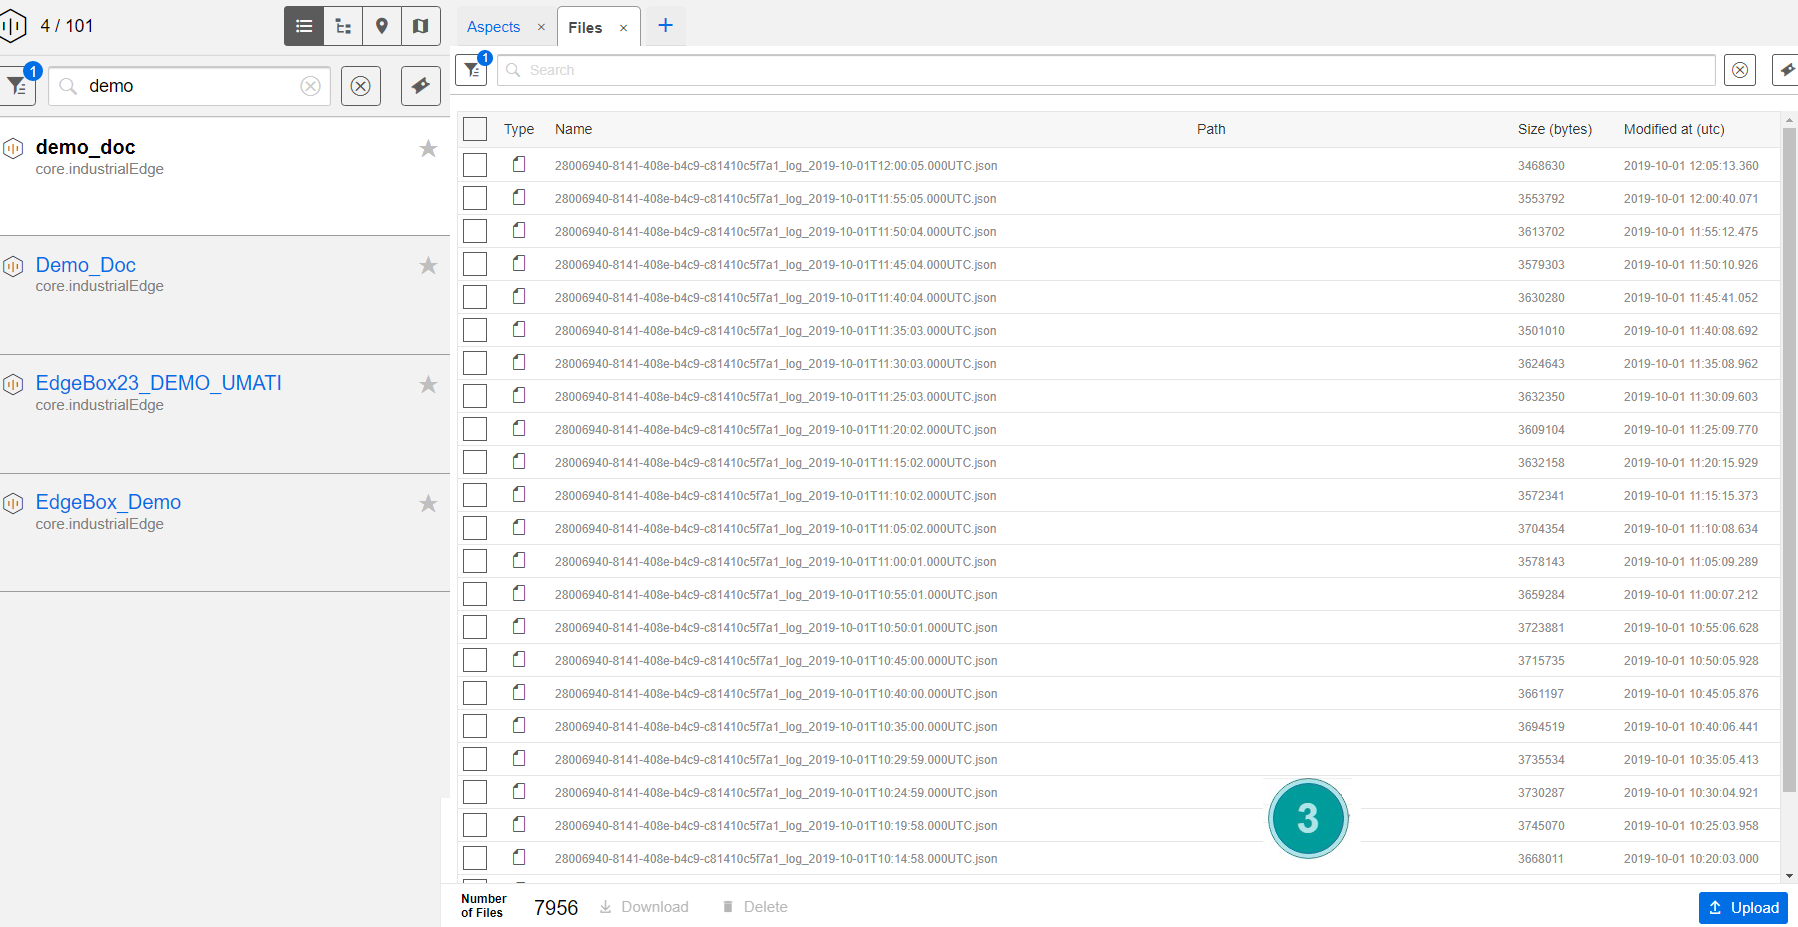
2) Find your asset through the search box and click it, then select the Files.
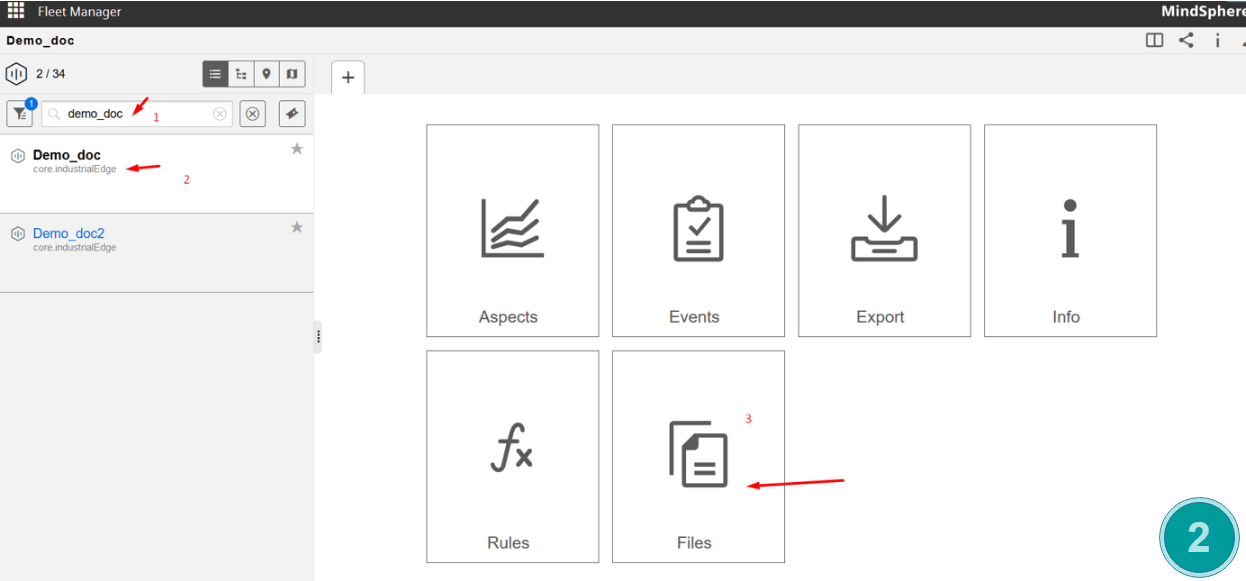
3) All log files which are uploaded to the Insights Hub should be listed in this section. Search, filter, download, delete operations are possible through this pane.
App Publishing with Manage MySINUMERIK Edge /App Publishing
SINUMERIK Edge applications can be published to Insights Hub using Manage MySINUMERIK Edge /App Publishing UI. More information regarding usage and step by step tutorial can be found in Developers manual.
Any questions left?
Except where otherwise noted, content on this site is licensed under the The Siemens Inner Source License - 1.1.