Using the a9s PostgreSQL
This section describes how to use a9s PostgreSQL.
Use a9s PostgreSQL with an App
To use the a9s PostgreSQL with with an app, follow the procedures in this section to create a service instance and bind the service instance to your app. For more information on managing service instances, see Managing Service Instances with the cf CLI.
View the a9s PostgreSQL Service
After the service is installed, postgresql and its service plans appear in your CF marketplace. Run cf marketplace to see the service listing:
$ cf marketplace
Getting services from marketplace in org test / space test as admin...
OK

service        plans                         description
postgresql     postgresql-xs, postgresql-m   This is the anynines PostgreSQL 9.4 service.
See the next section for instructions on creating PostgreSQL service instances based on the plans listed in the cf marketplace output.
Create a Service Instance
To provision a PostgreSQL database, run cf create-service.
cf create-service {service_name} {service_plan} {instance_name}
cf create-service postgresql postgresql-xs my-postgresql-service
Service and Service Plan Naming
Service and service plans may be named differently in your Cloud Foundry environment. Find the correct names of available services using the cf marketplace command.
Depending on your infrastructure and service broker usage, it may take several minutes to create the service instance.
Check the creation status using cf services. This displays a list of all your service instances. To check the status of a specific service instance, run cf service {instance_name}.
Bind an Application to a Service Instance
After you create your database, run cf bind-service to bind the service to your application:
cf bind-service {app_name} {instance_name}
cf bind-service postgresql-app my-postgresql-service
Restage or Restart Your Application
To enable your app to access the service instance, run cf restage or cf restart to restage or restart your app.
Obtain Service Instance Access Credentials
After a service instance is bound to an application, the credentials of your PostgreSQL database are stored in the environment variables of the application. Run cf env APP-NAME to display the environment variables.
You can find the credentials in the VCAP_SERVICES key.
cf env {app_name}
$ cf env postgresql-app
Getting env variables for app postgresql-app in org test / space test as admin...
OK

System-Provided:
{
"VCAP_SERVICES": {
  "postgresql": [
  {
    "credentials": {
    "host": "EXAMPLE-HOST",
    "name": "d92e2bd",
    "password": "EXAMPLE-PASSWORD",
    "port": 5432,
    "uri": "EXAMPLE-URI",
    "username": "EXAMPLE-USERNAME"
    },
    "label": "postgresql",
    "name": "my-postgresql-service",
    "plan": "postgresql-xs",
    "tags": [
    "sql",
    "database"
    ]
  }
  ]
}
}
...
You can use the host, username and password values to connect to your database with a PostgreSQL client.
Delete an a9s PostgreSQL Service Instance
Warning
Before deleting a service instance, you must backup data stored in your database. This operation cannot be undone and all the data is lost when the service is deleted.
Before you can delete a service instance, you must unbind it from all apps.
List Available Services
Run cf services to list your available services.
cf services
$ cf services
Getting services in org test / space test as admin...
OK
name                    service          plan                      bound apps           last operation
my-postgresql-service   postgresql   postgresql-xs   postgresql-app   create succeeded
This example shows that my-postgresql-service is bound to the postgresql-app app.
Unbind a Service Instance
Run cf unbind to unbind the service from your app.
cf unbind-service {app_name} {instance_name}
cf unbind-service postgresql-app my-postgresql-service
Delete a Service Instance
After unbinding the service, it is no longer bound to an application. Run cf delete-service to delete the service:
cf delete-service {instance_name}
cf delete-service my-postgresql-service
It may take several minutes to delete the service. Deleting a service deprovisions the corresponding infrastructure resources. Run the cf services command to view the deletion status.
Upgrade the Service Instance to another Service Plan
Once created, you can upgrade your service instance to another larger service plan. A larger service plan provides more CPU, RAM and/or storage. The plans also differ in availability. For more information, refer to Service Plans.
cf update-service my-postgresql-service -p a-bigger-plan
Here are the plans you can upgrade to depending on the one you are currently using:
| From / To | xs | s10 | m50 | s10_ha | m | m150_ha |
|---|---|---|---|---|---|---|
| xs | - | yes | yes | yes | yes | yes |
| s10 | no | - | yes | yes | yes | yes |
| m50 | no | no | - | no | yes | yes |
| s10_ha | no | no | no | - | yes | yes |
| m | no | no | no | no | - | yes |
| m150_ha | no | no | no | no | no | - |
The left column shows your current plan and the first row shows the target plan.
Example:
If your current plan is postgresql-s10, it's possible to upgrade to postgresql-m50, postgresql-s10_ha, postgresql-m and postgresql-m150_ha, but it is not possible to upgrade to postgresql-xs.
Info
It is not possible to update from a non clustered PostgreSQL 9.4 instance to a clustered PostgreSQL 9.4 instance. The table above is only valid for the other available PostgreSQL versions.
Migrate the Service Instance to another PostgreSQL version into new PostgreSQL instance
This feature is only available to a9s PostgreSQL 11 and newer.
It is recommended to migrate your PostgreSQL instance, if you have an existing a9s PostgreSQL instance Version 9.4 running. The version 9.4 is deprecated and will be removed in the future.
You can create a copy of that instance's data by creating a new service instance with the custom parameter copy_from.
Info
For migration, an additional Backing Service instance is required. After a completed migration process, you can stop the old Backing Service.
In case you do not have any Backing Services available, you can use a Backing Service Pay-per-Use. By using this, you will be charged only for this Service, if you use it on a hourly basis.
Backing Service Pay-per-Use is available via the Upgrade app in your Industrial IoT environment:
![]()
Select Backing Service Pay per Use:
 You will only be charged for additional service instance until you are back to your up-front paid service instances count.
The custom parameter copy_from requires an object with the following keys:
host: The hostname of the existing instance.username: The username of the existing instance.password: The password of the existing instance.main_database: The name of the main database. Only required if additional databases were created using CREATEDB privilege.
The values for the required keys can be derived from any service binding (either cf service-key or from cf env APP_NAME when bound to a service).
When the parameter role_privileges with CREATEDB has been used and there are additional databases next to the main database, the copy_from parameter requires the key main_database that specifies what is the main database on the origin instance. The main database name can also be derived from the binding information in the field name.
An example call to create a new instance and initial the database with data from another instance looks like:
cf create-service postgresql11 postgresql-m new-instance-name -c '{"copy_from": {"host": "pod56995d-psql-master-alias.node.dc1.a9ssvc", "username": "a9s9d374017068a7d4573bc61baf714500f4d948631", "password": "a9se2fdcf291672e4555293b13c4b7139ba2f77312f"} }'
Info
To avoid quote issues, you can transfer the custom parameter in a json file. Refer to "Transfer json in file".
The create-service call will validate whether the given credentials are correct. In the case of multiple databases, the presence of a value for the main_database will also be validated.
The databases postgres, template0 and template will not be copied over.
Behind the scenes, the new instance will copy over the data using pg_dump and pg_restore calls.
If an error happens during the time the instance copies the data from the old instance to the new instance, Cloud Foundry will just report back the instance failed.
To receive more information why the copy process failed, it is recommended to add a syslog endpoint via custom parameter to receive the logs from the copy process. The copy process reports progress and error lines with the text copy_from included. xs sized service plans don't have logging included, so it is not possible to add LogMe instance to xs sized PostgreSQL instances.
Info
- Only migration from instances that have an older or the same major version as the new instance is supported. This means
9.4 -> 11,10 -> 11or11 -> 11are supported. - Backwards migration such as
11 -> 10is not supported by this feature. - If possible, the migration should be executed at a time the database has less load.
- This feature has been tested with example feature sets for the Available Extensions. When using advanced features of these extensions, your experience can be different.
- When migrating data you might need more space than the old instance currently requires due to WAL files occupying additional space.
After the creation of database has successfully been finished and you've verified your data, you can unbind your app from the old database instance and bind it to the new one. The old instance can be deleted after the switch.
Add a Graphite Endpoint
If you want to monitor your service with Graphite, you can set an endpoint to where to information will be sent with the cf update-service command. This command expects the -c flag and a JSON string containing the graphite and metrics_prefix keys. Depending on your graphite provider the metrics_prefix might require that each metrics must start with an API key in their name. You can also change the interval within the data is send to the endpoint. Do to this modify interval the default is 10s.
cf update-service my-postgresql-service -c '{ "graphite": ["yourspace.your-graphite-endpoint.com:12345"], "metrics_prefix": "your-api-key.my-cluster-postgresql", "interval": "5"}'
Info
Logging is only possible for service plans that have the Logging component enabled. For more information, refer to Service Plans.
You can delete the graphite endpoint settings by calling update-service with an empty array.
cf update-service my-postgresql-service -c '{ "graphite": []}'
Add a Syslog Endpoint
The cf update-service command used with the -c flag can let you stream your syslog to a third-party service. In this case, the command expects a JSON string containing the syslog key. You can also change the interval for the syslog with the same key than for the graphite endpoint interval.
cf update-service my-postgresql-service -c '{ "syslog": ["logs4.your-syslog-endpoint.com:54321"], "interval": "5" }'
You can delete the syslog endpoint settings by calling update-service with an empty array.
cf update-service my-postgresql-service -c '{ "syslog": []}'
Info
Logging is only possible for service plans that have the Logging component enabled. For more information, refer to Service Plans.
Cloud Foundry Application Security Groups
This section describes how to check whether a security group was created.
Each a9s Data Service will automatically create and update Cloud Foundry security groups in order to protected service instances to be accessed by applications not running in the same Cloud Foundry applications space. To get a better understanding about Security Groups, refer to Understanding Application Security Groups.
Get Service Instance GUID
Run cf service INSTANCE_NAME --guid to get the guid of the service instance.
cf service {instance_name} --guid
$ cf service my-postgresql --guid
ca16f111-5073-40b7-973a-156c75dd3028
Check available Security Groups
To see all available security groups use cf security-groups.
$cf security-groups
Getting security groups as demo@anynines.com
OK

     Name                                         Organization     Space
#0   public_networks
#1   dns
#2   tcp_open
#3   guard_432fb752-876d-443b-a311-a075f4df2237   demonstrations   demo
#4   guard_ca16f111-5073-40b7-973a-156c75dd3028   demonstrations   demo
There we can see a security group with the named guard_ca16f111-5073-40b7-973a-156c75dd3028 was successfully created.
Note
If the connection between the application and the service instance cannot be established, check if a security group was created.
Backup and Restore Service Instances, Download Backups
a9s PostgreSQL provides an easy way to create backups and restore if needed.
Get Dashboard Address, Login and Authorize
-
Get the dashboard URL with
cf service {instance_name}, e.g.:$cf service my-postgresql Service instance: my-postgresql Service: postgresql Bound apps: Tags: Plan: postgresql-xs Description: This is a service creating and managing dedicated PostgreSQL service instances and clusters, powered by the anynines Service Framework Documentation url: Dashboard: https://postgresql-dashboard.aws.ie.apps.eu1.mindsphere.io/service-instances/ca16f111-5073-40b7-973a-156c75dd3028 Last Operation Status: update succeeded Message: Started: 2017-10-26T08:28:38Z Updated: 2017-10-26T08:28:38Z -
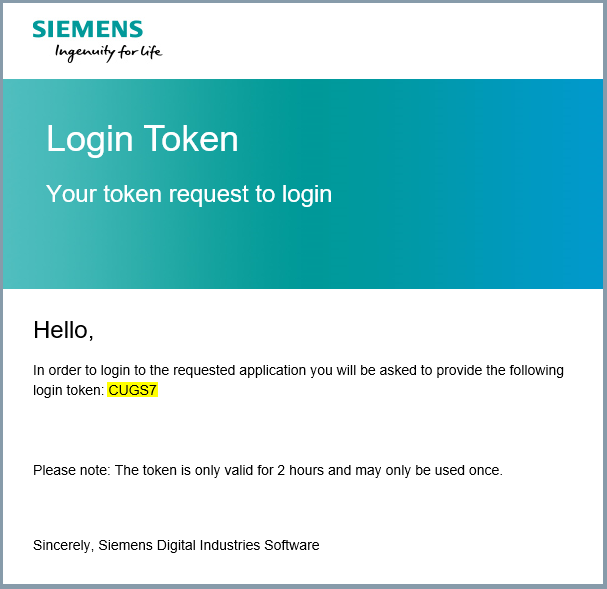
Enter the dashboard URL into your browser and authenticate with your WebKey user.
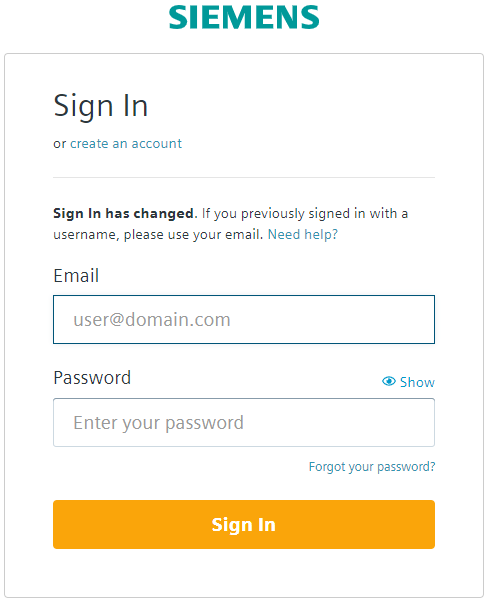
- You will be prompted to enter your login token.
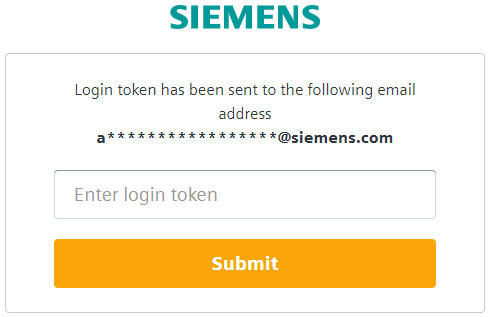
The login token will be sent to you by email. Copy your login token from email and paste it in "Enter login token" field. Click Submit.
- Click Authorize to approve the authorization request.

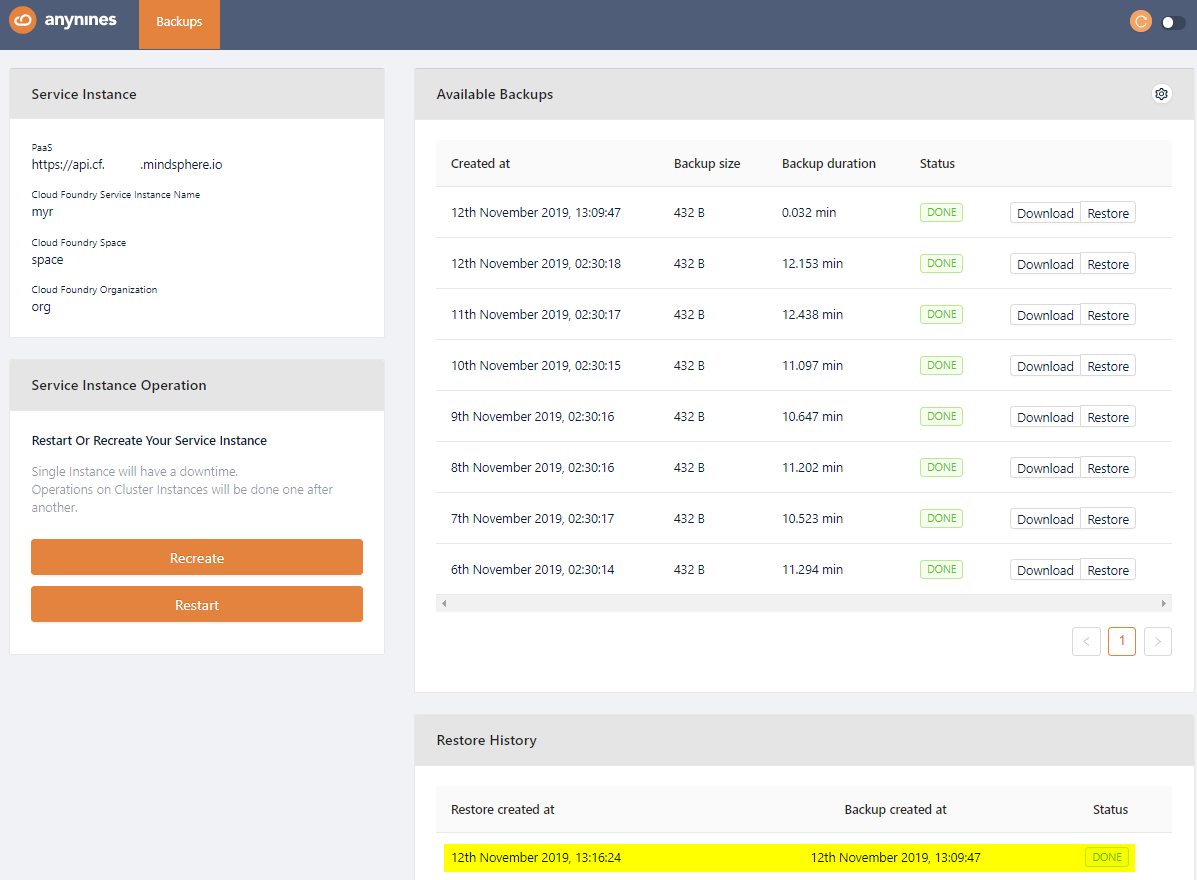
Perform a Backup
On the dashboard, you can trigger a backup by clicking on the Settings icon and selecting Manually Trigger A Backup.
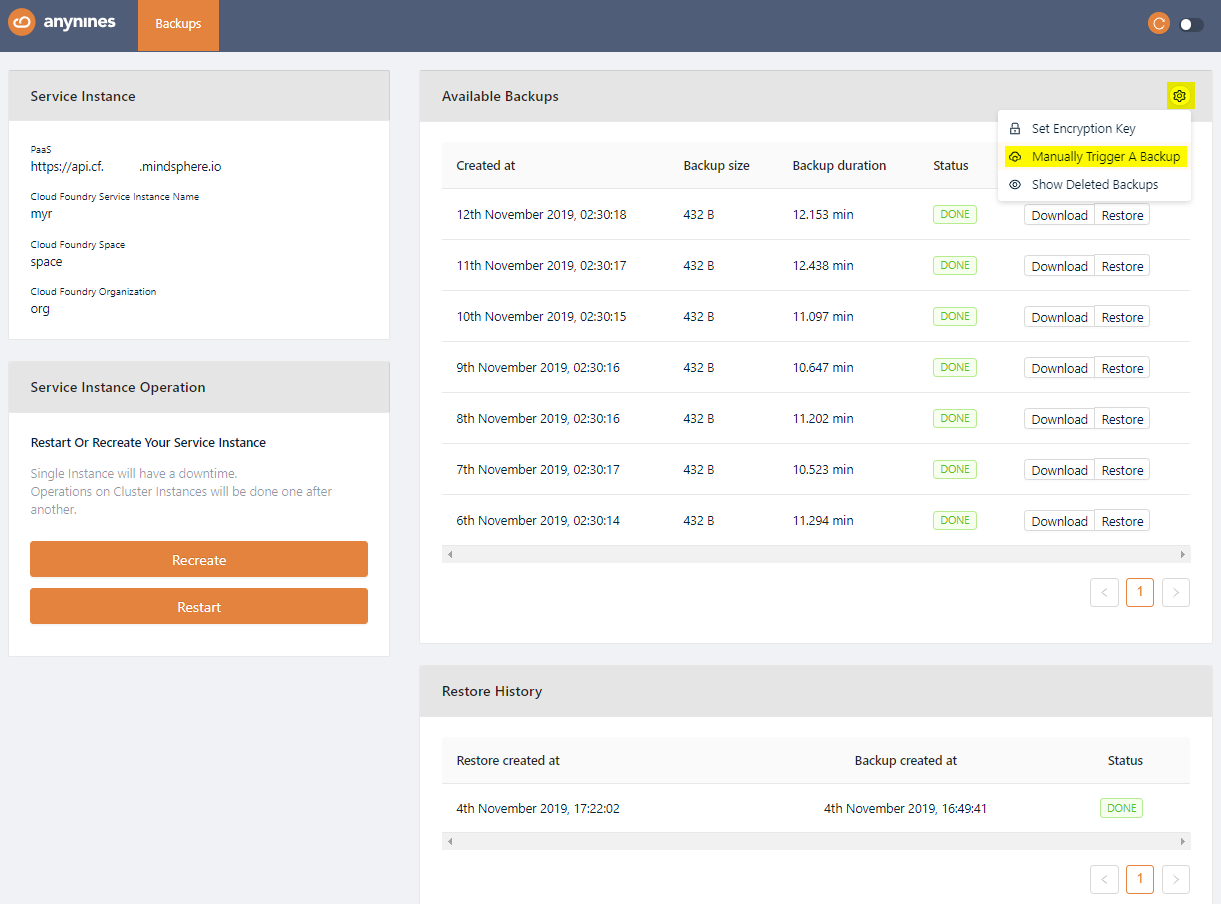
After a short period of time, the backup will be queued. The backup process will start soon.
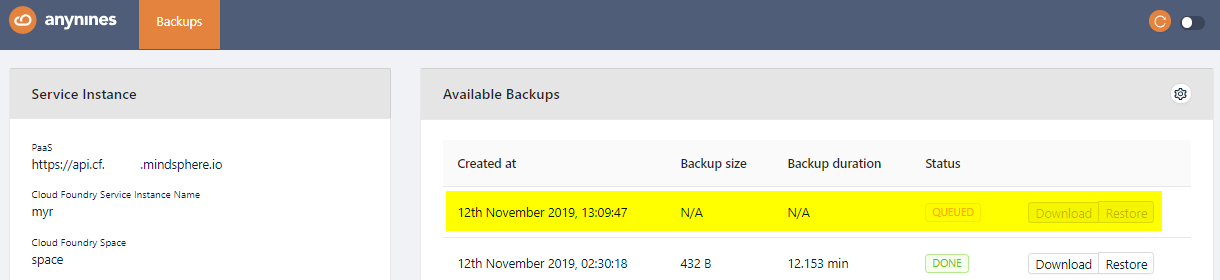
Note
Depending on the size of the data, the backup might take some time.
Restore a Backup
Open the dashboard again and select the backup you would like to restore. Click the Restore button of the backup. After a short period of time the restore will be triggered.
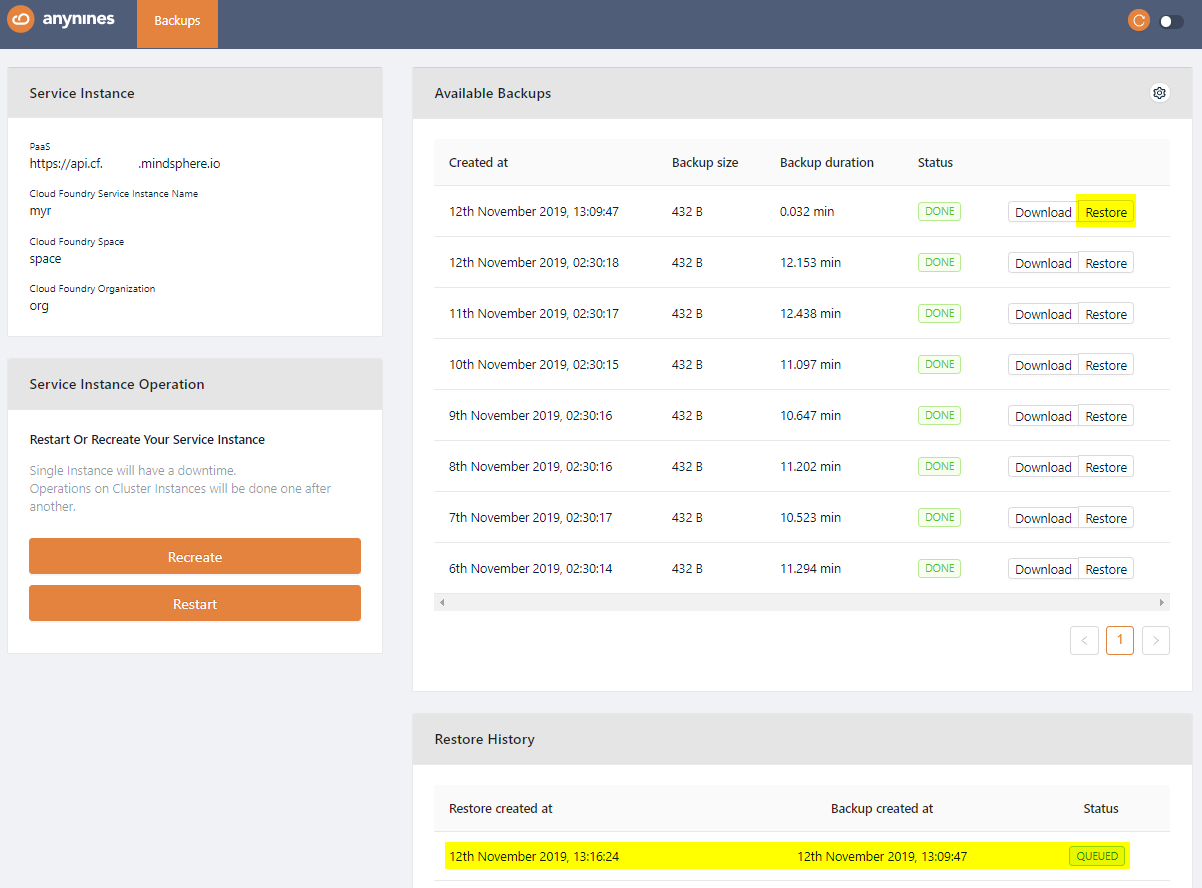
Note
Depending on the size of the data the restore might take some time.
Download a Backup
To be able to download a performed backup, you first have to set a personal encryption key. Otherwise a performed backup is not downloadable.
To set a personal encryption key, open the Service Dashboard for the appropriate Service Instance as shown above. Click the Setting icon and Set Encryption Key button.

Set the encryption key and click the Save button. The minimum length for the encryption key is 8 characters.

The newly created backup will now show a Download button. Click on this button to download a backup.

Note
If you change your personal encryption key, you will no longer be able to download performed backups encrypted with your old personal encryption key.
Make a Service Instance Locally Available
It is possible to access any of the a9s Data Services locally. That means you can connect with a local client to the service for any purpose such as debbuging. CF provides a smart way to create SSH forward tunnels via a pushed application. For more information about this feature see the Accessing Apps with SSH section of the CF documentation.
First of all you must have an application bound to the service. How to do this see Bind an Application to a Service Instance.
Note
cf ssh support must be enabled in the platform. Ask your administrator if you are not sure.
Get The Service URL and Credentials
Obtain the Service Instance Access Credentials to get the host name of the service and the user credentials:
cf env {app_name}
$ cf env postgresql-app
Getting env variables for app postgresql-app in org test / space test as admin...
OK

System-Provided:
{
"VCAP_SERVICES": {
  "postgresql": [
  {
    "credentials": {
    "host": [
        "d67901c.service.dc1.a9svs"
      ],
    "username": "brk-usr",
    "password": "password",
    "port": 5432
    },
    "label": "postgresql",
    "name": "my-postgresql-service",
    "plan": "postgresql-xs"
  }
  ]
}
}
...
The host and the port (in the example: d67901c.service.dc1.a9svs and 5432) are required in the next step.
Create a Tunnel to the Service
With the cf ssh you can create a SSH forward tunnel to the management dashboard. Use the host and port from the previous step to connect to the a9s PostgreSQL instance:
cf ssh {app_name} -L {local_port}:{host}:{port}
$ cf ssh postgresql-app -L 5432:d67901c.service.dc1.a9svs:5432
vcap@956aaf4e-6da9-4f69-4b1d-8e631a403312:~$
When the SSH tunnel is open you can access the instance in the example via the address localhost:5432.
Note
Don't forget to close the session using exit.
PostgreSQL Extensions
Create or Drop Extensions
It is possible to install PostgreSQL extensions with the Cloud Foundry CLI and additional configuration parameters:
cf create-service {service_name} {service_plan} {instance_name} -c '{"install_plugins": ["{plugin_name}"]}'
cf update-service {instance_name} -c '{"install_plugins": ["{plugin_name}]}'
cf update-service {instance_name} -c '{"delete_plugins": ["{plugin_name}]}'
Available Extensions
The following PostgreSQL extensions are available:
- postgis
- uuid-ossp
- ltree
- pgcrypto
- citext
Default Extensions
The following PostgreSQL extensions are installed by default and cannot be deleted, because they are needed to have a functional replication:
- pgcrypto
- citext
PostgreSQL Custom parameters
role_privileges
The role_privileges parameter allows you to enable special user permissions for your whole service instance, a service binding or service key.
Warning
There can be a risk of data loss due to wrong configuration using extended privileges.
The following permissions can be enabled:
- CREATEDB: Grants the permission to create and drop databases. Default is NOCREATEDB.
- CREATEROLE: Grants the permission to create, delete, and alter the attributes of a role. Default is NOCREATEROLE.
The role_privileges parameter receives values in the following format:
- null: Reset permissions to the default values.
- []: Removes all extra permissions (default).
- ['CREATEDB', 'CREATEROLE']: An array of privileges. Any privilege not specified is disabled.
This parameter can be specified during instance creation (cf create-service and cf update-service) and credentials creation (cf bind-service and cf create-service-key).
If this parameter is specified during instance creation, the privileges are applied to the cfuser role. All other users inherit this role by default. For example:
cf create-service {service_name} {service_plan} {instance_name} -c '{ "role_privileges": ["CREATEROLE"]}'
If this parameter is specified during credentials creation, the privileges are applied to the created user only and are enabled when using the created user role, instead of the cfuser role.
cf create-service-key {instance_name} {service_key_name} -c '{ "role_privileges": ["CREATEROLE"]}'
The role can be set using PostgreSQL command SET ROLE or ALTER ROLE. ALTER ROLE can only be executed if CREATEROLE privilege is granted.
Note
- CREATEROLE: Grants permissions to the user to create, delete and alter the attributes of a role. A role with these privileges can create new users with a weak password and therefore endanger the service. With this role, it is also possible to create new roles with different privileges (except SUPERUSER). For example, a user could create another user with CREATEDB privileges.
- CREATEDB: Grants permission to the user to create new and drop databases. A user with these privileges can cause data loss and even impact on the automation of your cluster. For example, deleting the
postgresdatabase can cause backup and restore to fail and deleting the current default database causes the user to lose the data and not being able to access the instance.
The PostgreSQL service instance has a special user called cfuser. Every user (e.g. created with cf bind-service or cf create-service-key) inherits the privileges and capabilities from cfuser, which means that every user has access to two roles: its own and the cfuser role.
The default role used when connecting is the cfuser role.
All objects in the default database must belong to the cfuser. Otherwise, other users will not be able to access them. When changing the user role using SET ROLE or ALTER ROLE, you need to consider the ownership and accessibility of tables, sequences, views and other objects. When deleting a credential, all objects belonging to the user being deleted have the ownership transferred to cfuser.
Note
If you are using a tool to create a new database,
- create it without extra options (e.g. create database mydb) or
- if the tool requires it select owner cfuser and use the tablespace default (not pg_default).
PostgreSQL statistics collector
PostgreSQL backing service supports the PostgreSQL Statistics Collector feature (PostgreSQL version specific). This feature allows you to retrieve information about the current status of the PostgreSQL cluster, like active queries.
For each statistics collector view, another view is created in "Insights Hub Managed Backing Services". These views have the same name as the original ones, prefixed with ds_.
Example: For original view pg_stat_activity, the associated view is called ds_pg_stat_activity.
To these views, the read-only access is given to all users who are allowed to log in on the cluster via the "public" schema.
Info
The views are available in the default database named "postgres", and not in the database starting with "pod", (which is in environment variables). This means before accessing the view, the connection has to be changed to "postgres".
Except where otherwise noted, content on this site is licensed under the Development License Agreement.