Onboarding MindConnect MQTT Agent
Overview
MindConnect MQTT agents can be onboarded to Insights Hub using agent certificates that are issued by the owner tenant's CA certificate.
To successfully connect, onboard, and communicate with the MQTT broker, each MQTT agent needs to use a client id in the following format:
For eu1: <clientId> = <tenant>_<AgentCertificate.Subject.CommonName>
For private cloud: <clientId> = <tenant>_<AgentCertificate.Subject.CommonName>
Where <tenant> is the tenant name and <AgentCertificate.Subject.CommonName> is Common Name attribute of agent certificate subject. A single client id represents a single agent, and multiple connections using a single client id are not allowed.
Prerequisites
-
To generate certificates, ensure to have the OpenSSLtoolkit or an equivalent setup to create certificates.
-
MQTTX is installed on your computer or an equivalent setup.
-
Certificates used by agents must be signed by uploaded CA certificates. Steps in the documents Managing CA Certificates using UI / Managing CA Certificates using MindConnect MQTT API must be completed before agent onboarding:
Agent Onboarding
EU1
-
Create an agent private key
Following commands creates an agent private key (line 1); creates a CSR using the agent name as certificate subject's Common Name, that is valid for 1 year (line 2). Next, the tenant's private key is used to issue the agent certificate using created CSR (line 3). Finally, the agent certificate and CA certificate are concatenated to use in later steps.
LINUX:
export TENANT=<yourtenant> export DEVICE_NAME=<yourdevicename> export COUNTRY_CODE =<COUNTRY_CODE> export CITY =<CITY> export ORGANIZATION =<ORGANIZATION>-
openssl genrsa -out $DEVICE_NAME.key 2048 -
openssl req -new -key $DEVICE_NAME.key -out $DEVICE_NAME.csr -subj "/C=$COUNTRY_CODE/ST=$CITY/O=$ORGANIZATION/OU=IT/CN=$DEVICE_NAME" -
openssl x509 -req -in $DEVICE_NAME.csr -CA "$TENANT.pem" -CAkey "$TENANT.key" -CAcreateserial -out $DEVICE_NAME.pem -days 365 -sha256 -
cat $DEVICE_NAME.pem "$TENANT.pem" > "$DEVICE_NAME"_chain.pem
You can view the created certificate with the following command:
openssl x509 -in "$DEVICE_NAME"_chain.pem -text -nooutWINDOWS:
set TENANT=<yourtenant> set DEVICE_NAME=<yourdevicename> set COUNTRY_CODE =<COUNTRY_CODE> set CITY =<CITY> set ORGANIZATION =<ORGANIZATION>-
openssl genrsa -out %DEVICE_NAME%.key 2048 -
openssl req -new -key %DEVICE_NAME%.key -out %DEVICE_NAME%.csr -subj "/C=%COUNTRY_CODE%/ST=%CITY%/O=%ORGANIZATION%/OU=IT/CN=%DEVICE_NAME%" -
openssl x509 -req -in %DEVICE_NAME%.csr -CA "%TENANT%.pem" -CAkey "%TENANT%.key" -CAcreateserial -out %DEVICE_NAME%.pem -days 365 -sha256 -
type %DEVICE_NAME%.pem "%TENANT%.pem" > "%DEVICE_NAME%"_chain.pem
You can view the created certificate with the following command:
openssl x509 -in "%DEVICE_NAME%"_chain.pem -text -noout -
-
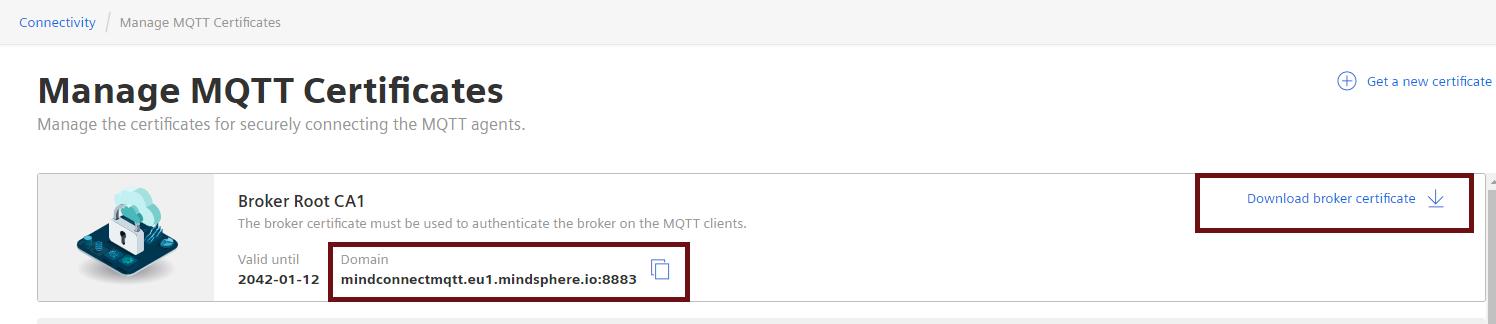
Connecting to MindConnect MQTT broker
Login to your Insights Hub environment and go to the "Asset Manager" application, in "Connectivity" section, select "Manage MQTT Certificates" and click "Broker Information". Under this, "MindConnect MQTT Broker Url" and "MindConnect MQTT Broker Certificate" can be found.
Connection parameters are as follows:
ClientId:
<tenant>_<AgentCertificate.Subject.CommonName>Username:
<empty>Password:
<empty>Client Certificate:
<DEVICE_NAME>_chain.pemClient Key:
<DEVICE_NAME>.keyAt the first connection attempt, the broker will close the connection and start provisioning of the agent in the backend. Once completed, you can see your newly created agent asset in the Asset Manager application in the Launchpad.
After a couple of seconds, retry the connection attempt. This time connection will remain intact since provisioning is complete.
- Mosquitto Connection Example
For example, the following
mosquitto_subcommand will connect and subscribe to a topic (You need AmazonRootCA1.pem to contain broker certificate, see above for how to find it):mosquitto_sub --cafile AmazonRootCA1.pem --key "$DEVICE_NAME".key \ --cert "$DEVICE_NAME".pem -h "$MqttBrokerHost" \ -p 8883 -t tc/"$TENANT"/"$CLIENT_ID"/i/amo_v3/ms -i $CLIENT_ID -v -d- MQTTX Connection Example
Once connected, clients can utilize the topics defined by applications available on AWS MindConnect Connectivity. Refer to the async API specs of related services to learn about available topics and payload schemas.
Private Cloud
MindConnect MQTT is just available for Rancher environments.
- Create an agent private key
Following commands creates an agent private key (line 1); creates a CSR using the clientId as certificate subject's Common Name, that is valid for 1 year (line 2). Next, the tenant's private key is used to issue the agent certificate using created CSR (line 3). Finally, the client certificate and CA certificate are concatenated to use in later steps.
LINUX:
```cmd
export TENANT=<yourtenant>
export DEVICE_NAME=<yourdevicename>
export COUNTRY_CODE =<COUNTRY_CODE>
export CITY =<CITY>
export ORGANIZATION =<ORGANIZATION>
export CLIENT_ID="$TENANT"_"$DEVICE_NAME"
```
openssl genrsa -out $DEVICE_NAME.key 2048openssl req -new -key $DEVICE_NAME.key -out $DEVICE_NAME.csr -subj "/C=$COUNTRY_CODE/ST=$CITY/O=$ORGANIZATION/OU=IT/CN=$DEVICE_NAME"openssl x509 -req -in $DEVICE_NAME.csr -CA "$TENANT.pem" -CAkey "$TENANT.key" -CAcreateserial -out $DEVICE_NAME.pem -days 365 -sha256cat $DEVICE_NAME.pem "$TENANT.pem" > "$DEVICE_NAME"_chain.pem
You can view the created certificate with the following command:
openssl x509 -in "$DEVICE_NAME"_chain.pem -text -noout
WINDOWS:
```cmd
set TENANT=<yourtenant>
set DEVICE_NAME=<yourdevicename>
set COUNTRY_CODE =<COUNTRY_CODE>
set CITY =<CITY>
set ORGANIZATION =<ORGANIZATION>
set CLIENT_ID="%TENANT%"_"%DEVICE_NAME%"
```
openssl genrsa -out %DEVICE_NAME%.key 2048openssl req -new -key %DEVICE_NAME%.key -out %DEVICE_NAME%.csr -subj "/C=%COUNTRY_CODE%/ST=%CITY%/O=%ORGANIZATION%/OU=IT/CN=%DEVICE_NAME%"openssl x509 -req -in %DEVICE_NAME%.csr -CA "%TENANT%.pem" -CAkey "%TENANT%.key" -CAcreateserial -out %DEVICE_NAME%.pem -days 365 -sha256type %DEVICE_NAME%.pem "%TENANT%.pem" > "%DEVICE_NAME%"_chain.pem
You can view the created certificate with the following command:
openssl x509 -in "%DEVICE_NAME%"_chain.pem -text -noout 2. Create X509 Client JWT
-
Required Headers
alg:
value must be “RS256”x5c:
Value of that claim must satisfy the following conditions:- Contains Device Certificate and TenantCA Certificate sequentially- Certificates must be in order (eg: [Device Certificate, TenantCA Certificate])- All certificates must be valid (Please see Device Certificate Requirements & TenantCA and Intermediate Certificate Requirements for details below.)typ:
value must be “JWT” -
Required and Optional Claims
jti:
Unique identifier for the token. The format is String in UUID with a maximum of 36 characters.iss:
Issuer information of the token. The value must be MQTT Client id.sub:
Subject information of the token. The value must be MQTT Client id (same as iss).aud:
Audience claim identifies the recipients that the token is intended for. Value must be [“MQTTBroker”]iat:
Time at which the token was issued. Format is epoch time in seconds (the number of seconds from 1970-01-01T00:00:00Z UTC).*nbf:
Identifies the time before which the token must not be accepted for processing. Format is epoch time in seconds (the number of seconds from 1970-01-01T00:00:00Z UTC). It is optional claim, if the token has that claim Insights Hub checks the notBefore time and validates the token.exp:
Expiration time of the token. The format is epoch time in seconds (the number of seconds from 1970-01-01T00:00:00Z UTC). Thetoken must be valid up to one hour. Therefore, the difference between iat and exp must be maximum one hour.schemas:
Defines the semantics of custom claims of the token. The value must be [“urn:siemens:mindsphere:v1”].ten:
Any string value with a maximum of 36 characters.*:
denotes optional claim. -
Signature JWT must be signed by the Device Certificate private key. For example, the JWT used by the device follows the structure as below:
    {
    "alg":"RS256",
    "x5c": ["MIICYzCCAcygAwIBAgIBADANB...","MIIDCTCCAfGgAwIBAgIUU..."],
    "typ":"JWT"
    }
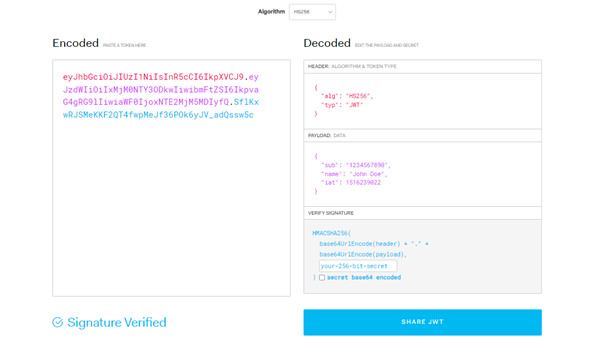
Creation Example
- Open jwt.io On jwt io there are two sections. Encoded and Decoded. We will use Decoded section to create JWT.
-
Header should be like following example.
    {
    "alg":"RS256",
    "x5c": ["MIICYzCCAcygAwIBAgIBADANB...","MIIDCTCCAfGgAwIBAgIUU..."],
    "typ":"JWT"
    }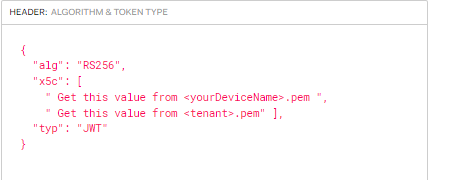
-
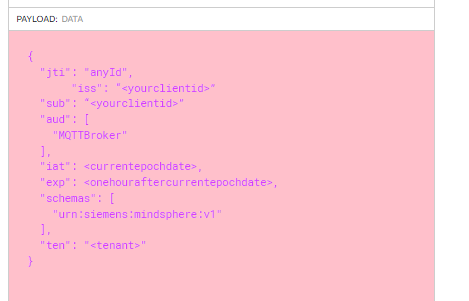
Payload should be like following example.
    {
        "jti": "anyId",
        "iss": "<yourclientid>",
        "sub": "<yourclientid>",
        "aud": ["MQTTBroker"],
        "iat": <currentepochdate>,
        "exp": <onehouraftercurrentepochdate>,
        "schemas": ["urn:siemens:mindsphere:v1"],
        "ten": "<tenant>"
        }
-
You need to add your device private key. You can find in
<yourdevicename>.keyfile.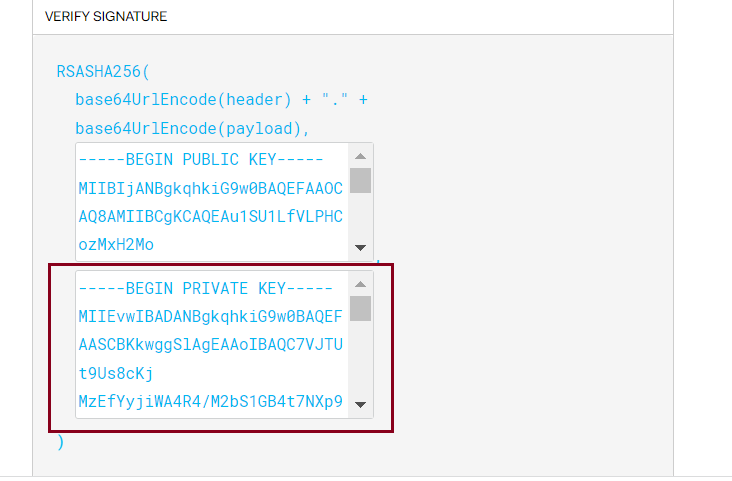
-
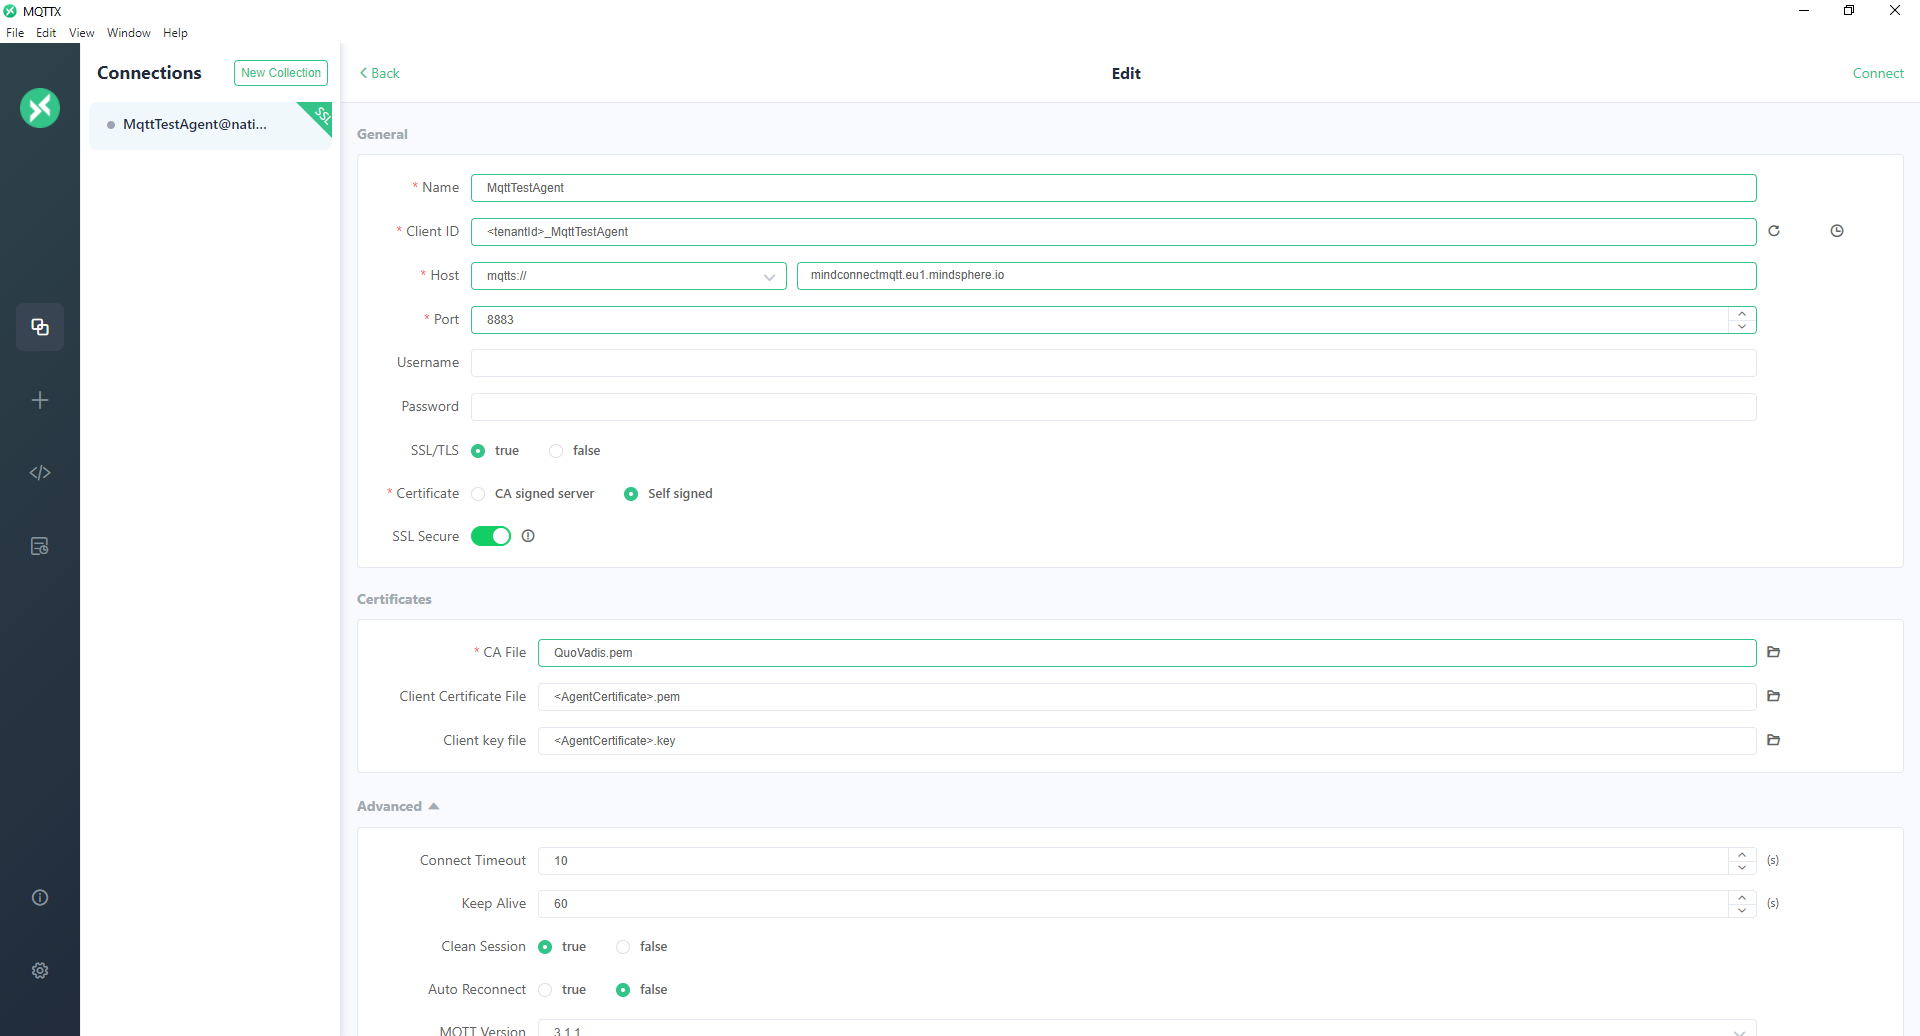
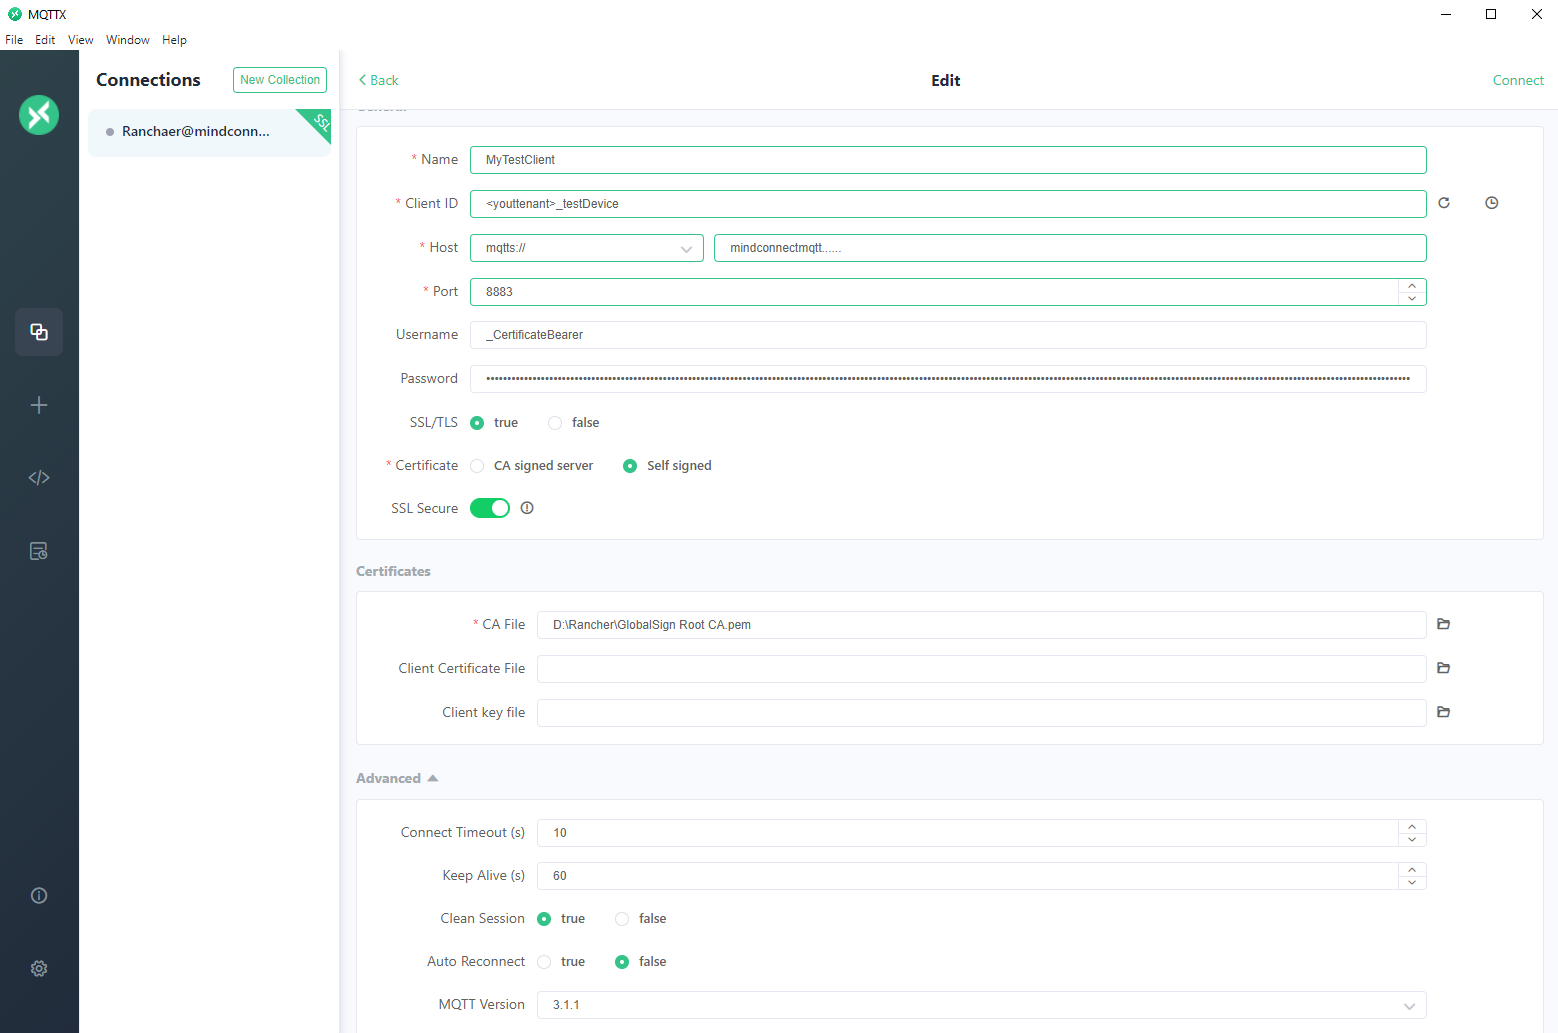
MQTTX Agent Onboarding Example
Connection parameters are as follows:
ClientId: <tenant>_<AgentCertificate.Subject.CommonName> Host: Customer specific MQTT broker URL. It should be started with “mindconnectmqtt” CA File: Customer specific MQTT Root CA. Username: _CertificateBearer Password: Created X509 Client JWT in above section.
At the first connection attempt, the broker will close the connection and start provisioning of the agent in the Insights Hub backend. Once completed, you can see your newly created agent asset in the Asset Manager application in the Launchpad.
After a couple of seconds, retry the connection attempt. This time connection will remain intact since provisioning is complete.
Once connected, clients can utilize the topics defined by applications available on MDSP AWS MindConnect Connectivity. Refer to the async API specs of related services to learn about available topics and payload schemas.
Except where otherwise noted, content on this site is licensed under the Development License Agreement.