Running a Cloud Foundry-Hosted Application - for Java Developers
This guide describes how to deploy, register and test your first application and how to deregister and delete it.
For additional information about Cloud Foundry hosted applications, refer to Cloud Foundry Application Basics.
Getting Started
Prerequisites
The following prerequisites must be fulfilled when deploying applications to Cloud Foundry and Insights Hub:
- Insights Hub user account on a developer tenant.
If you don't have one, contact your tenant admin. For instructions, they may refer to Providing Access for New Users. - Cloud Foundry Command Line Interface (CF CLI)
Download the latest version from https://github.com/cloudfoundry/cli and follow the installation instructions. - A Cloud Foundry role which allows to push applications, e.g.
SpaceDeveloper. - A Insights Hub developer role, either
mdsp:core:Developerormdsp:core:DeveloperAdmin.
Cloud Foundry
New users have to be assigned a role for Cloud Foundry (see Add a new user to Cloud Foundry).
For using the sample application the following prerequisites must be fulfilled additionally:
- Source code editor or IDE for editing the sample application.
- JDK 1.8 and Maven for compiling the sample application.
Proxy
If you work behind a company proxy, you have to set the corresponding system properties for gradle, e.g., via environment variable JAVA_TOOL_OPTIONS. You also have to configure the proxies for Maven. A sample configuration is given below:
Sample Configuration for Maven
Copy the following configuration for Maven into the ~/.m2/settings.xml file:
<settings>
  <proxies>
      <proxy>
        <id>http_proxy</id>
        <active>true</active>
        <protocol>http</protocol>
        <username>proxyuser</username>
        <password>proxypass</password>
        <host>{yourProxyIP}</host>
        <port>{yourProxyPort}</port>
        <nonProxyHosts>local.net|some.host.com</nonProxyHosts>
      </proxy>
      <proxy>
        <id>https_proxy</id>
        <active>true</active>
        <protocol>https</protocol>
        <username>proxyuser</username>
        <password>proxypass</password>
        <host>{yourProxyIP}</host>
        <port>{yourProxyPort}</port>
        <nonProxyHosts>local.net|some.host.com</nonProxyHosts>
      </proxy>
  </proxies>
</settings>
Environment Paths on Windows
On Windows it may be required to add Maven and the JDK paths to the PATH variable.
Deploy and Register an Application
This section shows how to deploy a sample application on Cloud Foundry and expose it at the Industrial IoT Gateway using the Developer Cockpit.
Prepare the Sample Application
- Download Hello World application (Java).
-
Build the application as described in the repository using:
mvn install -
Adjust the
manifest.ymlas shown below:applications: - name: hello-spring-cloud instances: 1 random-route: true path: target/hello-spring-cloud-0.0.1.BUILD-SNAPSHOT.jar memory: 1G
Deploy the Application to Cloud Foundry via CF CLI
- Open a command line interface (CLI) inside the folder with the application to be deployed.
-
Configure the proxy settings, if necessary.
Click here for detailed information on proxy settings
If you are in a company network behind a proxy, you may have to set the proxies to reach the Cloud Foundry endpoints. Contact your administrator, if you face any timeouts or connectivity problems.
Set the proxies for the Cloud Foundry CLI as shown below:
  set http_proxy=http://PROXY_IP:PROXY_PORT
  set https_proxy=http://PROXY_IP:PROXY_PORT
export http_proxy=http://PROXY_IP:PROXY_PORT export https_proxy=http://PROXY_IP:PROXY_PORT -
Log in to CF using CF CLI. Enter
cf login -a https://api.cf.{region}.{mindsphere-domain} --sso. - Open the URL printed by the CLI and log in using your WebKey credentials to get a One Time Code.
- Enter the One Time Code in the CLI.
-
Select your Cloud Foundry org and space using the following command:
cf target -o {org_name} -s {space_name}No Cloud Foundry Orgs displayed
If you do not see any Cloud Foundry orgs, you need to be added to your org. Refer to the How Tos for Cloud Foundry.
-
Push the application to your Cloud Foundry space using:
cf pushVendoring dependencies in region China 1
Pushing applications to Cloud Foundry in region China 1 sometimes fails while downloading dependencies due to unstable international network access from China. Refer to the Cloud Foundry buildpack's documentation for 'vendoring' your application's dependencies:
Application Routes
The routes shown after the deployment are not exposed on the internet. You need to register your application in the Developer Cockpit before it is reachable via the internet.
You can check if the application has been uploaded to your Cloud Foundry space using:
cf apps
Outbound IP Addresses
Insights Hub applications running on Cloud Foundry access the internet via a NAT gateway. If these applications need to access your enterprise network, your inbound firewall must allow the NAT gateway's IP addresses:
35.156.223.10
18.194.162.141
18.194.195.179
101.132.123.180
106.15.159.73
47.102.201.47
47.102.210.119
Bind a Backing Service to the Application (Optional)
The following instructions show how to create a Backing Service and bind it to the previously deployed application. Get a list of the available backing services using cf marketplace.
If you are using the sample application, bind a PostgreSQL Service to the application. Replace the placeholders by the following terms:
| Placeholder | Term |
|---|---|
{service_name} | postgresql11 |
{service_plan} | postgresql-xs |
{instance_name} | postgresql |
{app_name} | hello-spring-cloud |
-
Create an instance of the service. Note that it takes some time until the instance is up and running.
cf create-service {service_name} {service_plan} {instance_name} -
Check if your service instance is running using the following command:
cf services -
Bind the service instance to your application:
cf bind-service {app_name} {instance_name} -
Restage your application in order to activate the service binding in your application:
cf restage {app_name}
Register the Application in the Developer Cockpit
Components
An application on {{ whitelabel.IOTtoolName }} may consist of multiple Cloud Foundry apps with multiple endpoints. For clear distinction, Cloud Foundry apps are referred to as component.
The example application consists of one component with a single endpoint. Real-world applications usually consist of more components with multiple endpoints.
- Open the Developer Cockpit from the Launchpad and select the Dashboard tab.
- Click on Create new application.
- Select Type Standard and Infrastructure Cloud Foundry.
- Enter an arbitrary Display Name and an Internal Name which will be part of the application URL. The Internal Name cannot be changed after initial creation!
Use myfirstapp as Internal Name of the sample application.
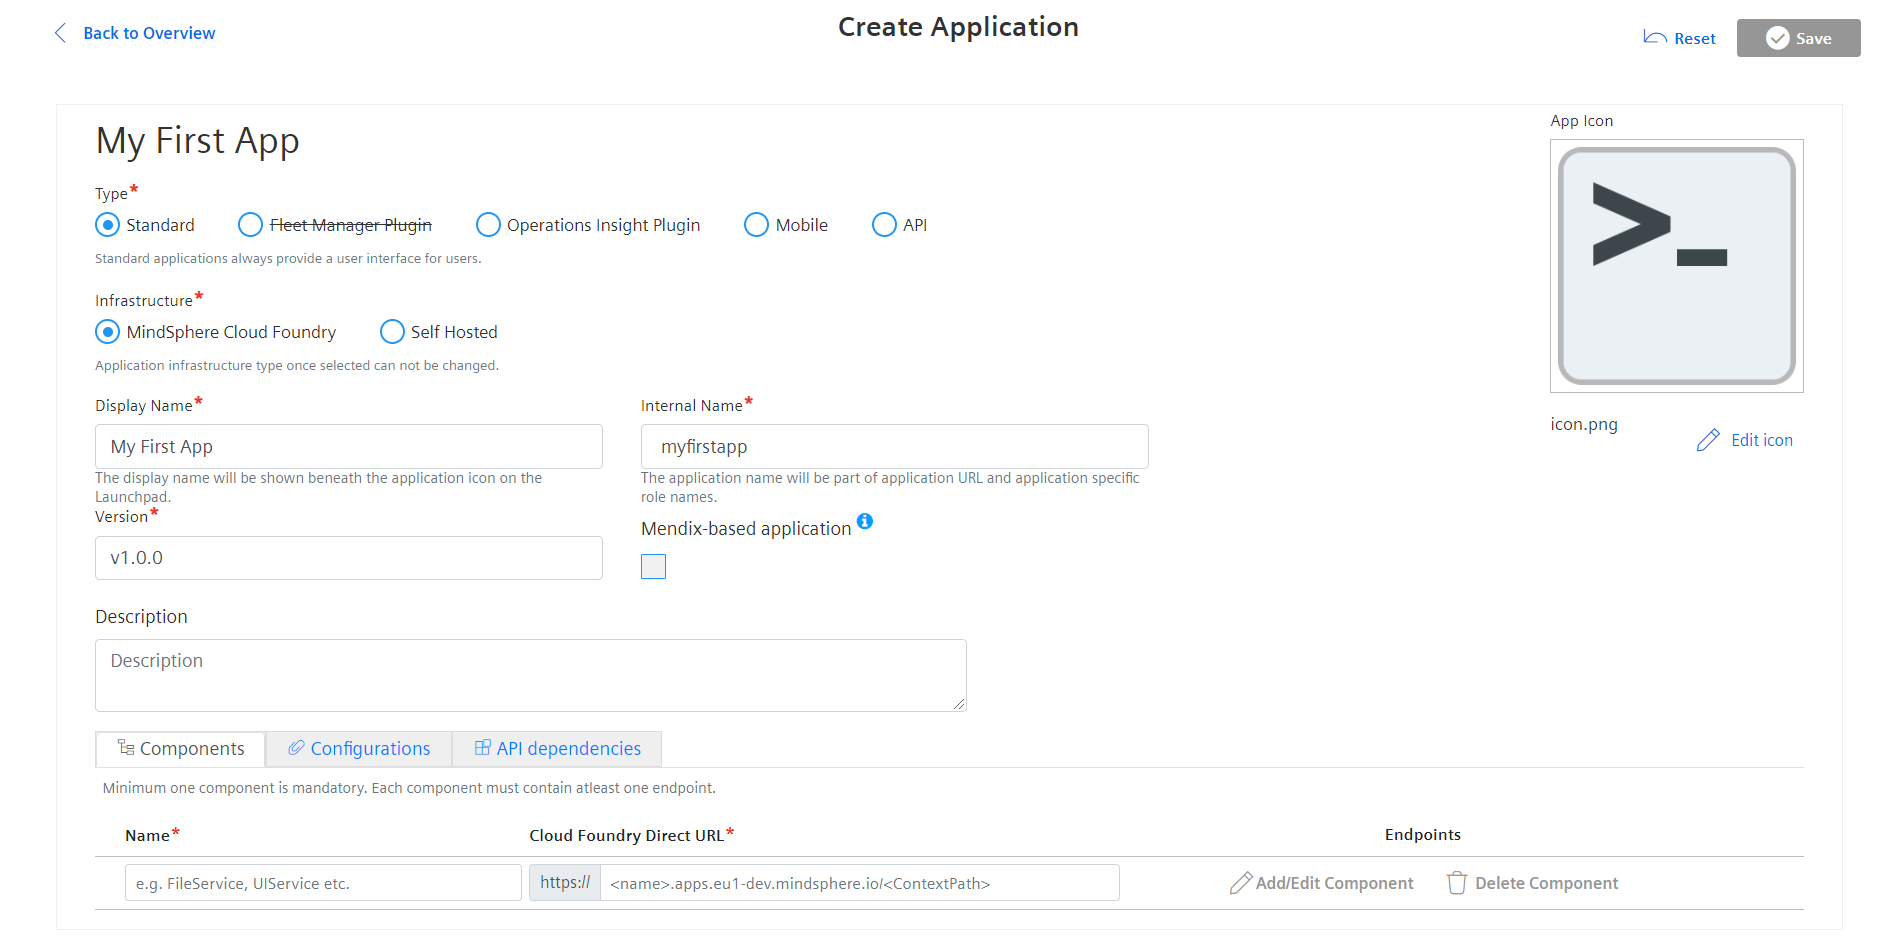
- Enter a version number.
Major.Minor.Patchscheme is supported.- Versions must start with a major number >= 1.
- The version cannot be changed after saving.
- Upload an icon for your application.
-
Enter the component name. The component name for the sample application is
hello-spring-cloud.Component Names
Component names must match the names of the Cloud Foundry applications in the
manifest.yml. Otherwise, the automatic registration in the production system will fail. -
Add at least one endpoint for your component. Use
/**to match all of your application paths as shown below.- You can use arbitrary paths for endpoints.
- The use of
/apiis not permitted, as this is reserved for calling Industrial IoT APIs from a relative path (e.g./api/iot/v3/timeseries). - Avoid using keywords which are reserved for SQL operations.
- You can use wildcard characters.
*matches any character in a path and**any characters and sub paths.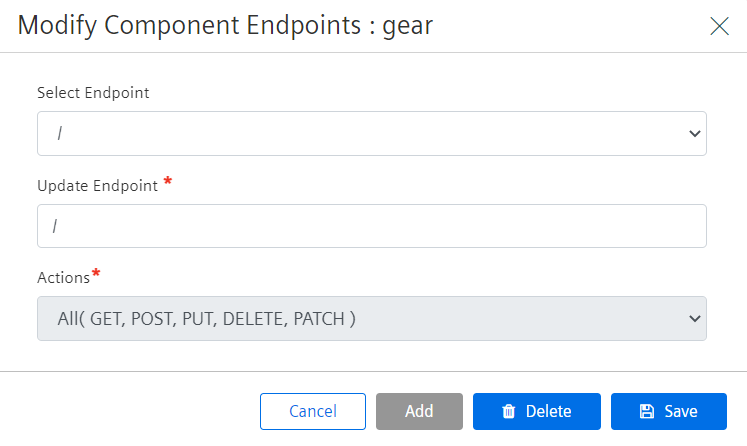
Component Paths
The path values defined at Industrial IoT Gateway must match with the corresponding component. See Industrial IoT Gateway for a complete list of possible mappings of gateway to component paths. A component can have a base path, which is not visible at Industrial IoT Gateway. The component URL needs to be appended by the base path.
-
Enter the Cloud Foundry URL of your application.
- Use
cf app {app_name}to get the URL for your deployed application. The URL for the sample application ishttps://hello-spring-cloud-myMindsphereTenant.apps.eu1.mindsphere.io.
- Use
-
Click on Save.
You are redirected to the application details. Your application is in the In-Development state and is ready for registration.
Configure the Application Roles & Scopes
Every application in {{ whitelabel.IOTtoolName }} is protected from unauthorized access by specific [roles and scopes]. {{ whitelabel.IOTtoolName }} automatically creates two default roles for new applications:
- admin (
mdsp:{tenant_name}:{app_name}.admin) - user (
mdsp:{tenant_name}:{app_name}.user)
For creating custom application roles, refer to [Securing your own Application]. The permissions for these roles are configured using the Developer Cockpit. You can assign Core roles, which grant access to Industrial IoT APIs, and define application scopes:
- Switch to the Authorization Management tab.
- Select the application.
- Create an application scope and select which roles it is assigned to.
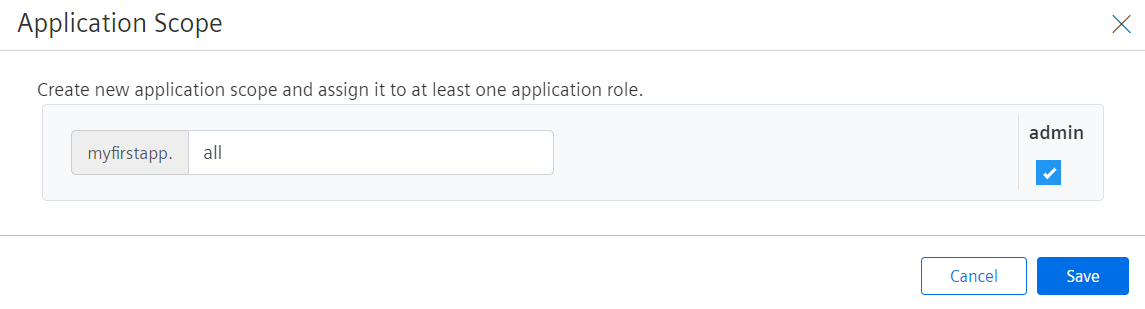
- Add a Core role, that enables access to the respective API (optional). The image below shows how to get reading access to the Time Series APIs.

- Saving is not required, unless you change one of the associations to the application specific roles afterwards.
Authorization Management for Applications
The roles and scopes configuration for applications is not specific for an application version.
Register the Application
An application must be registered at the Gateway to access it from the Launchpad. This enables the route from the tenant-specific Insights Hub URL to your internal Cloud Foundry application. The registration process follows a positive security concept, which requires every endpoint of the application to be explicitly registered.
- Switch to the Dashboard tab.
- Open the application details.
- Click on Register.
The application is registered using the following scheme: {tenant_name}-{app_name}-{tenant_name}.{region}.{mindsphere-domain} In this example, the application would be reachable under myMindsphereTenant-myfirstapp-myMindsphereTenant.eu1.mindsphere.io.
Assign the Application Roles
Applications only appear on the Launchpad, if one of the application scopes is present in the user's OAuth token. This is the case, if the user is assigned one of the application roles:
- Open the Settings app from the Launchpad and switch to the Roles tab.
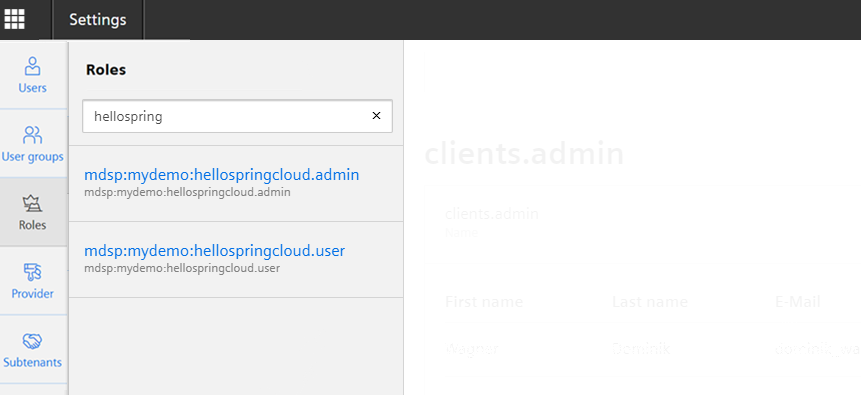
- Select an application role and click on Edit assignments.
- Assign one or more users to the application role.
- Click on End editing.
- Log out of from {{ whitelabel.IOTtoolName }} and log in again.
Logout
The user token is only updated with the new scopes after logging out and logging in again. In rare cases it might take a couple of minutes until the role assignment has been propagated through the system.
Your application is now available in your Launchpad. Your OAuth token contains all scopes and Core Roles defined in the application role. If you do not see the application, verify that you have assigned yourself the application specific role.
Deregister and Delete an Application from Cloud Foundry
This section shows how to deregister an application from the Gateway using the Developer Cockpit and how to delete the application from Cloud Foundry via CF CLI.
Unassign the Application Roles
Unassigning the application roles from your user removes the application from your Launchpad.
- Start the Settings from the Launchpad and open the Roles tab.
- Drag your user from Assigned Users to Unassigned Users.
- Click on End editing.
You should not be able to see your application on the Launchpad anymore.
Deregister the Application
The deregistration of the application at the Gateway disables the route from the tenant-specific Insights Hub URL to your internal Cloud Foundry application.
- Navigate to Developer Cockpit.
- Select the application.
- Click on Deregister and confirm.
Delete the Application via the Developer Cockpit
- Select the application in the Developer Cockpit.
- Click on Delete and confirm.
Delete the Application from Cloud Foundry via CF CLI
- Open a command line interface (CLI).
-
Configure the proxy settings, if necessary.
Click here for detailed information on proxy settings
If you are in a company network behind a proxy, you may have to set the proxies to reach the Cloud Foundry endpoints. Contact your administrator, if you face any timeouts or connectivity problems.
Set the proxies for the Cloud Foundry CLI as shown below:
  set http_proxy=http://PROXY_IP:PROXY_PORT
  set https_proxy=http://PROXY_IP:PROXY_PORT
export http_proxy=http://PROXY_IP:PROXY_PORT export https_proxy=http://PROXY_IP:PROXY_PORT -
Log in to CF using CF CLI. Enter
cf login -a https://api.cf.{region}.{mindsphere-domain} --sso. - Open the URL printed by the CLI and log in using your WebKey credentials to get a One Time Code.
- Enter the One Time Code in the CLI.
-
Select your Cloud Foundry org and space using the following command:
cf target -o {org_name} -s {space_name}
3.Get a list of all available apps using cf apps. 4.Delete the app from Cloud Foundry via cf delete hello-spring-cloud and confirm.
Except where otherwise noted, content on this site is licensed under the Development License Agreement.