Managing or maintaining the virtual machines or instances
MindConnect Software Agent can manage and maintain the multiple virtual machines or instances by using the setup program manually or via Windows "Control Panel" → "Programs and Features".
Note
Installation of multiple MindConnect Software Agent instances is supported from the version MCSA V03.05.00.03 b005.
Procedure to create multiple virtual machines or instances
To create the multiple instances in MindConnect Software Agent, follow these steps:
- Open "setup.exe" file, click "Yes" to make the changes to the device.
-
In "Maintenance" dialog, select "Create" and then click "Next":
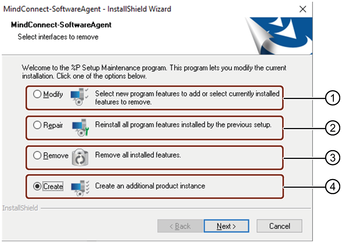
① Modifies the existing feature or instance
② Reinstalls all program features installed by the previous setup
③ Uninstalls or removes all the installed feature or the selected instance
④ Creates a additional product instance
-
Select the network interfaces and click "Next".
Note
- The setup will create external Hyper-V switches for MindConnect Software Agent to get its own IP address in the network and can be reached from outside of the Windows PC/IPC.
- The setup automatically detects the available network adapters and attempts to make a suitable pre-selection if it finds network adapters with X1 and X2 in their names (which should be the case on SIMATIC IPCs).
- If only one network adapter is available in PC, select a network adapter for the web interface only.
4.Select "Custom" setup type to install(recommended) and click "Next".
5.Configure the virtual machine settings and click "Next".
For the virtual machine settings, see Onboarding and installing MindConnect Software Agent in Windows.
6.Change "Destination Folder", if required and click "Next".
7.Review the settings and click "Next".
8.Click "Install".
9.After the installation, restart your PC.
Result
The second instance is successfully installed.
Procedure to modify multiple virtual machines or instances
A MindConnect Software Agent virtual machine can be modified by starting the setup program manually or via Windows "Control Panel" → "Programs and Features".
Multi instances
- Only one instance can be modified at a time. If you want to modify another MindConnect Software Agent instance setup must be started again.
- Instances which are stopped are started again during setup or modifying the other instances.
To modify the multiple instances in MindConnect Software Agent, follow these steps:
- Open "setup.exe" file, click "Yes" to make the changes to the device.
- In "Maintenance program", select "Modify" and click "Next".
- Select the installed virtual machine (VM) to be modified from the list and click "Next".
- Select the generated virtual switches to be modified and click "Next".
- Configure the virtual machine settings and click "Next".
- Click "Finish" to modify the virtual machine in MindConnect Software Agent.
Result
The selected virtual machine instance is successfully modified.
Procedure to repair multiple virtual machines or instances
A MindConnect Software Agent virtual machine can be repaired by starting the setup program manually or via Windows "Control Panel" → "Programs and Features".
Multi instances
- Only one instance can be repaired at a time! If you want to repair another MindConnect Software Agent instance setup must be started again.
- During the repair process, the selected MindConnect Software Agent instance's virtual machine will be configured using the settings which had been applied during its installation process. Furthermore, the virtual hard disk will be replaced by the original hard disk i.e., all customer data and settings will be lost and MindConnect Software Agent instance needs to be onboarded again.
To repair the multiple instances in MindConnect Software Agent, follow these steps:
- Open "setup.exe" file, click "Yes" to make the changes to the device.
- In "Maintenance program", select "Repair" and click "Next".
- Select the installed virtual machine (VM) to be modified from the list click "Next".
- Select the generated virtual switches to be modified and click "Next".
- Configure the virtual machine settings and click "Next".
- Click "Finish" to modify the virtual machine in MindConnect Software Agent.
Result
The selected virtual machine instance is successfully repaired.
Procedure to removing multiple virtual machines or instances
A MindConnect Software Agent virtual machine can be removed by using setup program manually or via Windows "Control Panel" → "Programs and Features".
Multi instances
Only one instance can be deleted at a time. If you want to delete the "MindConnect Software Agent " completely, then every single instance must be deleted. The last instance will deletes the complete folder structure.
To remove or uninstall MindConnect Software Agent, follow these steps:
- Open "setup.exe" file, click "Yes" to make the changes to the device.
- In "Maintenance program", select "Remove" and click "Next".
- Click "Yes" to confirm and remove the installed virtual machines (VM's).
- Select the generated virtual switches to be removed and click "Next".
Note
If the virtual switches are still needed, click "Next" without selecting a virtual switch.
5.Select the list of all installed virtual machines (VM's) to be removed and click "Next". 6.Click "Finish" to remove the virtual machines (VM's) completely from the PC.
Result
The virtual machines (VM's) is successfully removed or uninstalled.