Configuring Dagnostic settings
Diagnostic Settings
This section contains the configurations related with logging. To perform a diagnostic settings change, follow these steps:
- In "Asset" tab, select the asset.
- Open MindConnect plugin.
-
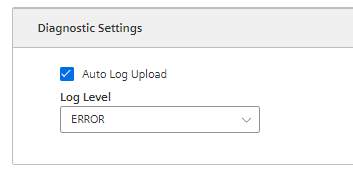
In the Agent settings view, make the changes in Auto Log Upload or Log Level.
-
Click “Save”.
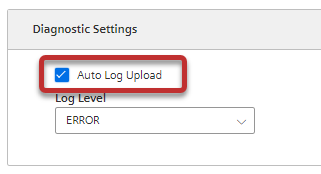
Auto Log Upload
If Auto Log Upload is enabled, the device uploads all the generated logs to Insights Hub periodically. Auto Log upload functionality for the device is enabled by default.
Log Levels
Log level represents the log level of MindConnect device. There are five possible log levels, and the hierarchy is as follows in lowest (TRACE) to highest (ERROR) priority. In “TRACE” mode, the device will log extensively and in “ERROR” mode device will only log error messages.
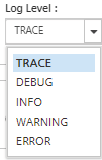
The selected log level and logging mechanism works as logging only selected level and the higher levels.
Log level is set to “INFO” by default.
Auto Log Level Change
- “TRACE/DEBUG” log levels provide more verbose logs which will be helpful to troubleshoot issues, however they produce more files. If the log level is set to “TRACE/DEBUG”. It will be automatically changed to INFO after one day.
- Auto log level change operation will not be synchronized with the asset’s device configuration.
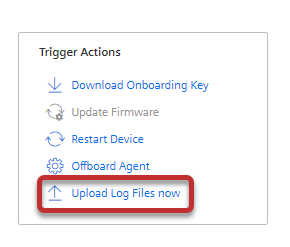
Upload Logs Now
If you click “Upload Logs Now”, the device uploads the latest logs to Insights Hub regardless status of Auto Log Upload. It can be used for troubleshooting purposes.