MindConnect network plan
You can set up the network plan for your MindConnect Elements in two ways. The following scenarios show them with IP address examples:
Note
In both scenarios it is important that you set X1 and X2 in different (and not overlapping) subnets.
Scenario A
The following scenario shows a setup example where each network-port of the MindConnect is connected to another switch or router.
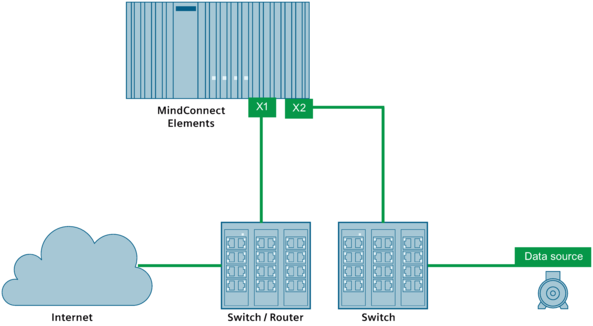
The following table shows possible setups:
| Port | Exemplary configuration |
|---|---|
| X1 | - IP address: 192.168.1.10 - Mask: 255.255.255.0 |
| X2 | - IP address: 192.168.3.110 - Mask: 255.255.255.0 |
| Data source | - IP address: 192.168.3.120 - Mask: 255.255.255.0 |
Note
- Make sure that X1 is in another and not overlapping subnet then X2.
- If you have a DHCP master in both network, you can use DHCP in both. In this case, make sure that the DHCP masters are set up so that X1 and X2 are in another subnet.
Scenario B
This following scenario shows a setup example where both network-ports of the MindConnect, are connected to the same switch or router.
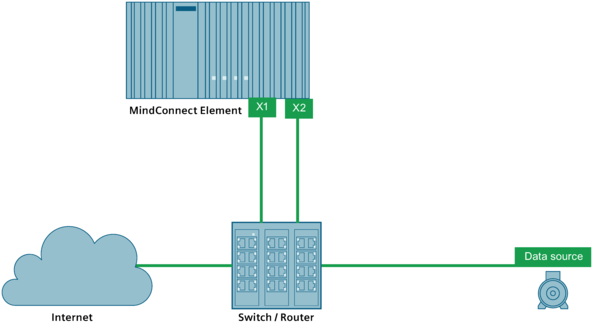
The following table shows possible configuration setups:
| Port | Exemplary configuration |
|---|---|
| X1 | - IP address: 192.168.1.10 - Mask: 255.255.255.0 |
| X2 | - IP address: 192.168.3.110 - Mask: 255.255.255.0 |
| Data source | - IP address: 192.168.3.120 - Mask: 255.255.255.0 |
Note
- Make sure that X1 is in another and not overlapping subnet then X2.
- You can only use DHCP for one port or subnet. The other has to be set up as static IP address. In this case, make sure that the DHCP master is set up so that X1 and X2 are in another subnet.
For more information about importing data to the MindConnect elements, refer to the below chapters:
-
Importing data source configurations for MindConnect IoT2040
-
Importing data source configurations for MindConnect IoT2050
-
Importing data source configurations with datapoint mapping for MindConnect Software Agent