Dashboard Actions
Dashboard action icons make it easy to perform common dashboard tasks. You can edit a dashboard any time by opening it and making changes—click Save and you're done.
This topic includes step-by-step instructions for:
- Opening an existing dashboard
- Adding an annotation (note) to a dashboard
- Saving a dashboard
- Renaming a dashboard
- Sharing a dashboard
- Deleting a dashboard
Illustration of the Dashboard Action Icons
Here are the Dashboard action icons:

Opening an Existing Dashboard
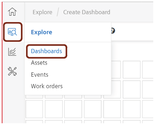
Here is an image that shows where you can Select Dashboards from the Explore menu on the Insights Hub Monitor landing page:
How to Open an Existing Dashboard
Follow these steps to open an existing dashboard:
- Click the "Explore" icon in the menu bar. A submenu displays a list of objects to explore.
- Click "Dashboards". The Dashboards page displays the dashboards you have access to.
- Click the "name" of the dashboard you want to open. The Insights Hub Monitor landing page closes and the Dashboard page opens.
How to Add an Annotation to a Dashboard
Add an annotation to a dashboard when you want to explain or comment. Annotations are timestamped and belong to the user who creates them. You can also add tags to the annotation for easy look-up, or search for all annotations that contain a certain tag. To view your annotations, select "Events" from the Explore menu.
Follow these steps to add an annotation to a dashboard:
- Click the "Add Annotation" icon. An annotation pop-up window displays.
- Enter a description for the note (required).
- Enter a unique tag in the Tags field, and press "Enter" to add it to the annotation.
- Continue to add relevant tags until you are done.
- Click "Create". Your annotation is saved to your dashboard.
How to Save a Dashboard
Once you create or open a dashboard, follow these steps to save it:
- Click the "Save" icon. A Save Dashboard pop-up window opens:

- Enter a name in the "Dashboard Name" field.
- Click the "Save" button. A message indicates the dashboard was successfully saved and the Save Dashboard pop-up window closes.
How to Rename a Dashboard
Follow these steps to rename a dashboard:
- Open the dashboard you want to rename.
- Click the "Save" icon. A Save Dashboard pop-up window opens:

- Enter the new name in the Dashboard Name field.
- Click the "Save" icon. A message indicates the dashboard was successfully saved and the Save Dashboard pop-up window closes.
Sharing Dashboards
You can share your dashboards with your organization's users and user groups that have the appropriate permissions; however, shared dashboards cannot be edited by those with whom the dashboard has been shared.
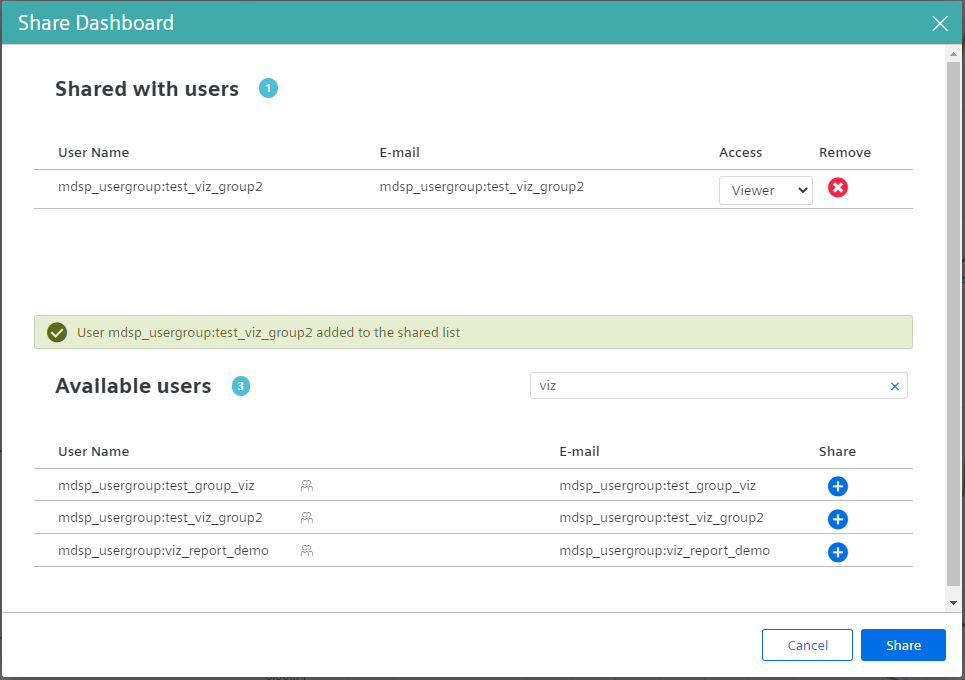
Here is an example of the Share Dashboard dialog:
Note
Sharing dashboards among subtenant users is not supported.
How to Share a Dashboard
Open the dashboard you want to share, and follow these steps:
- With the dashboard open on your screen, click the "Share" icon. The Share Dashboard window displays the list of available users and user groups.
- Select the "+" icon next to the email addresses or group designation you want to share the dashboard with. The username and email address or group designation is added to the "Shared with" list.
- When you finish, click "Share". A message indicates the dashboard was successfully shared and a Shared icon displays next to the Dashboard name at the top of the Dashboard window.
How to Link a Dashboard to an Asset
You can link a dashboard to a specific asset, which is helpful when you want to see the dashboard KPIs at the asset level. Follow these steps to link your dashboard to an asset:
- Click the "Explore" icon in the menu bar.
- Select "Dashboards" from the list of objects to explore. The Dashboards page displays the dashboards you have access to.
- Select the dashboard you want to link and click the "Link" button. A list of assets displays.
- Select the assets you want to link, click "Save".
Note
Sharing dashboards among subtenant users is not supported.
How to Delete a Dashboard
To delete a dashboard, switch to Design mode (otherwise the Delete button may not appear) and follow these steps:
- Open the dashboard you want to delete.
- Select or switch to 'Design mode'.
- Click the "Dashboard Delete" icon. An Are You Sure? message displays.
- If you're sure, click "OK". A message indicates the dashboard was successfully deleted.