Create a Rule
Rules can be created for an asset type. This means, you can create a rule one time and use the same rule definition for all instances of this asset type.
Rule can be created from the below two screens:
- Open "Rules" in "Configure" section and click Create, where you can also find all the rule definitions in the environment.
- Open "Assets" in the Explore section and select the "Rules" plugin, click "Create". Here you can create a rule directly for the selected asset. In this case the asset type and the asset instance is already preselected in the wizard.
The rule query enables you to create a new rule and enter the individual parameters.
The rule wizard guides you through the below steps to create a rule.
Parameter overview of rule query
The following table describes the parameters for defining rules:
-
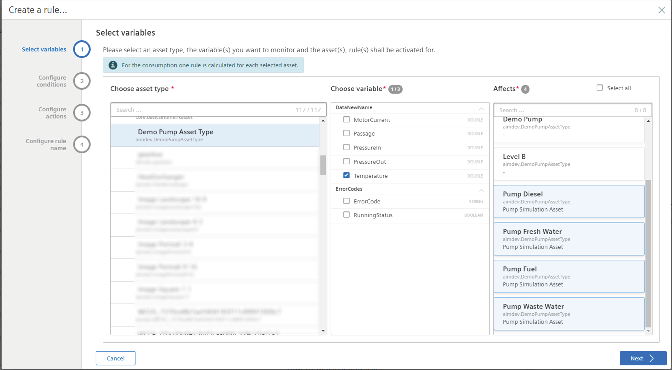
Select Variables:
In this step, you select the asset type, up to 3 Variables to be monitored, and the assets, the rule shall be activated. For Consumption data, one rule is calculated for each selected asset.
-
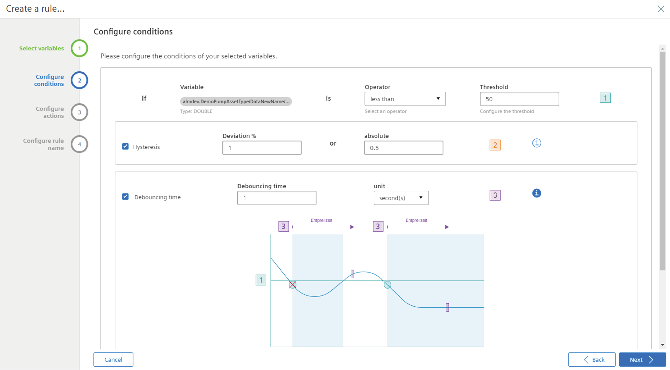
Configure conditions:
In this step, you can change the operators and thresholds and also configure hysteresis or debouncing time if needed. Follow the info pictures for more information.
-
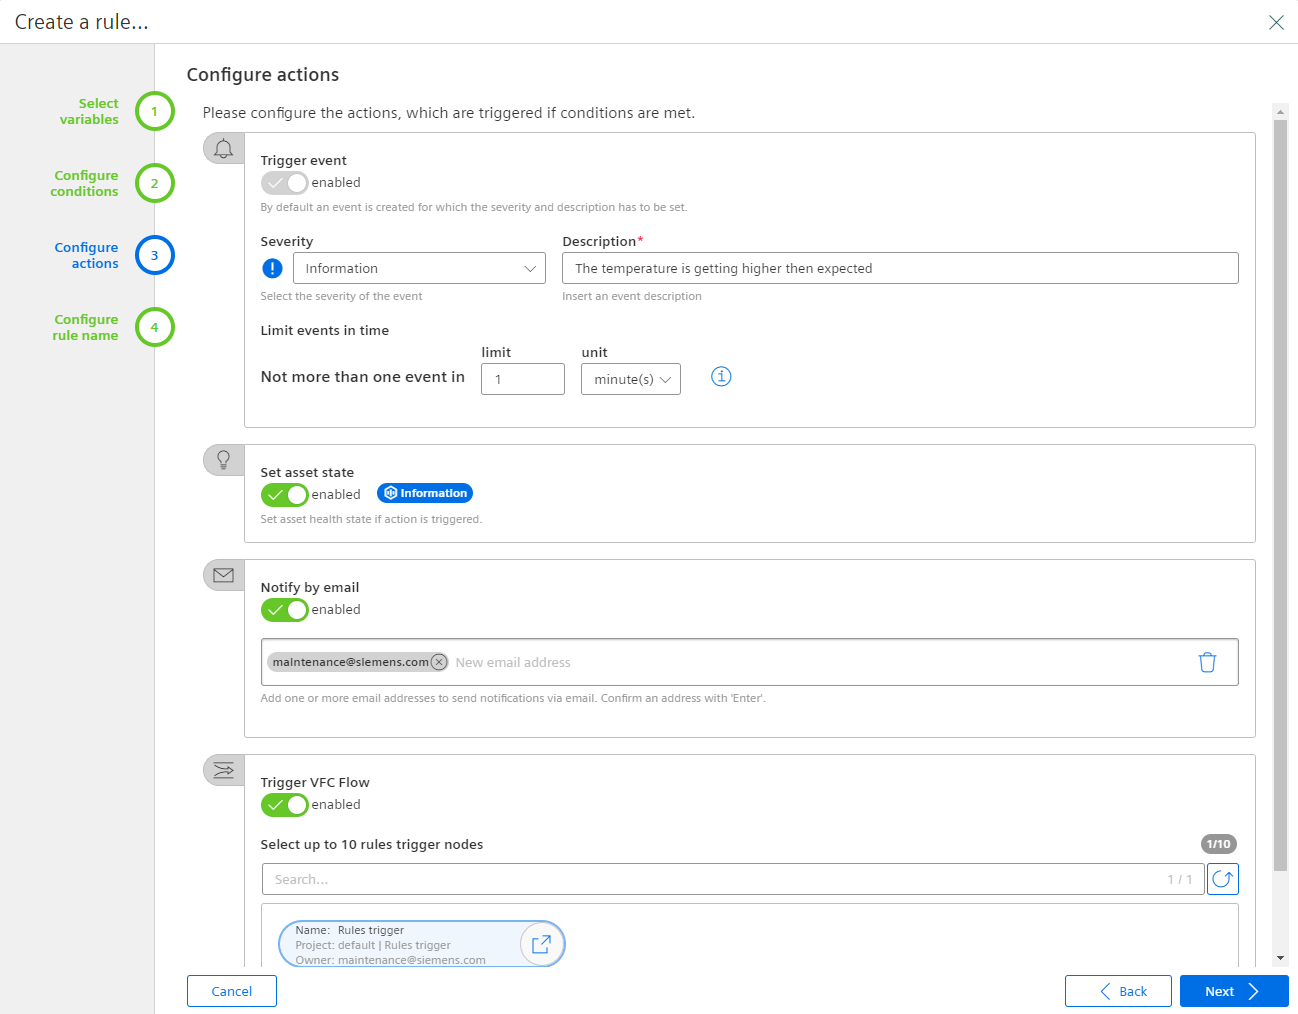
Configure actions:
In this step, you can configure the actions which are executed after a rule triggers.- Mandatorily always an event will be triggered. For that the description and severity (Information, Warning, Error) can be configured.
- You can limit the events, that not every rule violation leads to an event.
Furthermore there are following actions available:
1. Set asset state:
The asset status of the affected asset will be set according to the severity of the event. The status is displayed in the asset view on every asset with a colored indicator.
2. Notify by email:
The received email will contain all necessary information about the triggered rule like the tenant, asset, severity, description and so on. Multiple email addresses can be inserted. Confirm each valid email-address with 'Enter'.
Furthermore you can copy/paste semicolon separated email addresses into the input field.
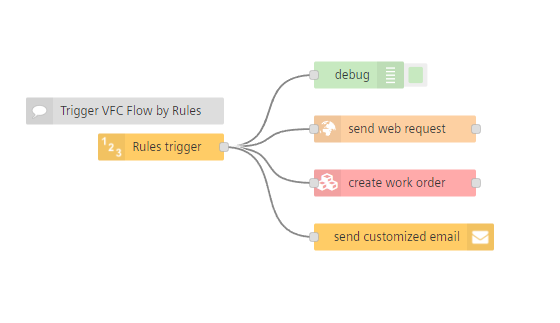
3. Trigger VFC Flow:
With this powerful action you can trigger a flow in the application Visual Flow Creator
For that you need to use a rules trigger node in a VFC flow. This node can trigger custom actions like sending a web request, sending a message, creating a case and so on. The rule wizard just shows available nodes, which you can select to be triggered. All other business logic can be implemented in Visual Flow Creator.
4. Notify by Simatic Notifier:
Optional you can enable the "Notify by Simatic Notifier" button to receive the notifications in the Simatic Notifier application or on mobile devices.
Note
An additional SIMATIC Notifier license is required in order to receive the push notifications on mobile devices. To buy a notifier license, please refer to SIMATIC Notifier documentation.
4.Configure rule name:
In this step, you configure the name of the rule. It is also possible to automatically generate the Rule name based on the selected variables and the conditions. To automatically create a name, click Generate.
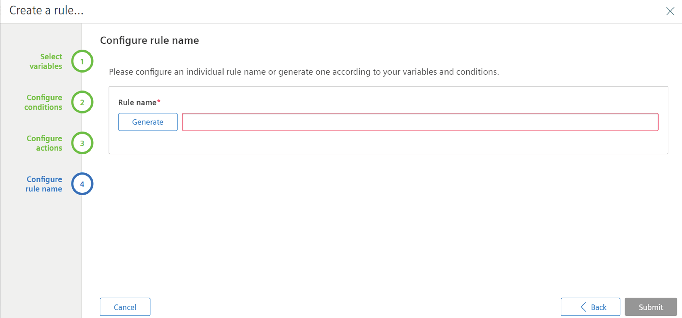
5.Click "Submit" to save the Rule.
Note
If the rule query screen does not display the "Set asset state" selection under "Additional actions", this may have the following cause:
The asset does not have an aspect with name "status" of type core.assetstatus. For your own asset types you could add this status aspect by using Asset Manager.
Copy a Rule
Insights Hub Monitor will allow the users to save a copy of the existing rules and reuse them for their assets. When a rule is copied, all the information in the rule will be copied, the users can make the necessary changes as per their choice and use these rules.
To copy the rules, proceed as follows:
- Select the rules of your choice from the "Rules" overview page.
- Click
 and select "Copy".
"Copy a rule..." window opens. By default, the same variables, conditions and actions are applied on the copied rule, if you want to make any changes to these variables, conditions or actions, refer to the procedural steps 1 to 3 from the section "Parameter overview of rule query". - Configure the name of the rule as per your choice.
By default, the same name of the rule will be copied. - Click "Copy".
The copied rule will be available in the "Rules" overview page.