Adding an Application with Step by Step (advanced configuration)
You can create new application with Step by Step process (advanced configuration), where all the application requirements need to be configured in a step-by-step process.
Pre-requisites
- Your self-hosted application is reachable via DNS and a valid SSL certificate (self-signed certificates are not allowed).
Procedure
To create an application with advanced configuration, follow these steps:
- In the "Application" tab, click “Create App step by step”.
- In "Application Settings" tab, select the "Application Type" and "Infrastructure" and then click "Next".
- In "General Information tab, enter the application field parameters and upload the "Application Icon" and then click "Next".
- In "Components Details" tab, enter the component field parameters and click "Next".
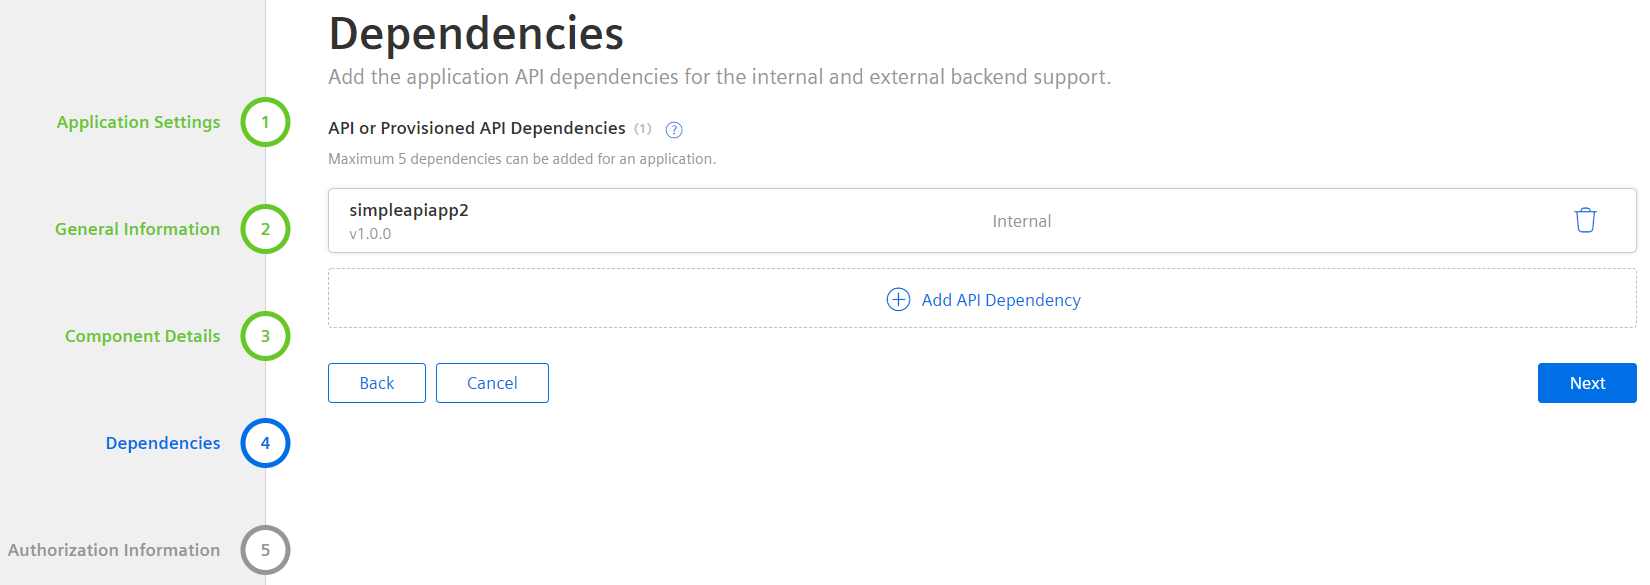
- In "Dependencies" tab, add the API dependency and click "Next". This is an optional step.
- In "Authorization Information" tab, assign "Roles" and "Scopes" for the application and click "Next" (optional).
- In "Application creation almost complete" dialog, select the possible actions that you want to perform and click "Save".
Application Settings
The user interface of "Application Settings" is as shown below:
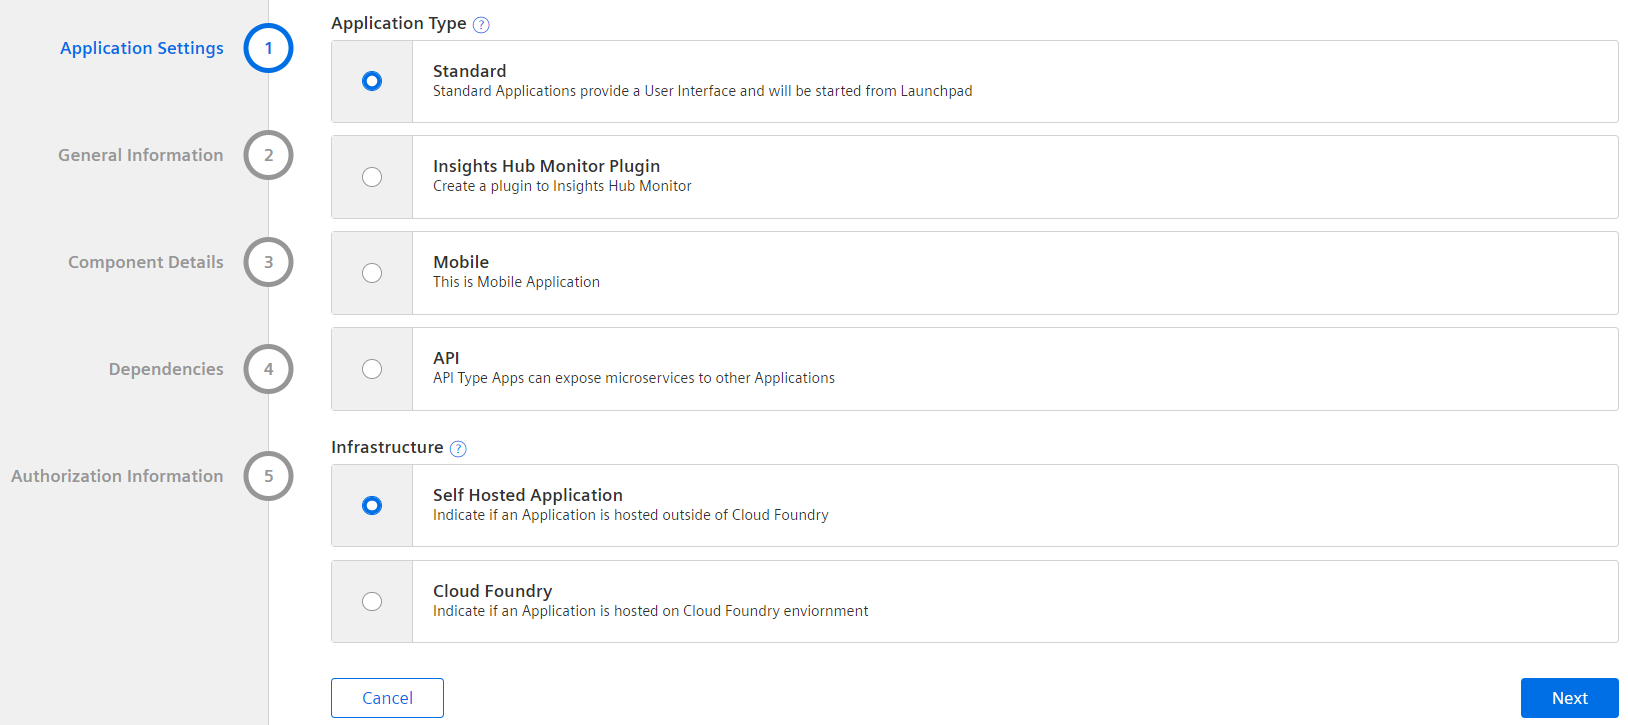
In the "Application Settings" screen, you can select the type of application and infrastructure.
| Parameter | Description |
|---|---|
| Application Type | You can create four types of applications: Standard, Insights Hub Monitor Plugin, Mobile and API. |
| Infrastructure | Two types of infrastructures are available: Self-hosted and Cloud Foundry. Cloud Foundry infrastructure is available to host your application in Insights Hub platform. To activate this infrastructure, you need to buy an add-on from IIoT Data Package. Self-hosted is available to host your application outside Cloud Foundry. |
General Information
The user interface of "General Information" is as shown below:
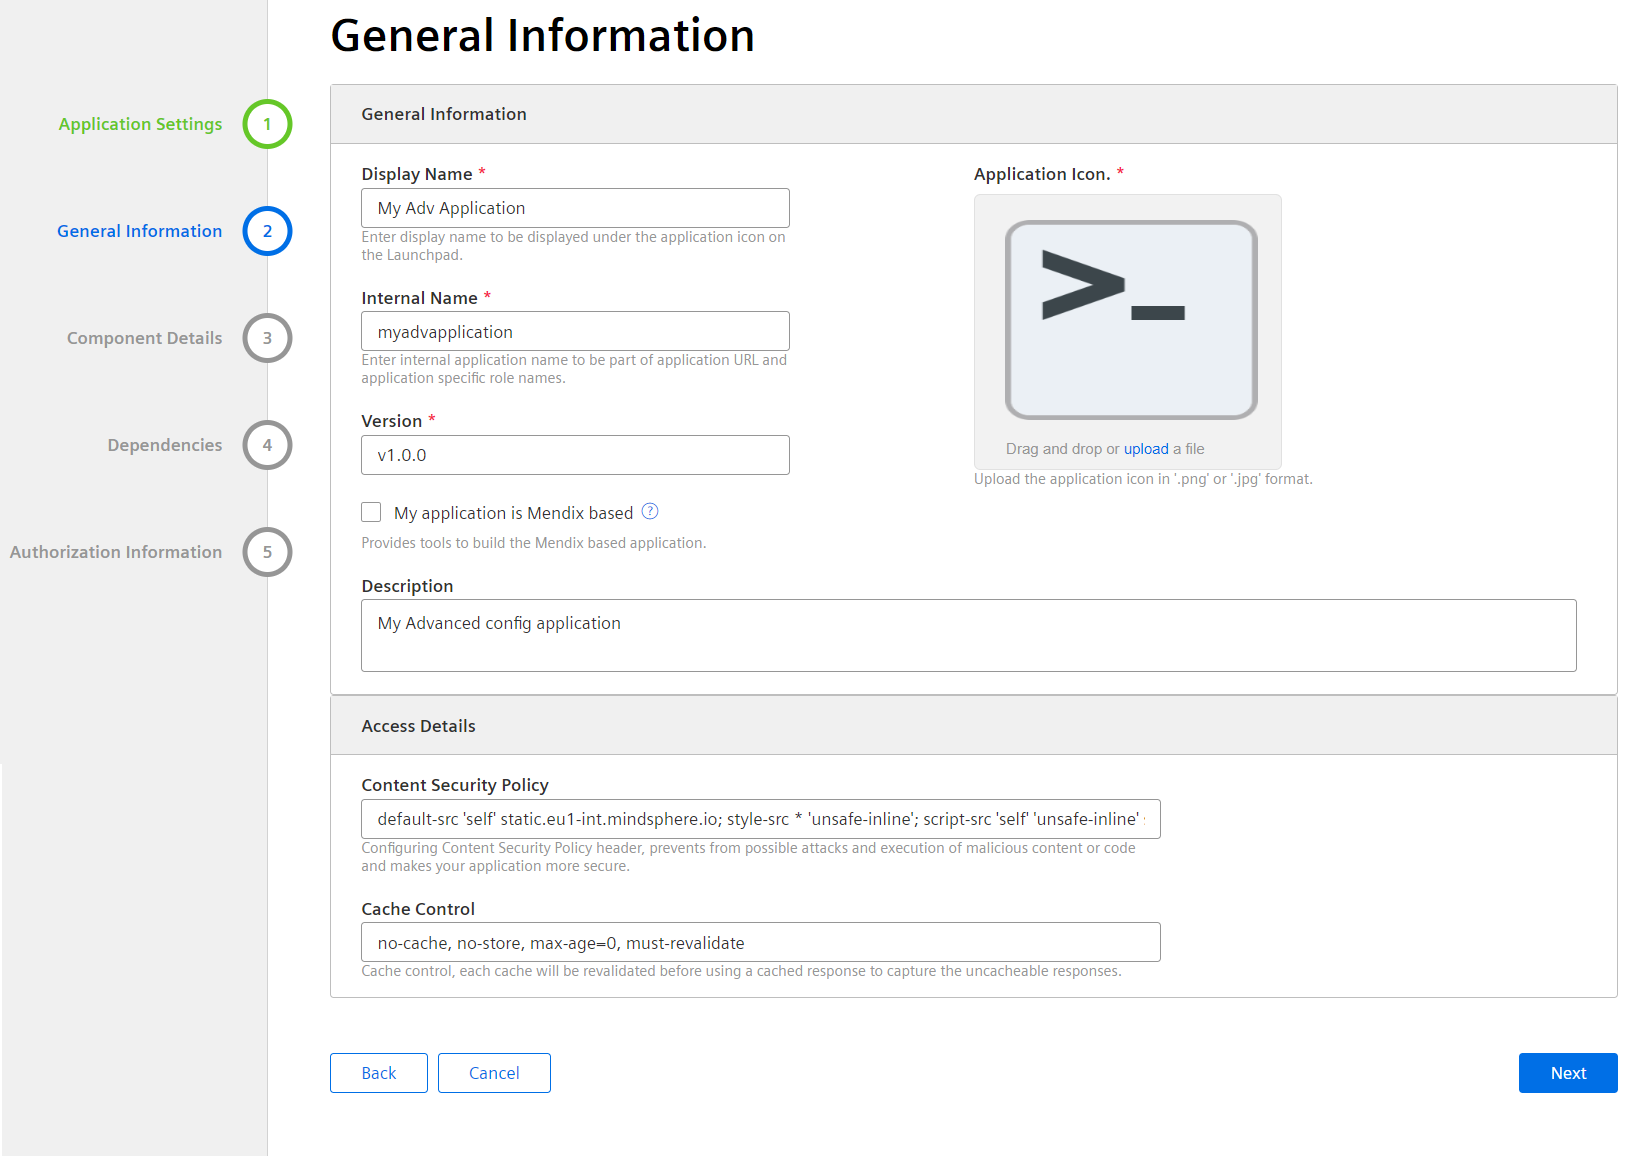
In the General Information screen, enter the application parameters.
| Parameter | Description |
|---|---|
| Display Name | Enter the name of the application. This name will be displayed in the Launchpad. This field does not support any special characters and is limited to 50 characters only. |
| Internal Name | By default, the "Internal Name" is auto-filled while entering the Display name. All characters in this field will be in lower case and without special characters. The internal name is used later in the application URL and must be unique for your tenant. Enter the name for the application with the following conditions: - The name must start with an alphabet. - Only lower-case letters are allowed. - A maximum of 20 alphanumeric characters is allowed. |
| Version | By default, "v1.0.0" version is auto-filled in the version field and it can be changed as per the requirement. The version supports alphanumeric string data. Spaces in between the nomenclature format are not supported. A maximum of 30 alphanumeric characters is allowed. Use of capital letters for naming versions is not allowed. However, it supports the following special characters: - '#' - '$' - '.' - ';' - '+' - '-' - '_' - '@' In the version field in DevOps Cockpit, if there are any special characters (except "@", "."), the provisioning workflow will be failed. For all the applications, the following format needs to be followed: v<version>.<revision>.<patch>-<label(optional)>, for example v1.0.0 - <version> is the version number with range 1-9.- <revision> is revision number with range 0-99. - <patch> is patch number with range 0-99. - <label> is label and optional, case insensitive alphabet. |
| Mendix-based | This check box is used to notify the users that a Mendix license is needed to run the app. |
| Description | Add a description for the application. This is an optional field. This provides information about the application and will be visible to the user. |
| Icon | Icon of the application is displayed in DevOps Cockpit and Launchpad. By default, an application icon is loaded. You can upload a different image to represent the application. The resolution of 512x512 is recommended for both high and low-resolution screens. |
| Access Details | |
| Content-Security-Header | Configuring Content Security Policy header helps to prevent possible attacks and execution of malicious content or code, and makes your application more secure. For more information, see Configuring Content Security Policy. By default, the configuration value is taken for the content security policy. The content security policy header value can be only 1000 characters long, rest of the characters will be discarded. The field cannot be empty. If you try to save the application with an empty field, backend service will set the default values. |
| Cache control | With Cache control, each cache will be revalidated before using a cached response to capture the uncacheable responses. By default, the configuration value is taken for the cache control. The cache control value can be only 255 characters long, rest of the characters will be discarded. The field cannot be empty. If you try to save the application with an empty field, backend service will set the default values. |
| Plugin Settings | With plugin settings, you can directly configure your application into Insights Hub Monitor. To configure your application with "Plugin Settings", refer to Plugin Settings in DevOps Cockpit. Note: This feature is only applicable for "Insights Hub Monitor" type of applications. |
Note
For API application, there are no default configurations in "Access details" section.
Component Details
Components are required to structure and register the application in the Gateway. Atleast one component is required and every component should contain atleast one endpoint.
The user interface of "Component Details" is as shown below:
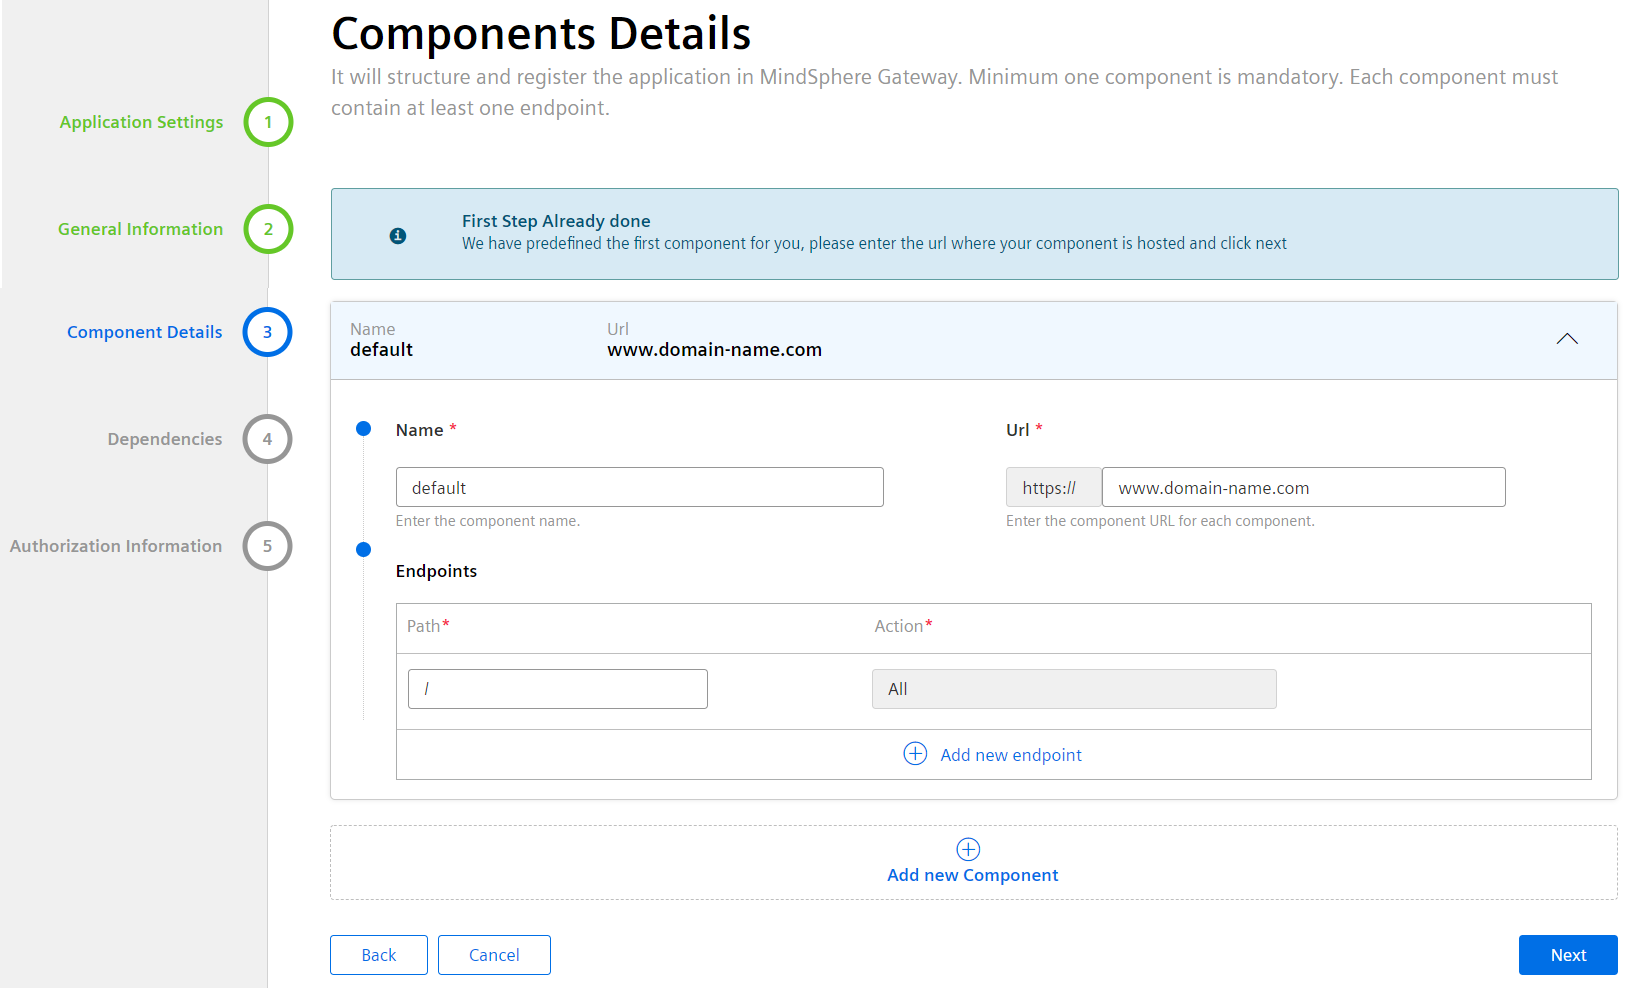
To enter the component details, follow the steps below:
- Enter the component Name and URL.
- Enter the path for the endpoint. To add a new endpoint, click "Add new endpoint" icon and enter the path details.
- To add a new component, click "Add new component" icon and enter the details.
- Click "Next" to proceed with the next steps.
| Parameter | Description |
|---|---|
| Name | Enter the name of the component. The following conditions are applicable while naming a component: - It should not include alphanumeric and '-', '_', '.' special characters. - A maximum of 40 characters are allowed. - The "Name" field of the application in the component tab supports only lower-case letters. |
| Url | Enter the direct URL for each of the components for an application. The URL format should be valid in the format and not malicious: https://apps.example.com/<ContextPath>. |
| Endpoints | The application will be added with the default endpoint. You can add multiple new endpoints for your application. |
Dependencies
A user can develop backend applications to support single or multiple UI apps. These applications are called API type apps. The developer can re-use the functional logic in multiple applications.
You can configure the internal or external the API dependencies for the application by adding the API dependency. API dependencies for applications enables you to build UI applications on top of already existing API applications from other developers. To use this new functionality, an operator will provision the API app to your developer tenant, and you can continue to use the provided functionality.
The user interface of "Dependencies" is as shown below:
Note
- For API type applications, dependencies are not supported.
- Maximum of 5 dependencies can be added for an application.
To add an API dependency to the application, follow these steps:
- Click "Add API Dependency".
-
Select the API type "Internal" or "External".
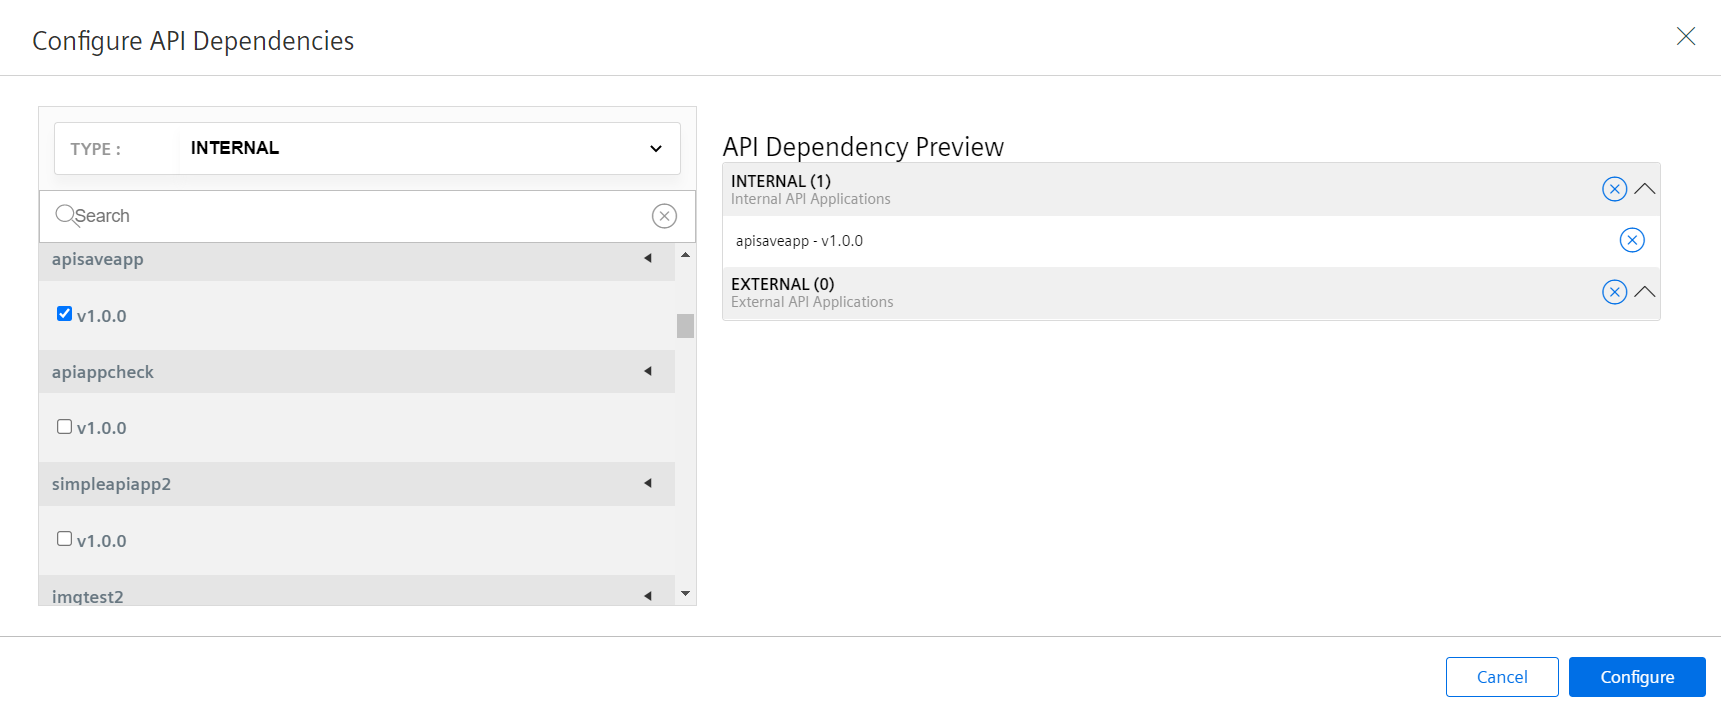
-
Select the API application and click "Configure".
API dependency is added to the application. - Click "Next" to proceed with the next steps.
Authorization Information
Authorizing the application Roles and Scopes
Scopes: A scope is the smallest entity that describes a single permission.
Scopes describe permissions which are listed in the access token as named parameters. When accessing an endpoint or application within Insights Hub, the Identity and Access Management automatically adds the required scopes to the access token if the respective user has access permission. Scopes must adhere to the following naming convention: {application_name}.{scope}.
It can either be assigned to a user via the Settings application or added to an application role to configure access to Insights Hub APIs. For example, the "Core" role mdsp:core:<role.name>, you can add to the application role so that this application can read time series data. This assignment makes all the scopes of the core role available in your application role.
Roles: A role is a collection of multiple scopes (permissions). These roles can be assigned to a user.
The scopes can be assigned to one or more default application roles. For more information on API specific roles and the available scopes, see Developer Documentation.
Note
- By default, the application scope with "Admin" role is automatically added to a newly created application.
- Once you create another role and scope, you can delete the default role and scope.
- At least, one role and scope is required to access the application.
- Adding new roles and scopes will not be added to the application which is provisioned to test environments.
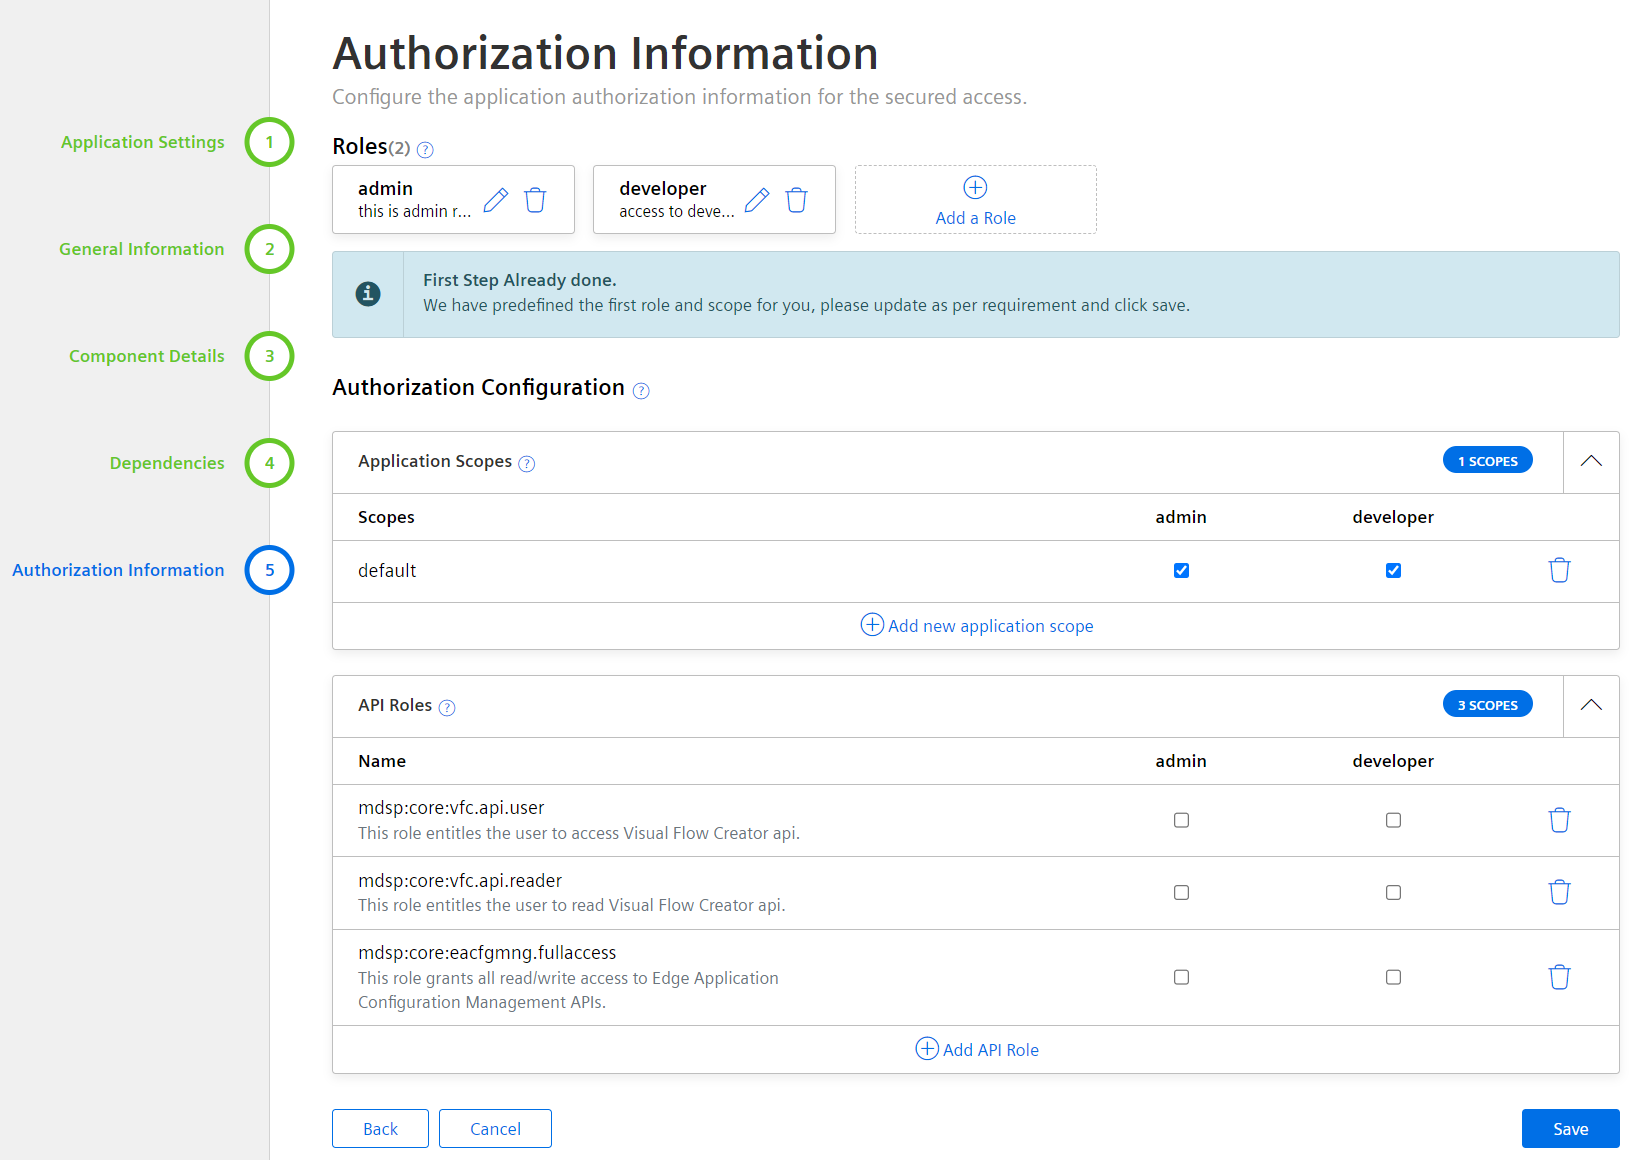
User interface
The user interface of "Authorization Information" is as shown below:
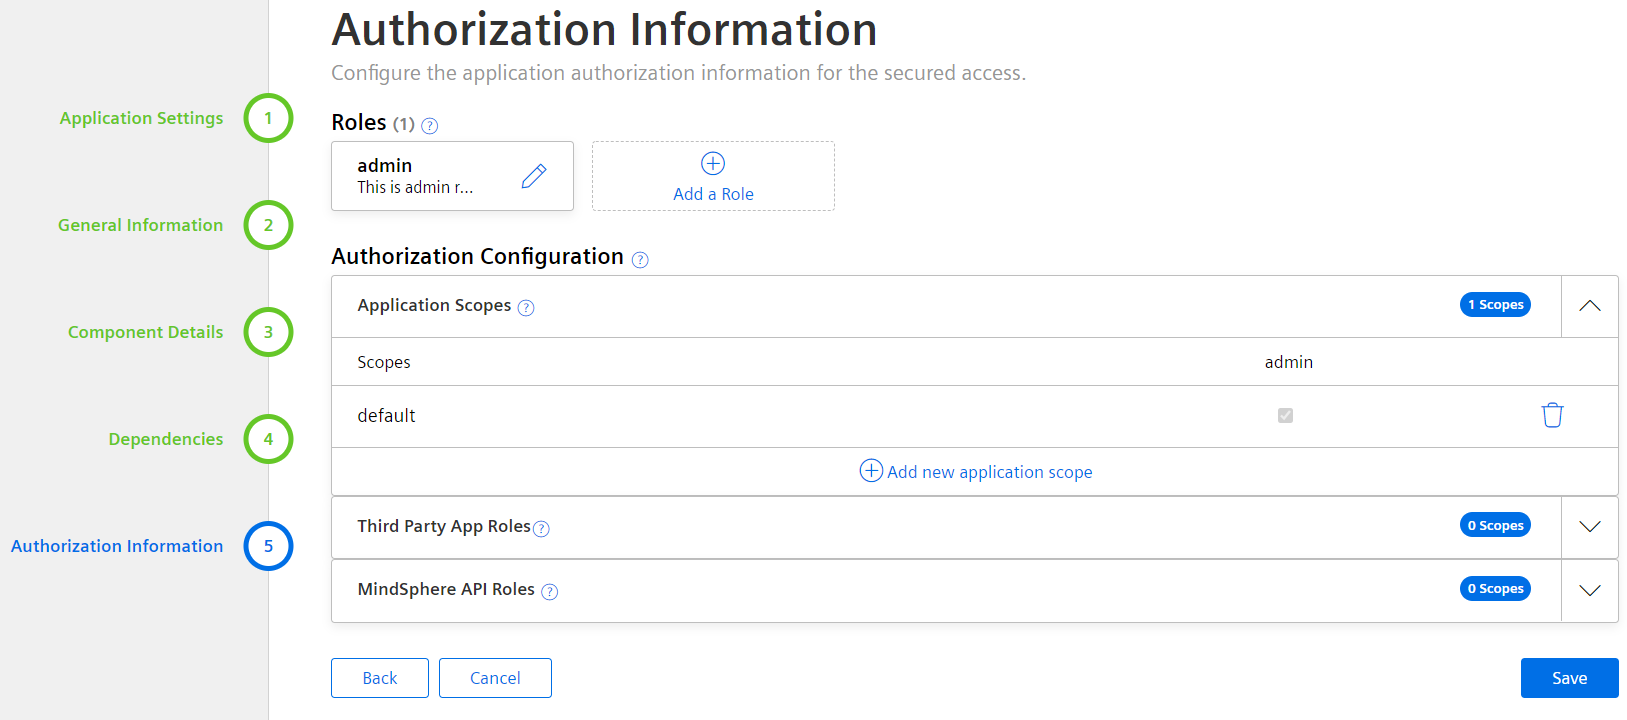
| Parameter | Description |
|---|---|
| Application Scopes | You can add your application scopes under the "Application Scopes" section. By default, an admin role with a scope is created for an application. You can create the scopes, apart from the default scope. |
| Third Party App Roles | You can add the dependent third party API role and assign it to the application role under the "Third Party API Roles" section. |
| API Roles | You can add your application scope to the specific API roles under the "API Roles" section. |
| Add a Role | You can add a new customized role for the application and add scope(s) for the newly added role. |
In "Authorization Information" tab, a default application role and scope is already configured. If required, you can configure customized roles and scopes as per the requirement.
Procedure
To add the application specific roles and scopes, follow these steps:
-
In "Authorization Information", click "Add a Role".
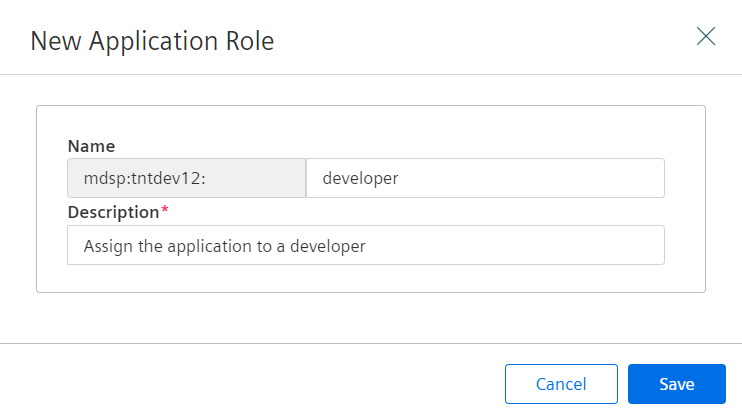
-
Enter the application specific role "Name" and "Description" and then click "Save".
-
Click "Add new application scope" to add the scope for the application specific role and click "Save".

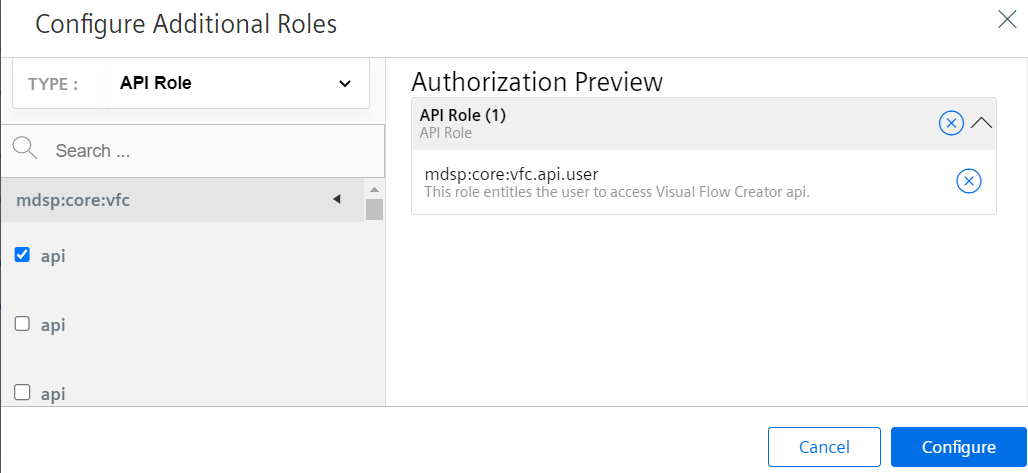
-
Click "Add API role" to configure the scope for the specific API role and click "Configure".
-
After adding the roles and scopes to the application and click "Save".
The application is successfully added with application specific roles and scopes.
Result
A new application with advanced configuration has been created. All these application details can be viewed in the "See details" screen.