Managing uploads of an application for Cloud Foundry
To make your app available for the productive use, it needs to be uploaded into the repository. The following chapter shows you how to upload the application.
Prerequisites
- The upload of the application to the Application Repository for handover to an operator can only be started after your application has been registered. During application registration, additional verification steps are performed in the background, like:
- For Cloud Foundry applications, the zipped binaries and the manifest files of the application should be available. To know more about the binary and the manifest files, see FAQs.
- The zipped file size for binary uploads is limited to 1GB for Region Europe 1.
User interface
"Manage uploads of a Cloud Foundry application" screen
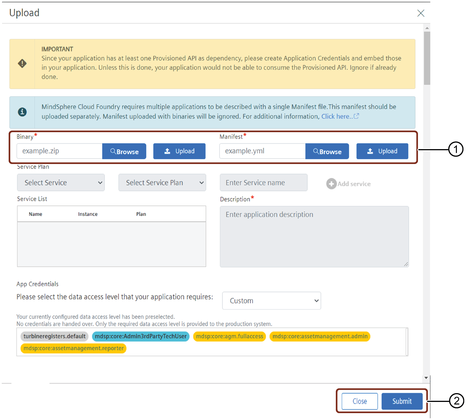
① Binary and Manifest files upload
② Tools menu
Parameters table
| Parameter | Description |
|---|---|
| Configure service plan | Configure all Backing Services that your application requires in order to run. The service name needs to match the exact names in the provided “manifest.yml”. This additional information is needed as the “manifest.yml” does not contain the information about the type and size of the Backing Services. |
| Manage service plan uploads | If you close the metadata dialog box by entering the binaries and manifest files, you can configure the service plans later and submit thereafter. This has the configuration for all Cloud Foundry applications which are included in your application. Once the uploading is finished, click "Submit". The application changes its state to "Preparation in progress" state. |
| Binary | Browse and upload the binary file containing your application. |
| Manifest | Browse and upload the manifest file containing all necessary configurations for your application. |
| Service | Select the service from the drop-down menu. |
| Service Plan | Select the service plan from drop-down menu. |
| Service name | Enter a unique name for the service. This needs to be the same name as in the .yml file |
| Service List | Displays the list of added services. This will be shown to the operators after assignment of the app |
| Description | Short summary of the application. |
| Application credentials | Select the kind of data level access the application requires. These are the following data access level options: - None - no action on application credentials - Limited - read and manage assets permissions are granted. - Read and write - both read and write permissions are granted. - Custom - Customizable set of core roles can be configured as per the user requirement. For more information, see Issue application credentials. |
Procedure
To manage the uploads of the application on Cloud Foundry infrastructure, follow these steps:
- In Dashboard overview, open the application in the "In Development" state.
- Click "Manage Uploads" to start the process of uploading the application.
- In the "Upload" screen, browse and upload the zipped archive that contains the binaries for this application.
- In the "Upload" screen, browse and upload "manifest" in ".yml" format. After hitting the "Upload" button, a sanity check of the Manifest is performed. It checks if the Manifest contains CF applications for every component that has been configured.
- You now have two options:
- You can continue configuring the service plans and submit.
- While configuring plans, you can upload the binaries and manifest and can submit the uploads later. In this case, the application manages the uploads at the backend. The state of the application changes to "Preparation in progress".
- Select a "Service" and "Service name" from the drop-down menu and configure your backing services and then click "Add service".
- Enter the "Description".
- Select the data access level for the application.
- Click "Submit".
Note
- Any mismatch in .yaml or entered configuration can lead to a rejection of the app.
- If your application utilizes Cloud Foundry User Provided Services like access to an AWS S3 bucket, you must add this information in the description.
Result
The application changes its state to "Waiting for Approval".

Next step
After submitting the upload, a user with the Developer Admin role can approve the upload which then triggers the upload to the Operator Cockpit.
Last update: January 22, 2024